2nd course: Lights, Sensors & Exposures
Lights:
Understanding of light & colors begins with Isaac Newton (1642-1726). He is the first to understand the rainbow. He refracts white light with a prism, resolving the light into its color components: Red, Orange, Yellow, Green, Blue and Violet.
RGB = Red,Green & Blue
sRGB = is a standard RGB color space created by HP & Microsoft in 1996 for use on monitors,printers, and the internet. (8 bit)
Visible light:
We often think of light as white or transparent. However, its color varies under different conditions. Candlelight appears yellow, a cloudy day may have a bluish tint, and light in the shade under a tree can look green.
The human eye perceives a wider range of colors than film or digital sensors. Our brain automatically adjusts to different lighting conditions, ensuring we see colors naturally. At the same time, cameras require manual or automatic adjustments to achieve accurate color balance.
The golden hour:

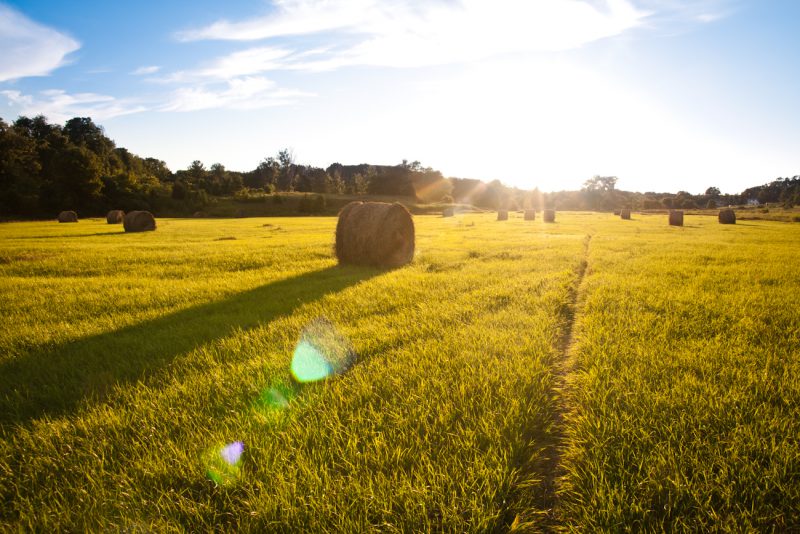
In photography, the golden hour is a period shortly after sunrise or before sunset during which daylight is redder and softer in comparison to when the Sun is higher in the sky.
Color Temperature:
Color & temperature don’t seem to have a direct relationship with each other. However, light sources are often recognizable in terms of their color temperature & measured in Kelvin Degrees.

Walk through this video via ReelSEO:
Kelvin Scale:
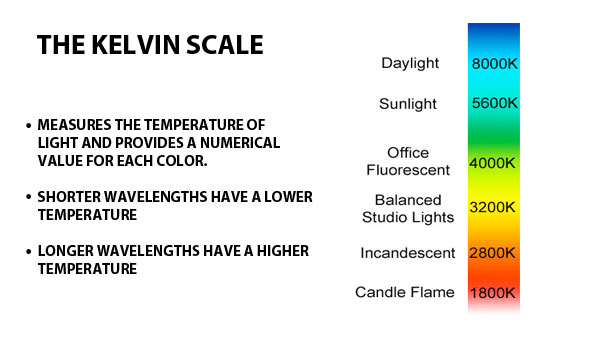
Like Fahrenheit and Celsius, Kelvin measures temperature. Zero Kelvin equals -459.67°F. The link between color and Kelvin temperature comes from heating a “black body radiator” (like black metal) until it glows. At lower temperatures, it appears dull red, then turns yellow, white, and eventually blue as heat increases.
So we can define photography as “Recording Of Light”
That’s why taking a good picture depends on choosing the light carefully.
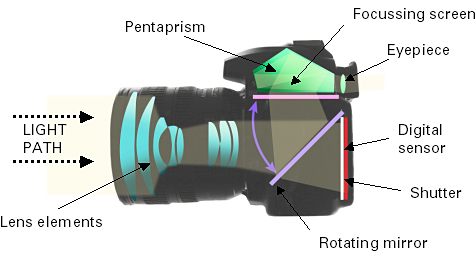
How is light is recorded by your camera?
A camera records light reflected off an object. Light travels from the source, bounces off the subject, and enters the lens, where glass optics bend the waves to focus on the sensor.
Pressing the shutter button opens the shutter curtain, allowing the sensor to capture light and create an image.
Three factors control this process:
- Shutter speed determines how long the shutter stays open.
- Aperture controls how much light enters through the lens.
- ISO adjusts the sensor’s sensitivity to light.
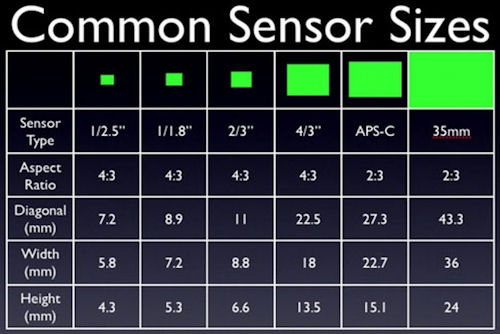
Sensors:
A device that converts an optical image into an electric signal, today’s digital cameras primarily use either a CCD or CMOS image sensor. Both sensors capture light and convert it into electronic signals.
A CCD sensor processes images in an analog format. When light hits the chip, each photosensor holds a small electrical charge. The sensor then reads and converts these charges into voltage, one pixel at a time. Some CCD chips also include circuitry to convert the voltage into digital data.
A CMOS sensor, built using the CMOS semiconductor process, functions as an active pixel sensor. Each photosensor has circuitry that directly converts light into voltage. Some CMOS chips also include built-in circuitry to transform this voltage into digital data.,
Technology has a clear advantage in image quality.
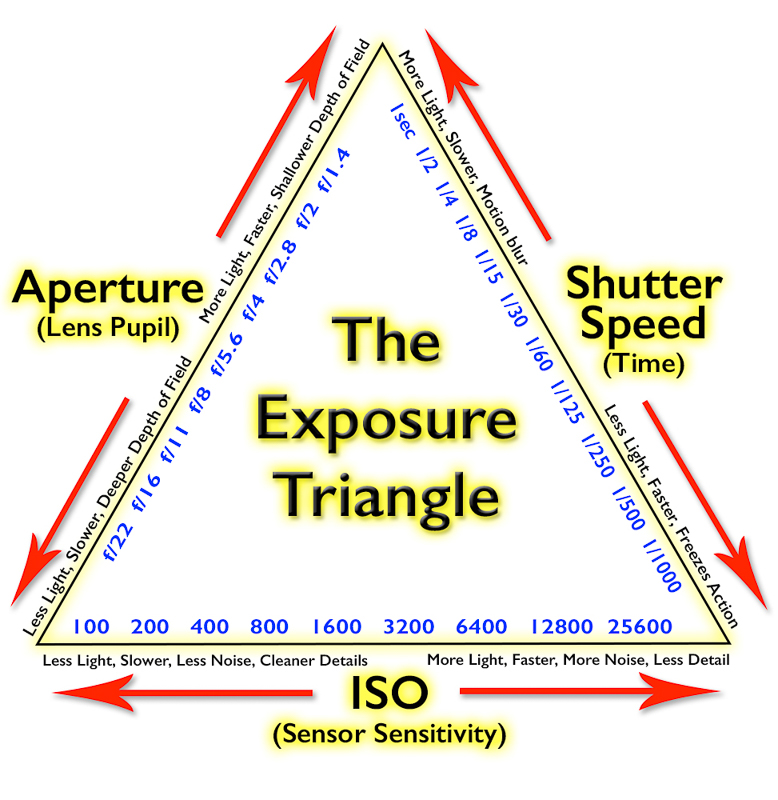
Exposures (EV):
The exposure formula = AV + TV + ISO = EV
these 3 elements work together to create exposure if you will shoot in manual mode so you will have a full control of these 3 elements: Aperture, Shutter & ISO.
ISO is the first key element in the exposure triangle. I prefer keeping it as low as possible since higher ISO increases image noise. After setting ISO, I adjust shutter speed, followed by aperture. However, the priority depends on the type of image you want to capture. Balancing these three elements is essential for achieving the perfect exposure.
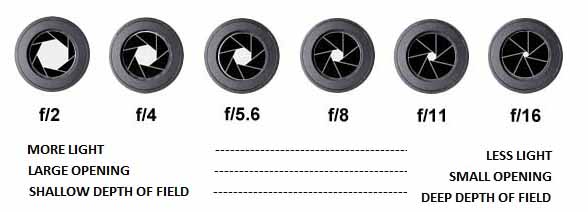
Aperture numbers (F-Stops):
Aperture is the size of the opening in the lens when a picture is taken.
When you press the shutter, a hole opens to let light reach the camera sensor. The aperture setting determines the size of this hole— a larger aperture lets in more light, while a smaller one allows less.
The below part will be little confusing to you but with practice, you will find it very easy.
“The higher the F number the smaller the aperture, the lower the F number the larger the aperture.”
The shutter speed:
Shutter speed refers to how long the shutter stays open when capturing an image. A fast shutter speed freezes motion, while a slow shutter speed creates motion blur. For example, using a slow shutter speed when photographing water results in a silky effect. Additionally, slow shutter speeds allow for evening and night photography, including capturing star trails.
ISO:
A low ISO means the film responds slowly to light, while a high ISO allows it to respond quickly. ISO is a numerical measure of light sensitivity, typically ranging from 100 to 1600, though some cameras extend from 50 to 3200 or higher. The higher the ISO, the greater the sensor’s sensitivity to light.
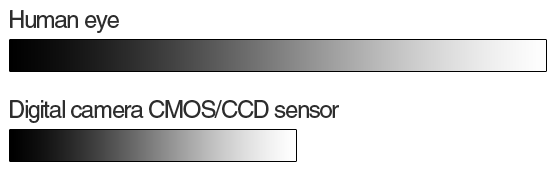
Dynamic Range:
Describes the ratio between the maximum & minimum measurable light intensities (White, Black, respectively).
Camera Dynamic Range & Human Eye:
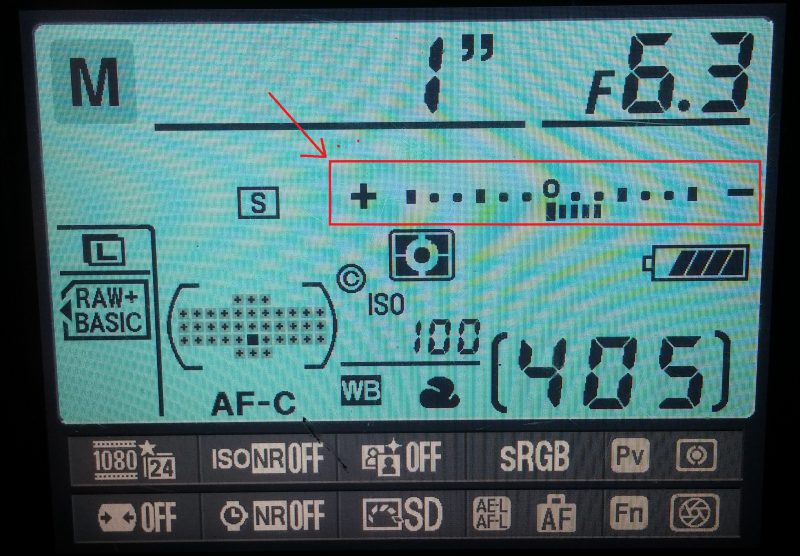
Exposure:
Exposure is the amount of light the sensor collects in a single shot. If the exposure is too long, the image will be overexposed; on the other hand, if it’s too short, the image will be underexposed. To help with this, your DSLR has a light meter that guides you in adjusting the exposure. While some photographers rely on auto settings for convenience, taking manual control allows for more creative and precise shots. Ultimately, exposure is determined by two key factors: shutter speed and aperture.
How to eliminate blur & avoid camera shake:
To capture sharp photos, use a shutter speed at least as fast as 1 divided by the lens’s focal length. For example, a 100mm lens requires a minimum shutter speed of 1/100s, while a 50mm lens needs at least 1/50s.
To eliminate blur:
- Use faster shutter speed
- Use a tripod
- You can use also self-timer
Some lenses have IS (image stabilization) options which help to reduce camera shake.
Next> Shutte Speed Tricks