
There are many ways to get information and learn about a specific topic, one of the easiest ways is by asking questions and getting answers from experienced guys. Questions and answers for photography is a FAQs list, in other words, it is a collection of frequently and commonly asked questions by newbie and beginner photographers and their answers.
This article is the first of a series of articles covering the most frequent questions about photography and their answers. The link to the other lists is shown below:
The Digital Photography Tips- Advanced Q&A
The Digital Photography Tips- Ultimate Q&A List
To search easily through the basic Q&A list, a shorter list that contains only the question is presented first, just click the question link; it will take you right to the answer.
You may also test yourself and answer some photography quizzes.
Questions List
31 Where can I learn photography?
32 Where can I buy a used camera lens?
33 Where can I find professional editing tools?
-
What is the difference between using a wide aperture and a small aperture?
These terms mean the used size of the aperture. The smallest f/stop number (f/2.8, f/4) set the camera to a wide aperture. The biggest f/stop number (f/16, f/22, and so on) sets the camera to a small aperture.

For more information, you may check my post >>What Is The Aperture In Photography<<
-
What is the meaning of depth of field, and how It can be changed?
It is the extent of the elements in the photo that appear sharp, normally at the point of focus the subject is sharp enough, but in front or in the rear of it the sharpness decreases until it becomes blurred as the distance increases. When the depth of field increases more layers in the scene appear sharp, the depth of field is influenced by the focal length of the lens, focusing distance, and aperture selection. The smaller the aperture you use, the more depth of field you get, and the wider aperture you use, the less depth of field you get.
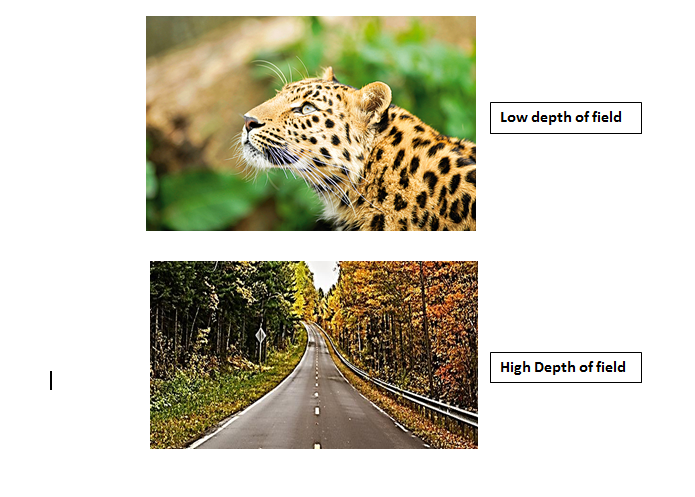 For more information check my post >>How to Control DOF of Your Photos – Shallow Depth of Field vs Deep Depth of Field<<
-
Why my photos of the sunset look not colorful?
Probably you have set the camera to use Auto white balance. This mode cancels out any shift in color temperature. The automatic white balance absorbs all orange light out of the photo leaving you with insipid images.
To get much better photos and exaggerate orange hues, you may switch the setting to a cloudy white balance
-
What is the suitable fill-in reflector to be used when shooting portraits?
To create a softer quality of light which is more suitable for portrait photos, you may use larger reflectors. To get a delicate effect use a white reflector if you want to warm up skin tones, use a golden reflector. To get more dynamic, results use a silver reflector. You may check the post “Photography Lighting Techniques – All About Light Reflectors” for more reading about reflectors.
-
What is the difference between single and continuous autofocus (AF) modes?
The single mode is suitable for shooting static subjects when there is no reason to change the focus. The continuous autofocus mode is better for moving subjects because the camera continuously tracks the subject as it is moving. There are some limitations to using the continuous focus mode, when the subject moves very fast (racing cars for example), the autofocus cannot keep up with its speed. You may learn more about Autofocus, just click HERE
-
Can you tell me more about Scene Mode, the Program, Aperture Priority, Shutter Priority, and Manual Mode?
The Program (P) shooting mode gives the ideal balance of both aperture and shutter speed for most ordinary shooting situations. You can use a faster or slower shutter speed by turning the main control dial.
Aperture Priority (A or Av), it allows you to change the aperture, use a small one to extend your depth of field, and use the large one to blur the background.
Shutter Priority (S or Tv), it allows you to select the suitable shutter speed, use the slow speed for creating blur, and use fast to freeze a fast-moving subject.
Manual (M), you got everything under your control, you may use it in very high-contrast scenes where the exposure compensation you need exceeds the range the camera offers.
-
Can you tell me about exposure bracketing, when do I need to use it?
When there are important shots you certainly cannot afford to miss them or get under or overexposed shots. This exposure bracketing setting allows you to get three shots, the first shot is at the recommended exposure, the second shoot is at one-two-thirds of a stop darker, and another shoot one two-thirds of a stop brighter, so you have three shots in different exposure settings and choose the best. The bracketing technique is used to produce HDR photography. For further reading about bracketing, check my post “Bracketing – The Best Way To HDR Photography“
-
When using a flashgun, foreground areas look bright and OK, but the background is so dark, is there any solution to this situation?
When using flash, you switch your camera to AV (Aperture Value) shooting mode, apply exposure compensation to brighten and darken the background area and then apply flash exposure compensation to adjust the foreground brightness.
-
How can I avoid red-eye in portrait photos?
When the flashlight reflects off the subject’s retina, a Red-eye is formed. There are a couple of ways to eliminate this problem:
- Use the AF-assist illumination lamp, the shining of this lamp causes the pupils of the subject eyes to contract; this may reduce the red-eye effect.
- Use a separate flash, so the light of the flash can be angled or bounced.
- Some modern DSLRs have ISO ratings of 1600 or more, and with a wide aperture, you can shoot without a flash.
- You can use photo editing software like Photoshop or Lightroom to fix the red-eye easily.
-
How can I avoid deep shadows and dark eyes in my portrait shooting, especially on sunny days?
Shooting portrait photos on sunny days creates deep shadows and turns eyes black. The solution is to avoid direct sunlight and use a fill flash to lighten shadows. Use Av (Aperture value) mode to get the suitable aperture and shutter speed, then switch to manual, use the setting as a guide, the TTL flash exposure system should enable the right amount of illumination for the fill-flash.
-
What is the histogram and what is used for?
The histogram is a graphical representation of the exposure of the pixel in your photo. The horizontal axis represents the amount of light, starting at zero on the left side which stands for blacks
(Shadows), and ending at the right at 255 which stands for white (bright). The vertical axis represents the number of pixels in the photo for each tone.
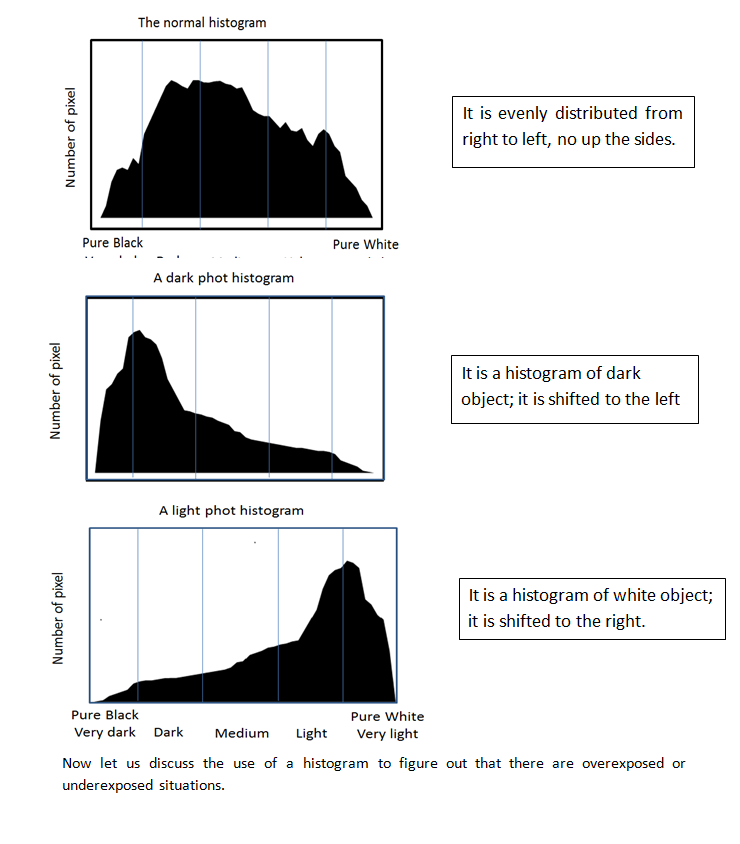
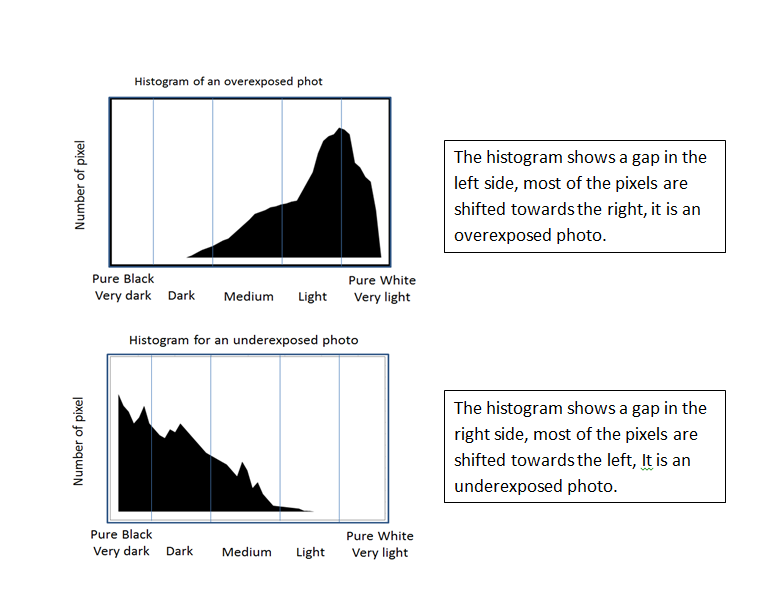
Now let us discuss the use of a histogram to figure out whether there are overexposed or underexposed situations.
For more information, you can check my post “How to Use Histogram in Photography”
-
The ISO number represents the sensitivity of the digital camera sensor, the lower the number, the less sensitive is the sensor and vice versa.What is ISO, how can I set it?
In outdoor shooting when it is a sunny day with a lot of lights, it is normal to go for the lowest ISO, say ISO 100. When it is night, and the light is low, you may go for a high ISO number. The only disadvantage when using a high ISO number is that there will be more noise in the photo.
For more information, you may check my post >>What Is the ISO in Photography<<
-
What is image stabilization, and How can I avoid camera shaking?
When the camera shakes, the whole image will become blurred. There is an advanced system in modern camera lenses that provides Image Stabilizing. But it is, of course, expensive.
To stop the camera from shaking, you also can use a tripod, and a remote shutter, block the mirror, and achieve similar results.
-
What is the difference between RAW and JPG?
The Raw and JPG are two types of photo files format, the Raw file is an uncompressed and unprocessed file, so it contains all the information of the shot taken, it is normally big in size. On the other hand, JPG is a compressed file; there is some information lost during saving to the memory of the camera. It is rather an option to take if you are going to shoot many photos in one session and there might be a situation in memory, save the file as a JPG. But if you are considering processing your photos on a PC later, it is better to save them in RAW file format.
-
What are the types of filters and when do we use them?
Filters are certain accessories; they can be attached to the front face of a camera lens. They provide a protective layer to the camera’s lens as well as deal with some lighting problems.
The most three common types are :
- UV filter: it increases saturation and cuts down on haze.
- Polarizing filter: It helps in reducing reflections.
- Neutral Density filter: it helps in long exposure
You may check the post Camera lens filters explained – your full guide, also you may view the post about ND filters Best neutral density filters – Use long exposure in the morning.
-
Do I need more than one memory card?
That is an amazing idea, to have a backup memory card. You may check the post about how to choose your memory cards here.
-
What is digital zoom?
Digital zoom is zooming on a certain point of the frame using software on the camera rather than using the optical zoom offered by the lens. The digital zoom makes the image very pixilated and there is a very noticeable loss of quality. Digital zoom is found in compact cameras as they often do not have interchangeable lenses. Dig more about Zoom Vs Telephoto.
-
Why is my subject slightly out of focus?
There are some reasons for having your image out of focus if you use a too-low shutter speed that may cause motion blurs or too small aperture which leads to a very small area in focus.
To straighten things out you should use a shutter speed of more than 1/125 when taking a photo of people, and much higher when your subject is a child even when he/she is relatively still. As for using too small an aperture, you should be aware that you actually decrease the depth of field and limits the area of the scene that will be in focus.
-
What camera and lens should I start with?
What a tough question! There are many alternatives in the market, especially from the famous brands Canon, and Nikon, and Sony. The idea is to have a piece of equipment that can grow as you learn more and at the same time, its price is within your budget. As a Canon lover, I recommend to you the following:
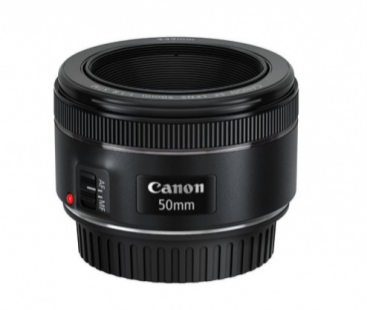
For the complete list of equipment, you should have, you can view the post, Photography Equipment For The Beginners – 10 Basic Pieces. & Best DSLR for a beginner.
-
How do I get a blurry background in my photo?
The idea behind this technique is to limit your depth of field and only focus on your subject. The way to do this is by setting your camera to aperture priority mode and using a wide aperture ( f1.4 – f5 ), you may also use portrait mode.
-
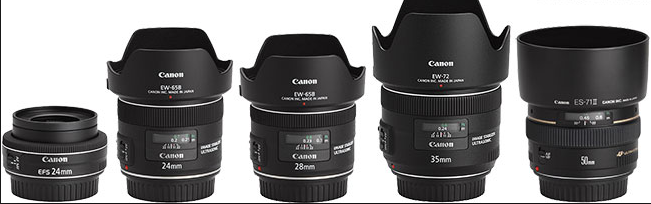
What are all these different lenses for, do I need them?
The kit lens is quite sufficient for you as a beginner photographer, once you found an interesting type of photography you admire most, you surely will need another lens. The lenses are classified into the following types:
- Fisheye lens: it provides you with wide hemispherical images, and it is amazing for panoramic shots.
- Macro lens: It is used for capturing a very close-up photo of tiny and small subjects.
- Wide angle lens: It is usually around 12mm – 24mm and it is used in capturing landscape photographs.
- Telephoto lens: It is the extreme zooming lens, it is ranging from 70-200 mm, and can reach 500mm. It can be used for sports photography.
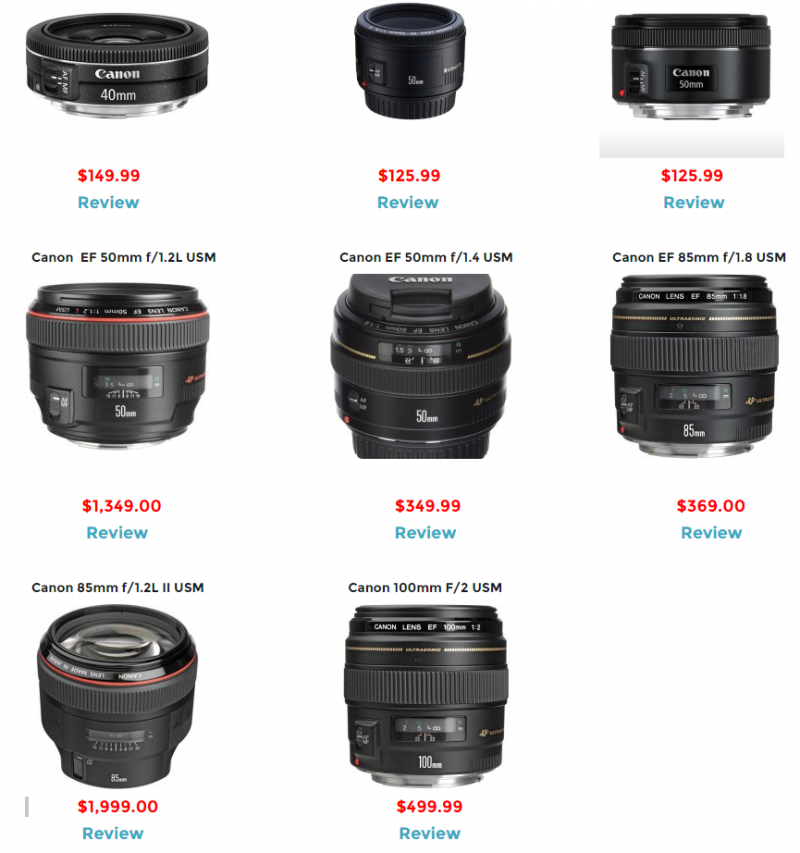
You can find updated reviews of Canon lenses Here.
-
What editing and post-processing software should I invest in?
The popular editing software packages are Adobe Photoshop , Adobe Lightroom, and Luminar. If you are short in budget, you may try some free software such as Gimp and Picasa, they offer great editing features. Also, you can check My favorite one. This post contains some amazing free editing software “The Free Photo Editing Software- The best 7 Software Packages

- How do I get a sharp background?
This is a question about getting wonderful landscape photos. You want both the foreground and background of the scene to be in focus. The trick is to maximize your depth of field. This is done by shooting with a narrow aperture (f/16 to f/22). The f/22 is commonly called the “storytelling aperture” as it means that almost all the scenes will be in sharp focus. So set your camera to aperture priority or landscape mode set the aperture as mentioned above and enjoy the results. You may check my links: landscape photography tips and tricks – Shoot like a pro and how to capture landscape – Your simple guide, and Where To Focus In Landscape Photography
-
Why do some of my photos look grainy?
You use a high value of ISO, higher ISO value means more noise and grain in the photo and less clearness and sharpness. In normal lighting conditions, keep your ISO setting to low values.
-
Why are the colors of the sky in my photos look different from the true color?
Shooting photos in the middle of a sunny day and when the sky is clear, without clouds, this situation when there is too much light, capturing the exact color of the sky is difficult, The fact is most cameras find it difficult to produce strong colors in these lighting conditions.
To overcome this situation, the easiest solution is to come back to the scene when the sun is not shining so brightly, try using a narrow aperture (f/18, f/22), or simply follow the f/16 rule. Use an ND filter to take some of the brightness out of the light, and consider using a polarizing filter. All of the above remedies aim to restrict the amount of light reaching the sensor, they will enhance the strong colors.
-
Do I need a Tripod?
Of course, yes, and a remote shutter is also needed. The two pieces of equipment can be of great help, and they canceled many causes of camera shaking problems. You do not have to invest a lot of money, there are some cheap items available online, and they will do the job. See here my recommended tripods.
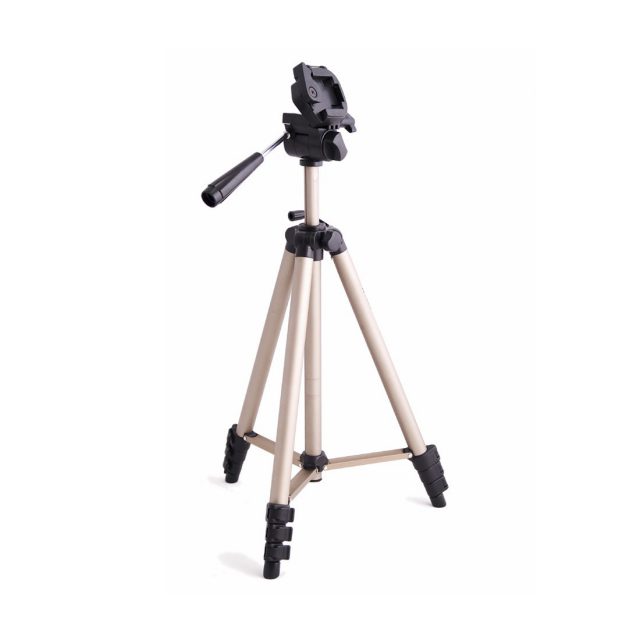
My recommendations are Manfrotto 190 mt190xpro3, and Canon Wireless Remote Shutter Release.
-
Can you suggest some resources for learning photography?
You should follow some photography blogs, join forums, and ask about problems you are facing, most photographers are more than happy to answer your questions and blog about mistakes they have made, this is a great way to learn. I suggest the post 1st Course – Basics of DSLR camera to start with and then complete the available 5 courses, I am sure they will help you a lot.
I recently published two posts that contain many learning resources:
Learn Digital Photography Online
YouTube Photography Tutorials- Improve your Photography Skills
Of course, there are many sites and magazines that you can learn a lot from them, I will mention a few popular top sites:
You can also see the below-paid photography courses from the photo academy, which covers most of the photography parts.
Online photography courses
- Photoshop Level 1: Introduction to digital photo acquisition, development and editing
- Lightroom Level 1
- Trimester 1: Mastering your camera, educating your eyes
- Trimester 2: Developing your photographic style
- Trimester 3: Affirming your style, developing your photographic writing
- Course 1: Camera Settings
- Course 2: Aperture and depth of field
- Course 3: Speed and movement
- Course 4: Light and focus
- Course 5: Instagram
-
What is the lens hood, and what is it used for?
Bright light sources inside or outside the frame can cause a lens flare. It is caused by the reflection of light internally among elements of the lens. Using a lens hood can protect the lens from unwanted and excessive light coming from outside the photo area. It also protects the lens from raindrops if any. For more reading about lens hood check the following link “Canon Camera Lens Hood – Reduce Lens flare
-
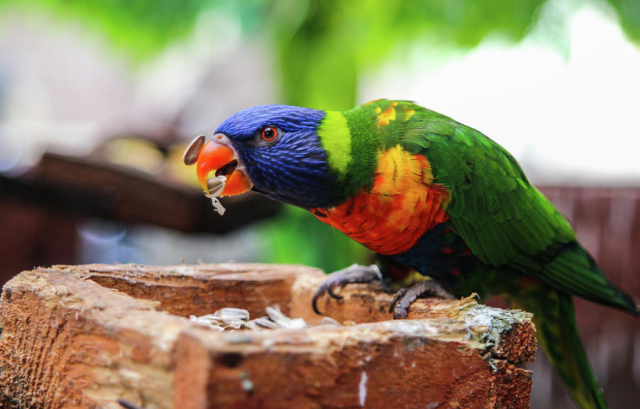
Do you have any tips for a newbie wildlife photographer?
First, you need a telephoto lens, something between 300-400mm, a tripod, and a remote shutter speed to minimize camera shake. Shoot early in the morning or late afternoon when the light conditions are perfect, also you may get lucky, it is the usual feeding time for animals and birds.
Do not be afraid to increase ISO if the light condition is low and you also need a higher shutter speed.
Nikon user? have a look at my post about best Nikon camera for wildlife photography.
-
How do you get that soft water look when photographing waterfalls or sea waves?
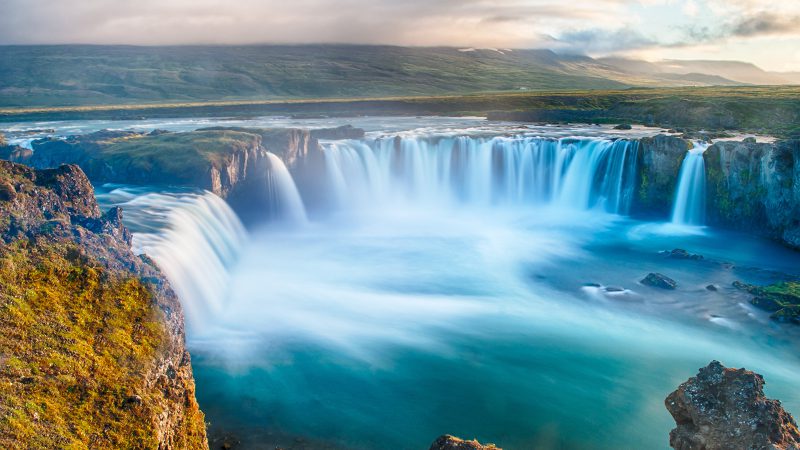
By allowing for longer time exposure to moving water you can achieve that silky water effect. Use a tripod so it won’t shake during the long exposure, set ISO to the lowest value, and reduce your aperture all the way so that you can set the shutter speed to the lowest value. If the shutter speed is still too fast, consider attaching an ND filter, this will knock down the light further. At last, try to shoot at dusk or dawn when the light condition is softer, and don’t forget the remote shutter release. I have a special post about photographing waterfalls tutorials, check it here.
31 – Where I can learn photography?
Thanks to the internet, with the internet at your fingertips, there is nothing that cannot learn. I wrote two posts about this subject. The first one Learn Digital Photography Online contains a round-up of some of the best online photography courses that will teach you everything you need to know. In addition, the second one is YouTube Photography Tutorials- Improve Your Photography Skills, in this post, I compiled a list of my favorite YouTube channels that I found very interesting and useful. Finally, my recommended place to start learning and improving your skills is The Photo Academy.
It is one of the world’s largest and most popular online platforms and provides live and online photography courses taught by numerous experienced photographers around the world (in many cities and languages).
32 – Where I can buy a used camera lens?
Buying and selling used cameras and lenses has almost become an industry by itself. There are many high-quality second-hand cameras and lenses out there, which means you can fulfill your needs and still save a good bit of money. For more detailed information check my posts:
What Is The Best Place To Buy Used Camera Lenses
How To Buy Used Camera Lenses? – KEH Is The Answer!
Although Amazon, B&H, and ADORAMA have their markets for used photography gear, my recommended place is KEH. It is a one-stop shop for camera and lens enthusiasts who love the process of buying and selling gear. They have one of the largest online lens collections around and they have streamlined the process of buying and selling in a way few others have.

33- Where can I find professional editing tools?
If you are looking for editing resources like actions, overlays, and textures, I highly recommend paying a visit to my store, it has amazing professional photo editing tools.
Related Posts:
The Digital Photography Tips- Advanced Q&A
The Digital Photography Tips- Ultimate Q&A List
Thanks for reading, I hope you enjoyed the article.
If you enjoy the site, don’t forget to subscribe, we will only inform you when a new article is posted.