5th course: Circle of confusion, sharpness, resolution, contrast, composition rules & setting up your camera
circle of confusion in photography
Circle of confusion:
To understand the circle of confusion, remember that light reflects off the subject in all directions. Your camera captures the rays traveling toward it, which then pass through the diaphragm’s opening.

You can visualize this as a cone of light with its apex at the reflection point on the subject and its circular base in the diaphragm opening. Furthermore, the circle of confusion, also called a blur circle, disk of confusion, or circle of indistinctness, refers to the effect of non-converging, unfocused light rays entering the lens. When light waves fail to converge after passing through the lens, they produce a larger optical spot instead of forming a single point.
Calculating the circle of confusion is crucial for photographers. More importantly, it helps determine the depth of field needed to capture a sharp image.
If a photographer maintains the correct distance from the subject, light and chromatic aberrations can be minimized. As a result, this improves the chances of different light wavelengths forming a focused image on the film.
Simply put, the circle of confusion estimates the depth of field required for a clear image.
Circle of Confusion (COC):
- Out of focus = Large circle of confusion
- In focus = Very small or no circle of confusion
Sharpness
It is the most important factor in image quality because it determines how much detail an imaging system can reproduce.
Sharpness describes the clarity of detail in a photo and serves as a powerful creative tool for emphasizing texture. Additionally, proper photographic and post-processing techniques can significantly enhance sharpness. However, camera equipment, image magnification, and viewing distance set certain limits. Consequently, two key factors influence perceived sharpness: resolution and contrast.
Resolution
In the analog world, negatives and prints had continuous tones, making enlargements straightforward. However, today, digital photography introduces complexity, especially with input and output resolution settings. Therefore, many newcomers struggle with these concepts.
Understanding resolution starts with acknowledging the limits of human vision. Since the human eye cannot distinguish details below a certain level, this varies between individuals.
When an image consists of dots smaller than this threshold, it appears as a continuous tone. In fact, printing has relied on this principle for centuries. Every photograph in books, magazines, calendars, and art reproductions consists of tiny dots of ink, typically ranging from 70 to 300+ dots per inch.
Thus, the best lenses, lowest ISO settings, and sensor quality determine recorded resolution.
Contrast
Contrast refers to the range of tonal differences in a photograph.
In black-and-white photography, contrast defines the difference between the darkest and lightest tones, shaping the grayscale. Similarly, in color photography, contrast affects how distinctly colors stand out from each other.

Composition & design rules:
Rule of thirds explanation
Rule of thirds:
Imagine dividing your image into nine equal segments using two vertical and two horizontal lines. For a more balanced and visually appealing composition, try placing the most important elements along these lines. This technique helps guide the viewer’s eye and creates a stronger focal point.
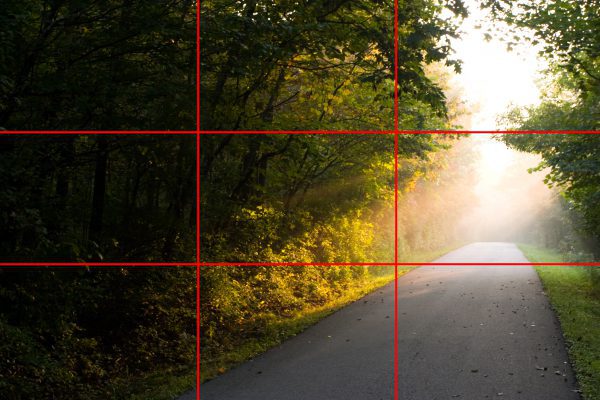
Placing your main subject off-center, following the rule of thirds, makes a photo more interesting. However, this can also create an empty space that feels unbalanced. To fix this, you should add a smaller, less important object to fill the gap and create a more visually appealing composition.
Setting Up Your Camera:
- RAW or JPEG – First, decide whether to shoot in RAW for maximum editing flexibility or JPEG for smaller file sizes and quicker sharing.
- Select Your Mode – Next, choose a shooting mode. Use Manual for full control, Aperture Priority (AV) for depth of field adjustments, or Shutter Priority (TV) for motion control.
- ISO – Then, adjust your ISO based on lighting and shutter speed. Use a lower ISO in bright conditions and a higher ISO in low light.
- White Balance – Additionally, set your white balance manually for accurate colors, or use Auto WB if unsure.
- Focus Point – Similarly, choose your focus point. A centered point ensures reliability, all points work for general use, and an off-center point adds creativity.
- Auto or Manual Focus – Decide whether to use Auto Focus for speed and convenience or Manual Focus for precision in tricky lighting.
- Single or Continuous Shooting – Likewise, select Single Shot for still subjects or Continuous Shooting for moving subjects.
- Fill Flash – If needed, use Fill Flash to soften harsh shadows in bright light or add illumination in dim conditions.
- Take a Test Image & Review – Finally, always check your exposure, focus, and composition while keeping the Exposure Triangle (ISO, Shutter Speed, Aperture) in mind.
Now you have finished the full course, you did a good job 😉 start practicing & if you have any questions just post below & I will be glad to answer you.