

Most of the newer model DSLRs allow you to calibrate your focus so that your lens focus point is always spot on. We are going to discuss and describe how to calibrate your lens in order to enhance and adjust autofocus. After using your camera for sometimes or you just buy a new lens, you may find that your camera’s autofocus is not working well and you get blurry photos for no apparent reason. This might mean that your camera and certain lenses aren’t playing together nicely and it is time for a tune-up. Most photographers assume that when they buy a lens, whether brand new or used, that the Auto Focus is going to be accurate when using it. Unfortunately, most of us don’t realize that is might not turn out this way and a shift of focusing point happens and resulting in what most consider to be “blurry” images.
Lenses need to be calibrated to each camera so you can get sharp images and accurate focusing. Simply, assuming that your lenses and camera are accurate when using autofocusing, is a huge risk. I would bet that if you’ve never checked, chances are your lenses need to be adjusted.
Sometimes calibration is not the answer to focus issues you might be having. Often times, the USM (ultrasonic motor) unit in the lenses can go bad. If you have a Canon USM lens and the focus “seeks” (goes in and out without locking focus), or is very erratic (i.e. will back focus one moment and front focus the next) you need a repair, not just a calibration.
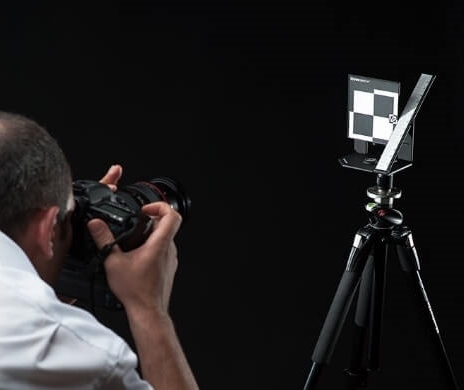
The calibration process and adjustment do not require fancy equipment, it only needs a reference focusing chart. It is simply a printed photo of some specific shapes and patterns that should be positioned vertically and another ruler that is mounted with an inclination angle to the vertical board. The setup is shown in the following photo.
There are many free charts available online. You may download and print one of them. But I recommend using one of the charts mentioned at the end of this post
Checking and Calibration procedures
- Stand the focus chart on a level surface. Put your camera on a tripod and adjust it so it’s level and pointing at the center of the focus chart. The distance between the camera and the chart should ideally be around 50 times the focal length of the lens – for example, with a 50mm lens you want to be 2.5 meters away from the chart.
- Lighting should be bright/even.
- If the lens has an image stabilizer, turn it off.
- Use a remote switch or the camera’s self-timer to fire the shutter. Use mirror lock up as well.
- Select the widest available aperture.
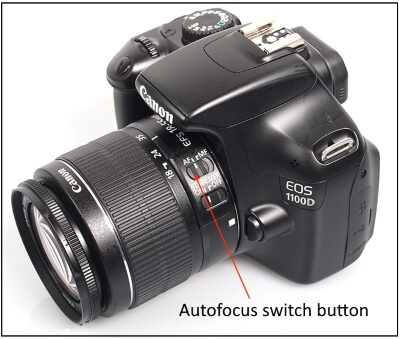
- Set the lens for AF and the camera for One-Shot AF, and manually select the center focusing point. Look through the viewfinder and lock the center focus point by half-pressing the shutter button.
- Switch to manual focus and turn the Live View mode on.
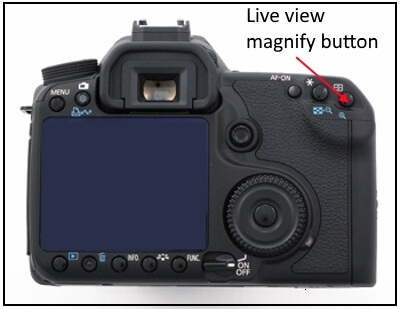
- Enlarge the image in the live view mode by pressing the Magnify button twice. This will give you a 10x pixel-by-pixel zoom of the image how it will actually look on the sensor. See if the finest details of the focus chart are in focus.
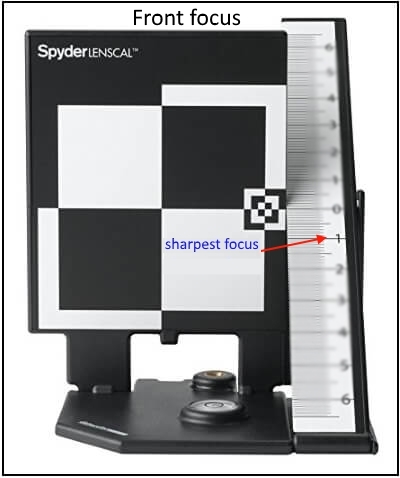
- You can also download the resulting images to your computer, and enlarge them to 100% and examine them carefully. If your camera focused accurately in the middle of the chart, the chart in the resulting image will be sharp and the sharpest number on the ruler will be O. If the number in focus is continuously located on the ruler in front of the chart, your lens has some front-focusing issues.
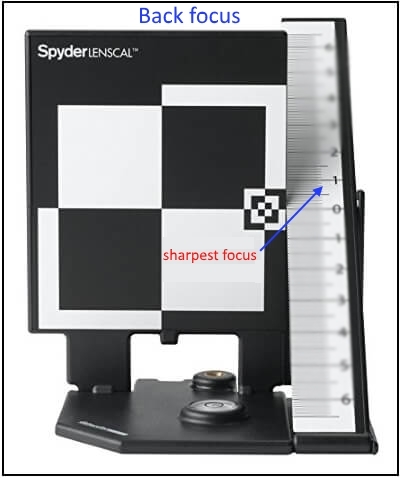
- If the sharpest number on the ruler is behind the chart, then your lens tends to back-focus.
Adjusting the focus
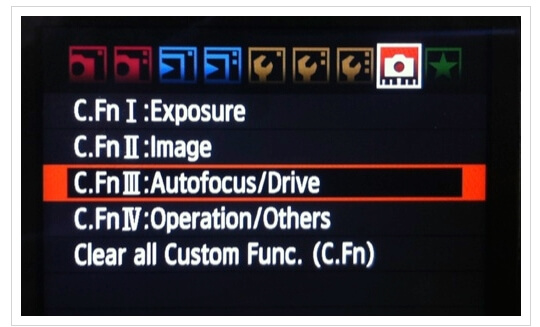
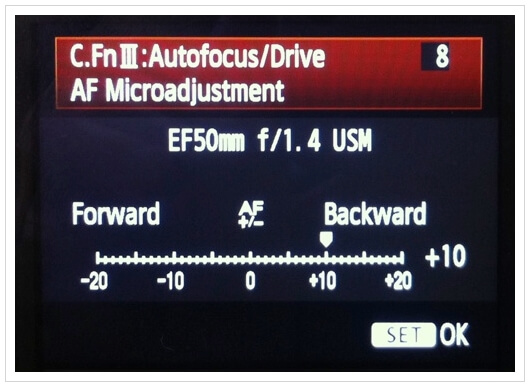
- Turn Live View mode off and go to your camera’s menu. In the Functions menu, select Autofocus/Drive menu and press Set.
- You have the option of adjusting all the lenses that are used on your camera by the same amount or do it for each lens separately. Canon cameras can remember the settings for up to 99 different lenses that are used on a particular camera.
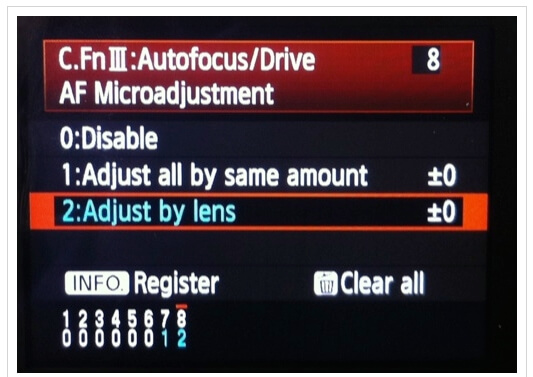
- To make changes, hit the “Info” button and adjust the focus: go “+” if your lens tends to back-focus, or “-” if it has front-focusing issues. Press “Set” to register the changes and run the autofocus accuracy-test again using Live View mode as described above.
The following are common charts and calibration systems used in adjusting and calibration of lens autofocus.
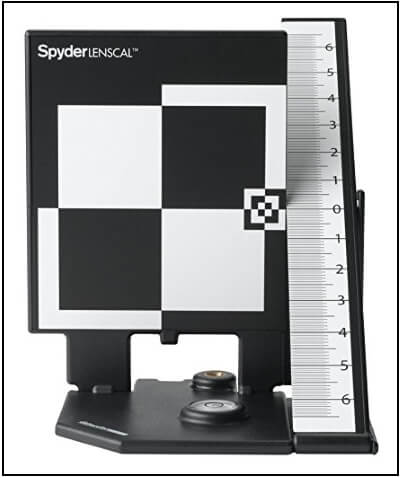
Datacolor SpyderLensCal SLC100
The SpyderLensCal Autofocus Calibration Aid from Datacolor is a focus test chart, designed for use with select DSLRs that support autofocus adjustment. The chart allows you to test the autofocus accuracy of your camera, making it easy to fine-tune it for optimum performance.
The SpyderLensCal features a built-in level and tripod mount, allowing you to create precise testing environments. Cameras that support autofocus adjustments such as the Canon 5D Mk II, 5D Mk III, 1D Mk III, 1D Mk IV, and 1Ds Mk III, are supported. Please consult your owner’s manual to confirm that your camera supports autofocus adjustment.
- Fast, easy solution for your interchangeable lenses and recent DSLR bodies provides razor-sharp auto-focusing, using modern DSLR autofocus micro-adjustment technology
- Compact, lightweight and durable, with integrated level and tripod mount, making this the most convenient way to adjust your own camera gear
- Save time and hassle of sending your equipment in for service. Now you can check or calibrate your own lenses
- Accurate and repeatable calibration of your lenses and recent DSLR bodies
- A worthwhile investment to ensure your camera is focusing your lenses as precisely as possible
Requirements: Camera with autofocus adjustment capability
Partial List: Canon: 50D, 7D, 5D Mk II, 5D Mk III, 1D Mk III, 1D Mk IV, 1Ds Mk III
LensAlign Fusion Integrated AF Calibration System
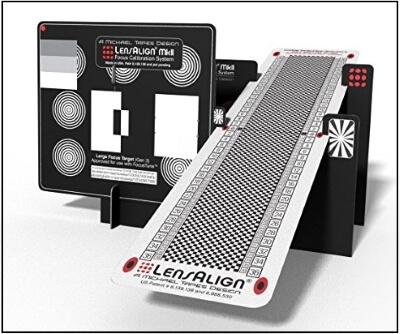
The MkII Focus Calibration System from LensAlign uses your camera’s menu-based autofocus fine-tune function to match each of your lens’s autofocus systems to your camera body for precise focusing. The MkII assembles into a system that offers a dual-sided focus target and a focus display ruler.
To use, simply place the MkII on a table or use the integrated 1/4″-20 tripods mount to set the system on a tripod, and with your DSLR on a second tripod, use the True Parallel Alignment feature to accurately align the camera and target. With the aperture open as much as possible, focus your lens on the target and see your lens’s focus error (or lack thereof) on the display ruler. Afterward, simply enter the data garnered into your camera’s menu and it will adjust the autofocus to be precise and retain that information to be utilized each time you use that specific lens.
The MkII is the second-generation calibration tool from LensAlign and is built of sturdy card stock and polystyrene. It assembles and disassembles easily for versatile long-term use with any lens and with DSLRs equipped with autofocus adjustment capability.
- The LensAlign MkII target features a front sighting plate with a precision focus target and TPA sighting ports. The rear sighting plate on the target provides additional parts of the TPA sighting system.
- The 10.5″ plastic Focus Display Ruler offers a choice of graphics display patterns on both sides (black with white numerals and white with black numerals) and is situated along with the focus target at a 20º angle for an optimized depth of field display.
- True Parallel Alignment is the basis that provides visual verification of perfect camera positioning during AF calibration. The orientation of your camera is essential for accurate analysis and adjustment of the camera’s auto-focus systems.
- The MkII system disassembles easily for storage and travel.
LensAlign MkII Focus Calibration System
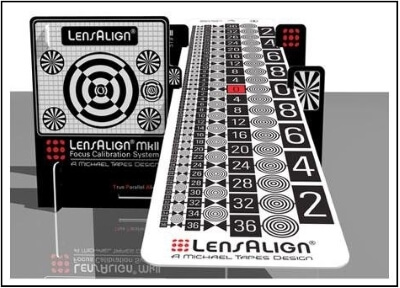
LensAlign MkII is a precision reference tool that enables photographers to accurately measure and then adjust the auto-focus accuracy of their DSLRs. It also reveals the performance of the camera’s manual focus system.
A few years ago, photographers started to notice front/back focusing problems with their DSLRs. For example, when their camera’s AF system was locked in a person’s eye, the person’s nose or ear was actually the sharpest part of the captured image. In order to allow hundreds of lenses and bodies to be interchangeable, the tolerances within the manufacturing process can cause any specific body/lens combination to potentially exhibit these front/back focus anomalies. To compensate for this condition, most new professional and enthusiast DSLRs have an Auto Focus Adjustment within their menu system. LensAlign was created as a focus system measurement standard by which photographers can accurately measure and improve the performance of their cameras’ focus systems. Like its industry-standard LensAlign Pro predecessor, the LensAlign MkII features our exclusive and patent-pending True Parallel Alignment™ (TPA™). TPA verifies perfect parallel alignment between the camera sensor plane and the target surface of LensAlign, a requirement for consistent and precise Auto Focus adjustment. LensAlign MkII comes standard with a 10.5″ Focus Display Ruler containing 2 alternate display patterns, one on each side. A 24″ Long Ruler add-on option will be available in early February. LensAlign MkII is shipped flat in a Priority Mail postal envelope to reduce shipping costs. The MkII can also be disassembled for travel or storage. Note: Ships flat. Simple assembly required. (Under 5 minutes with no tools).
Focus Pyramid AutoFocus Lens Calibration Tool
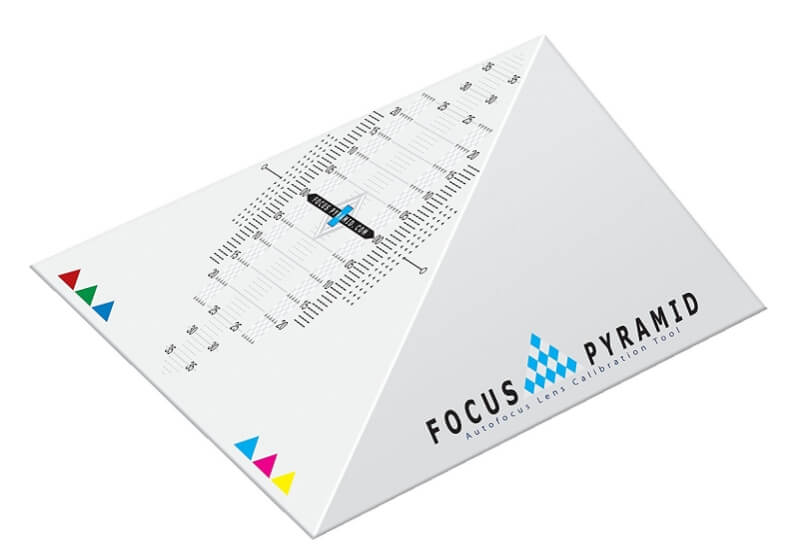
The Focus Pyramid Autofocus Lens Calibration Tool from J.Cristina Photography Tools features a simple design for quickly fine-tuning your autofocus performance. The die-cut pyramid features a printed direct targeting system that helps to easily identify any front or back focus issues associated with your various lenses, which can then be compensated for in-camera in order to achieve sharper, more exacting focus.
In order to make full use of the Focus Pyramid, a camera should be used that allows for user-input lens and autofocus calibration settings. Examples of compatible cameras and some lenses include:
- Canon EOS 50D, 70D, 7D, 6D, 5D Mark II, 5D Mark III, 1D Mark III, 1D Mark IV, 1Ds Mark III, 1D X, 1D C
- Nikon D7000, D7100, D300, D300S, D600, D610, D700, D800, D800E, D3, D3S, D3X, D4, D4S
- Sony A850, A900, SLT-a77, a99, E-mount cameras with LA-EA2 adapter
Related Posts
Thanks for reading, I hope you enjoyed the article if you have any questions just post them below & I will be happy to answer you.
If you enjoy the site, don’t forget to subscribe, we will only inform you when a new article is posted.

Can I do this with my Canon Rebel T7? I do not see the corresponding settings in my camera, so I am guessing not.
You are right, the Canon Rebel T7 does not have “the micro autofocus adjustment” feature
First I would like to thank you for posting this content, I have be worrying allover what happened to my camera, any time I am taking photo the auto focus is not working well, I always ending up with blurry images. At first I thought it was a temporary issue and with time I got concerned, I took to for specialist and they asked me to change the lens , they did it for me but later after few month the problem is even bigger, but as from now I have learnt how the lens issues work and am looking forward to reinstall my camera back to operations, I really appreciate this post thank you.
also I am greatful for you have highlighted images with affiliate links that has price on them that make it even easier for me to make some purchase.
I’m not too conversant with the calibration of lenses but actually needs to learn it. I used to think that an object will be used to mark some kind of calibration on the camera lenses but I have seen that it’s actually different from what I had in mind. I think I will have to revisit your website over and over again to learn it properly.
You are welcome at any time, we add fresh posts every week.