


The Sigma USB dock works in conjunction with Sigma Optimization Pro software to Update lens firmware and customize other lens parameters such as focus. In this article, we are going to explain how to use Sigma USB dock to customize and adjust your lens.
The Sigma USB dock offers 4 Categories of customization for fixed focal length (prime lenses) at 4 different shooting distances. For zoom lenses, it offers 16 Categories of customization (4 options for focal length) x (4 options for shooting distance).
You can also customize Autofocus speeds, focus limiters, and optical stabilization functionality for certain types of Sigma lenses. Updating the firmware can be done via an internet connection. Sigma Photo Pro is available for Mac and PC computers.
The Sigma lenses that are compatible to be used with the Sigma USB dock are listed below:
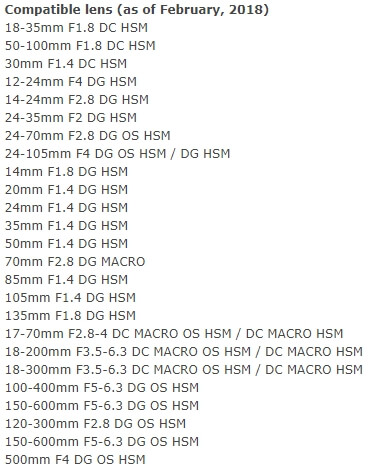
You may also check your lens compatibility with Sigma USB dock here
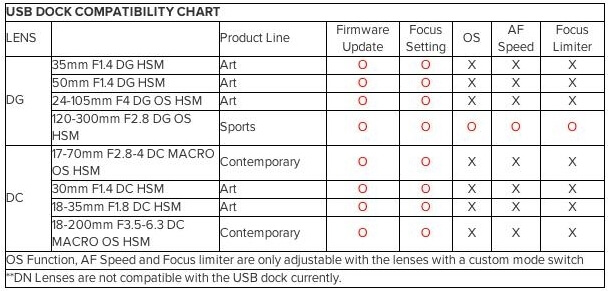
You have to keep in your mind that not all the features that come with the software are applicable to all lenses, the table below shows some examples.
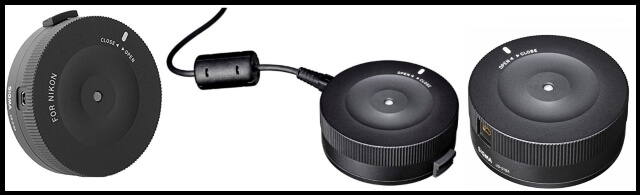
The Sigma USB dock comes in a variety of models to suit the different types of lens mounting:
Sigma USB Dock (for Sony Alpha A-Mount Cameras)
How to use the Sigma dock
The Sigma dock is used with a dedicated desktop app, Sigma Optimization Pro. The app works on Windows and Mac. First, you need to download and install it in your computer. The following are the download links for Windows and Mac computers.
SIGMA Optimization Pro 1.4 (Ver.1.4.1) for Windows
SIGMA Optimization Pro 1.4 (Ver.1.4.0) for Macintosh
The link to the operating manual of the Sigma USB dock is HERE
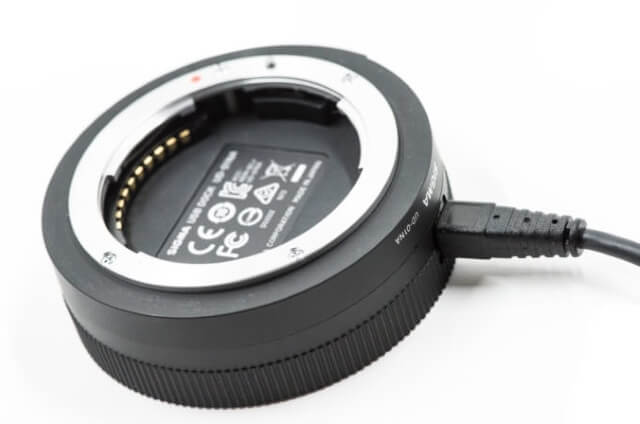
The USB dock is an interface between the computer and your Sigma lens. You simply attach the dock to the end of the lens, using the same kind of mounting method you’re used to for attaching the lens to a camera. Then a USB cable is attached between the doc and your computer. And then run the Sigma Optimization Pro app.
Features of Sigma USB dock and Sigma Optimization Pro
# One: Lens Firmware Updates
Although updating the lens firmware is not a frequent matter and for most lessees famous brands such as Canon and Nikon this job is done in the services departments. Sigma chooses to make the updating of their lens firmware much easier, it can be done by using the Sigma USB dock and a computer via the internet.
This system allows Sigma to make update the firmware of a lens to improve its performance and correct some issues such as overexposure problems with specific camera combinations and improve autofocus accuracy. It can also be used to address performance issues with newly released cameras. For example, a firmware update of the 150-600mm lenses actually leads to an increase in the autofocusing speed by up to 50 percent.
Start the updating process by mounting the Sigma USB to your lens and connecting it to your computer via a USB cable and then run your optimization pro software. The main menu of the program is shown below:
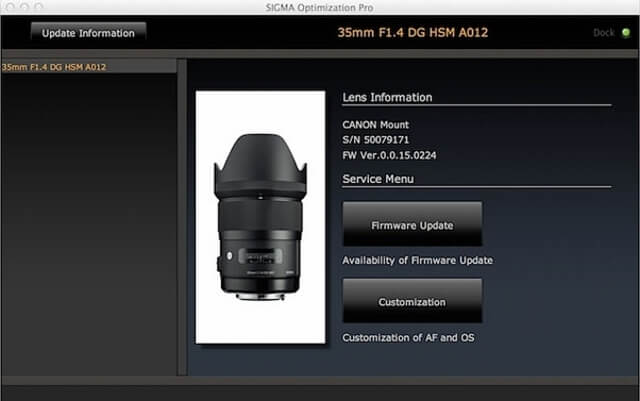
The screen shows the type of the connected lens, and then clicks the “Firmware Update” button and the confirmation button:
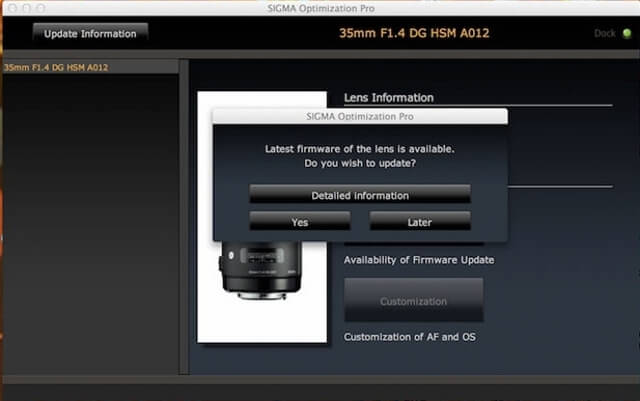
Then the updating will proceed if there is an update available.
# Two: Setting the focusing position of Autofocus
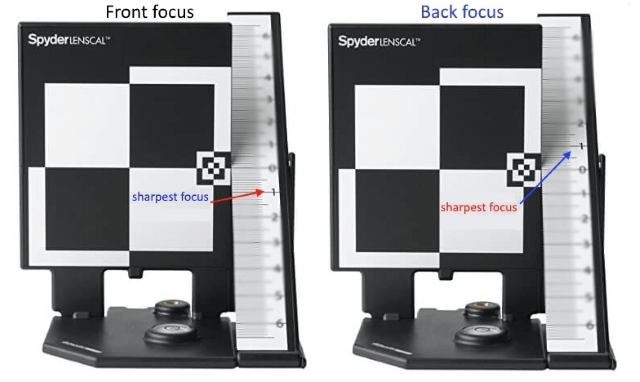
Sometimes you observe that your lens is back focusing (the lens AF system focuses somewhat behind the intended plane) or front focusing (the lens AF system focuses somewhat in front of the intended plane). This matter can be adjusted and you can tweak the setting.
This focus calibration is applied through the lens itself and it is different from calibrating with the camera. For more information regarding the calibration of the lens and camera combination, you may check my post “How to Calibrate Your Lens- Enhance Autofocus Accuracy”
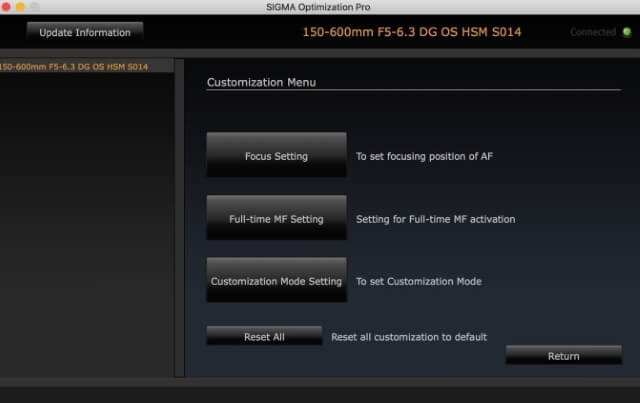
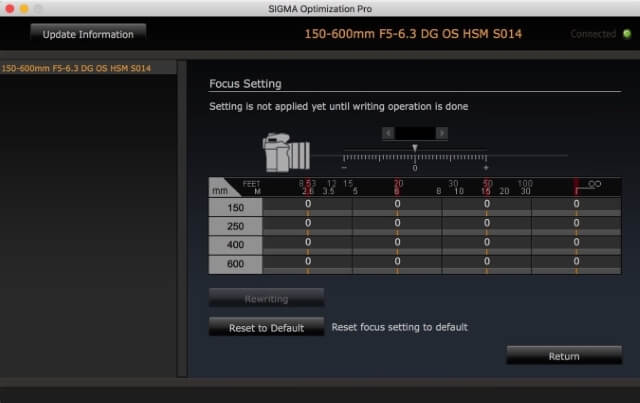
In the main menu of the software, clicks the customization button then focus setting.
The display will depend on the type of lens prime or zoom.
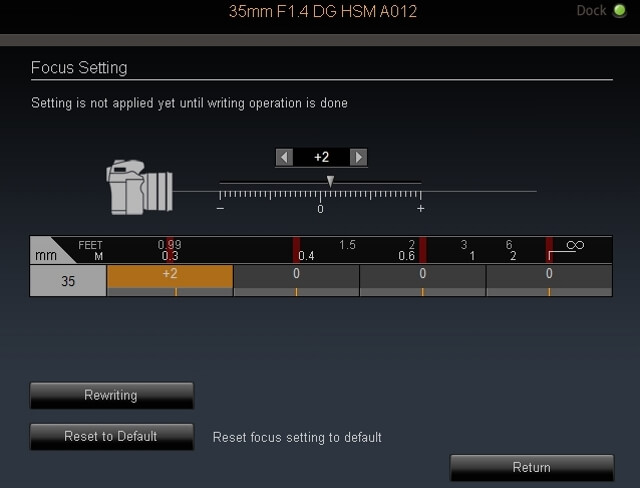
For a Prime lens, you can adjust the focus at four shooting distances. For example, Sigma 35mm will show the following display, and you need to calibrate it at four shooting distances: 30cm, 40cm, 70cm, and infinity.
For a zoom lens, you can adjust the focus at four shooting distances for four selected focal lengths. For example, Sigma 150-600mm will show the following display, and you need to calibrate it at four shooting distances: 2.6m, 6m, 15m, and infinity, and at four focal lengths: 150mm, 250mm,400mm, and 600mm. Total of 16 adjustments to be done.
Setting procedure
- Take test shots with the lens mounted on your camera body at the specified distances mentioned in the software using a tripod and aiming at a focus calibrating tool.
My recommended types of focus calibration tools are:
Datacolor SpyderLensCal SLC100
DSLRKIT Lens Focus Calibration Tool Alignment Ruler Folding Card
- Stand the focus chart on a level surface.
- Put your camera on a tripod and adjust it so it’s level and pointing at the center of the focus chart.
- Lighting should be bright/even.
- If the lens has an image stabilizer, turn it off.
- Use a remote switch or the camera’s self-timer to fire the shutter. Use mirror lock up as well.
- Select the widest available aperture.
- Set the lens for AF and the camera for One-Shot AF, and manually select the center focusing point.
- Inspect the images on your computer and find out if the focus is sharp at the ruler at the mark “0” or otherwise the lens is back focusing or front focusing as shown in the following figure.
- If the focus is not sharp, mount the lens on the Sigma USB dock and go to the focus setting menu and enter a starting number (an estimation number from 0 to 20) in the specified field according to the evaluation of the test photos.
- Redo the steps again from no 1 to 3 and refine the deviation estimate until you get satisfying photos. Remember it is a try and error procedure.
- After getting a satisfactory result click the rewriting button to save the new setting to the lens.
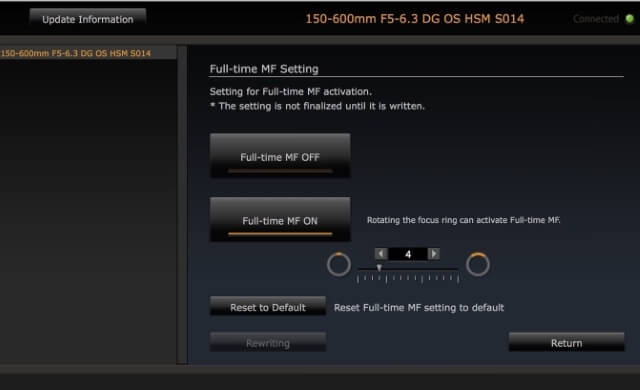
# Three: Full-time MF setting
You can select the Full-time MF function ON / OFF. (When the shutter button is half-pressed while autofocusing is in operation, Full-time MF is activated by rotating the focus ring.) This menu is used to control the manual focus override sensitivity (by defining how much you can turn the focusing ring to activate the full-time manual focus), or you can turn it off completely.
# Four: Customization Mode Settings
It is possible to save 2 sets of the customization status in [C1] and [C2]. The following are the functions offered for further customization.
- AF Speed Setting
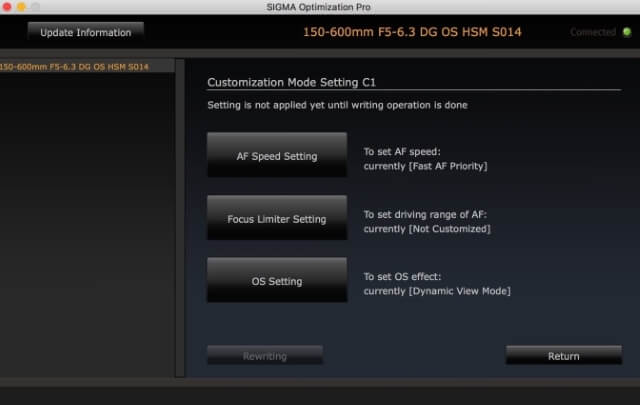

It allows you to select 3 different AF speeds (only available on lenses with a custom mode switch)
Fast AF Priority
Prioritize autofocus speed to reach the focus point as quickly as possible.
Standard AF
The default setting achieves both smooth operation and fast AF speed.
Smooth AF Priority
Prioritize smooth autofocusing. This mode offers slightly slower but very smooth autofocus, ideal for use with video.
Focus Limiter Setting
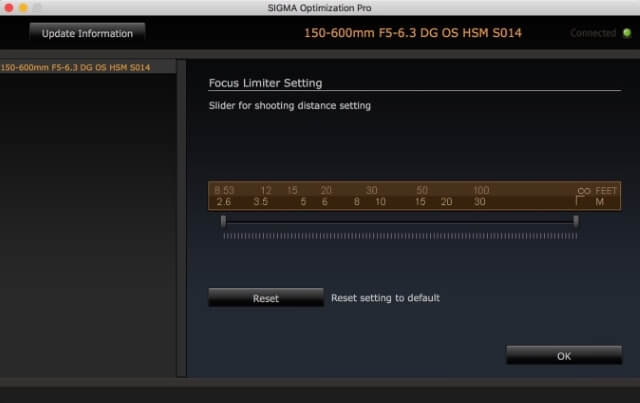
It allows you to adjust the range of the AF drive (only available on lenses with a custom mode switch)
- OS Setting
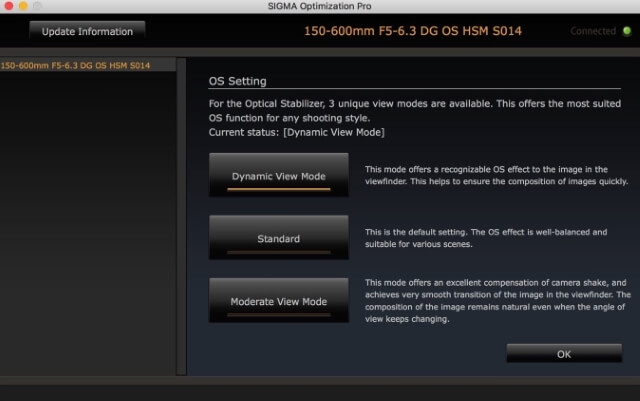
For the Optical Stabilizer (OS), 3 unique view modes are available. This offers the most suited OS function for any shooting style (only available on lenses with a custom mode switch).
Dynamic View Mode
This mode offers a recognizable OS effect to the image in the viewfinder. This helps to ensure the composition of images quickly.
Standard
This is the default setting. The OS effect is well-balanced and suitable for various scenes.
Moderate View Mode
This mode offers excellent compensation of camera shake and achieves a very smooth transition of the image in the viewfinder. The composition of the image remains natural even when the angle of view keeps changing.
Finally, it is very important to remember to save the settings you have just altered, the new setting needs to be written to the lens’s own built-in memory. That’s going to overwrite the firmware. So it’s very important that the process isn’t interrupted by disconnecting the dock or closing the app.
Related Posts
How to Calibrate Your Lens- Enhance Autofocus Accuracy
Thanks for reading, I hope you enjoyed the article and find it useful if you have any questions just post them below & I will be happy to answer you.
If you enjoy the site, don’t forget to subscribe, we will only inform you when a new article is posted.


Although the directions indicate that a tel-converter attached to the lens makes it a different lens.
However, it does not seem that you can have different settings for bare lens or diferent converters?
Quick question. For measuring the distance between the camera and the Spyder Len Cal.. can you do it in the manner mentioned in this video?
https://youtu.be/azDmL8p8Jp4
Look forward to your reply.
Hi Blair
Thanks for your comment, the video is great, but it does not say how to physically position the distance between the camera and the calibration chart. It only sets the distance on the lens scale . You need to make sure that the actual distance is matching the setting on the lens by using any measuring rulers or tap.
Question about the settings: you said “For a Prime lens, you can adjust the focus at four shooting distances. For example, Sigma 35mm will show the following display, and you need to calibrate it at four shooting distances: 30cm, 40cm, 70cm, and infinity.”
Do i need to change the f/stops or just use the same settings 1.4 for all 4 distances?
Hi Vira
thanks for the comment, you do not have to change the aperture, keep the same value for the different shooting distances.
Nice article, but unless I missed it you didn’t mention on what basis to measure the focusing distance. I assume it’s from the focusing plane marked on the underside of the camera body? Or am I misreading that?
Hi Tim
You are right, The focusing distance measurement is the distance from the camera sensor plane (that rests behind the lens and its true location is designated by a “Phi” mark on the body of the camera) to the focusing point on the subject.
I think there’s an error with the 35mm 1.4 distances too. “30cm, 50cm, 130cm, and infinity.” The first red line is exactly on .3m which is 30cm, but the 2nd red line falls before .4m which is 40cm and you listed 2nd length as 50cm which would be 1.6ft which also doesn’t even come close to the ft they offer above the meters. The third you say 130cm but the red line falls on roughly 65cm.
Hi Matt Z
Thank you very much for your comment, you are right about the mistake. I updated the post and corrected the numbers.
You have an error in the text: “For example, Sigma 150-600mm will show the following display, and you need to calibrate it at four shooting distances: 2.6m, 6m, 15m, and infinity, and at four focal lengths: 100mm, 250mm,400mm, and 600mm. ”
Obviously you cannot calibrate a 150-600mm lens at 100mm. (It should be 150mm).
Hi RY
Thank you very much for your comment, you are right about the mistake. I corrected it.
Technology has improved dramatically over the years. I used to remember when I was little and how long it took between taking a picture and having it printed, how close the photographer would have to get in order to get a good picture. There are very quality lenses in the market now that has improved the quality of pictures and you can take pictures from any distance.
Thanks for your comment