


The Low key photography refers to a style of photography that utilizes predominantly dark tones to create a dramatic looking image. The key here is not producing dark images but to use lighting very selectively so that only specific portions of the image are illuminated.
Instead of avoiding intense shadows, as normally we are trying in ordinary photography, we’ll have to consider them as the primary element of the composition. Low key photography is about creating striking contrasts through reduced lighting. Shadows are the key element of the composition. Compose your photo in a way that hopefully produces a dramatic and artistic look.
An image is considered low-key if its dominant values are dark. According to Wikipedia, low-key photography attempts to create a chiaroscuro effect, it is an oil painting technique, developed during the Renaissance, which uses strong tonal contrasts between light and dark to model three-dimensional forms, often to dramatic effect.
Another characteristic of the low key photos is the shape of its histogram. The figure below is a typical histogram of a low-key photo.
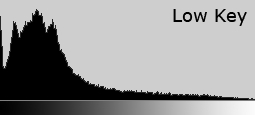
- It has many low tones spreading up to the right side (white tone)
- The average tone or media is too low.
- It is shifted and clipped on the left side (black tone)
When to use Low key photography
When shooting low-key photography of any type, the most important thing to think about is how the light is hitting the subject. By creating shadows it helps create a more creative photo.
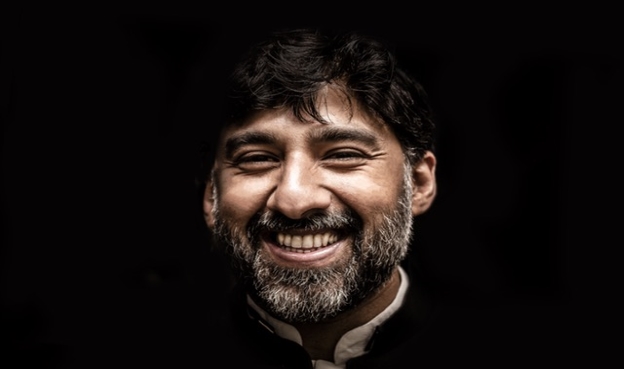
Typically it can be applied to any type of photography, but probably portrait and close up photography are the most suitable types to try low-key settings on them. The photos below are some samples of low-key photos.


General guidelines
Good low-key photography requires a good knowledge of light, shadow, and tone. Precise application of lighting is required in order to control the very important shadow detail. Here are some guidelines.
- The lighting zone should be much narrower than high-key lighting, meaning the subject has to be more carefully placed with respect to the light source.
- By adding a grid to the light, you can control the light even more. The grid restricts the light to whatever is in front of the light only; none bounces around or spills out the sides.
- You have only one key light so the only choices you have are the direction and strength of the light source.
- Keep your subject away from any background and walls that may interfere with the shots.
- Try to avoid light from reaching your background.
- Manipulate your lighting and placement of the subject until the shadows fall exactly as you want them.
Indoor Low key – studio setup
The following is a very basic studio light setup for low-key photography. Remember that direction and intensity are all up to you but avoid lighting the background. And don’t be too afraid of backlighting! It can produce some spectacular results. You may try one of the following setups:
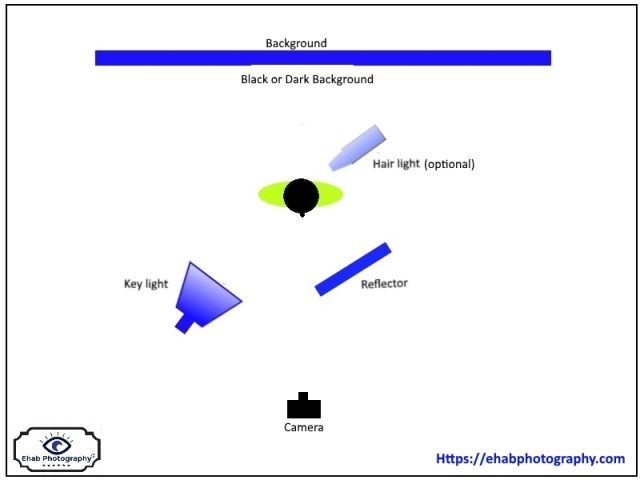
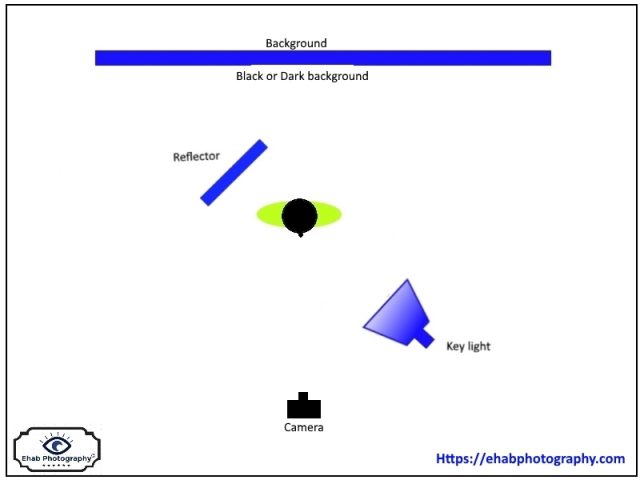
- Place the light at an angle with the camera to achieve the required shadow.
- The light source height is nearly at the same level as the model’s head.
- The best results with this lighting setup are achieved with the use of a softbox and a grid.
- The flash power is adjusted according to the ambient light; be careful not to create hard shadows by having too much flash power.
- The closer the light, the softer the shadows will be and the less flash power will be required.
- A reflector is used to soften the very hard shadow.
- A hair-lighting may be used (optional) to add some extra effects.
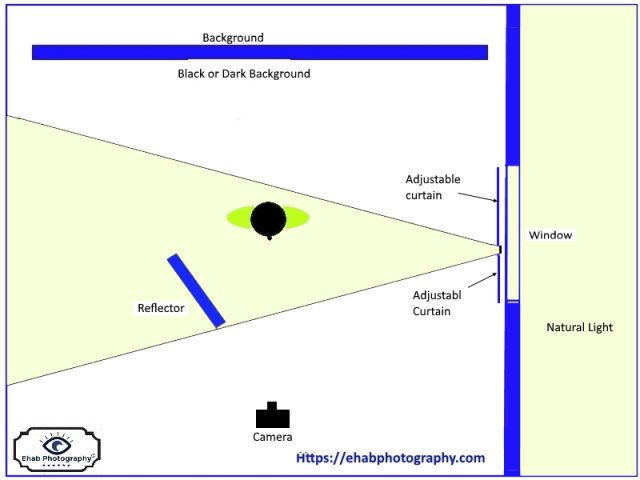
Indoor Low key – Using natural light
If you don’t have a studio, you still have another option. A popular one is to use the natural light that is coming through a window and control its direction and intensity by using a moving blackout curtain. Try to keep the light from hitting the camera or the background. The figure below illustrates the setup.
Outdoor Low key – using a flash
Look for shaded areas with enough space to allow at least 2-3 meters between your subject and the background. The darker the background is the better. Use an off-camera flash that can fire wirelessly and preferably with a diffuser, try different positions of the flash until finding the suitable position.
Camera setting
The following is a common camera setting for low-key photography:
- Set your ISO speed as low as possible.
- Set your aperture speed to a fast value (the fast shutter speed does a great job of getting rid of a lot of the surrounding natural light.
- Start by setting your aperture as wide as it will go, then progressively narrow it until it cuts out all of the ambient light. (The camera histogram is particularly useful).
- Use the flash or the light source at reduced power, see what happens. If your photo is underexposed, use higher power.
Finally, low-key photography is about capturing shadows, the application and control of the light are the key factors towards amazing low-key images. Try to practice a lot, and learn how to manipulate your lighting and how to position your subject with respect to both its background and the light source until the shadows fall exactly as you want them.
Related post
Photography Lighting Techniques – Softbox Vs Umbrella
Photography Lighting Techniques – All About Light Reflectors
Photography Studio – Setting Up Home Photography Studio
Low Key Portrait Photography – Create A Dramatic Family Composite Photo!
Thanks for reading the article, hope it is useful and helpful to you. I will be glad to respond to your comment or any more information, just write it down in the box below.
If you enjoy the site, don’t forget to subscribe, we will only inform you when a new article is posted.


Very good post, recommended by a blogging friend. Will come back to it.
Thanks for your input Rosie!
This is awesome Photography tips, I’ve always loved photography and I seriously wanted to learn more, you have given me exactly what I wanted, Although my first camera is on it’s way and now I have a better understanding how our cell phones camera works.
That’s cool Terri! I am happy that you are enjoying the site. Best of luck with your photography journey.
I am definitely a beginner in the picture taking department . So I am favoriting your site so I can learn more. I love the pictures and the idea of low key photography .
My philosophy on life. Make your weakness a strength. And Strengthen your strengths. I will search your site for good cameras for a business person and family man to purchase that are not too expensive. Do you have any recommendations?
I do a lot of photos of my products and just normal fb and social network pictures of me and my family . Thanks
Hi Vertical
Thanks for the comment, I recommend the following post Top canon DSLR Cameras to pick up the one that suits you. I would like to mention that I’m preparing a new post about high key photography, and I’m going to publish it recently. The high key techniques is used in product photography. Hope you the best and big success in your work.
Hey Vertical, I also recommend reading this post from here, if you want a new DSLR on budget
This is a very detailed article, but not too difficult for an amateur like me to follow. I love the photos, by the way. I especially like the black and white with this effect. But I am always more partial to b/w anyway. 🙂
If a person was out and about with just a camera phone, do you think it is possible to capture images similar to these? I realize without proper equipment they would not be as good in quality.
Hi Ruby
Thanks for the comment, I appreciate your saying that the article is easy to understand and follow. The question you had asked whether you can shoot similar photos with a phone camera, the answer is, the low key photography is all about manipulating light and shadows to get the required mode, it is not a question of using high quality camera gear.