


Chromatic aberration is a common optical phenomenon that can affect the quality of your photos. It occurs when light is refracted differently by different wavelengths, resulting in color fringes around the edges of objects. Chromatic aberration can be caused by a variety of factors, including the type of lens you are using, the aperture setting you are using, and the subject matter of your photo.
While chromatic aberration can be corrected in post-processing using software such as Adobe Photoshop or Lightroom, it is best to avoid it altogether if possible.
In this blog post, we will discuss what chromatic aberration is, how to identify it in your photos, and how to reduce or eliminate it. We will also cover some tips for taking photos that are less susceptible to chromatic aberration.
Why Photo Quality Matters
Photos are everywhere these days, from social media to websites to our personal collections. And the quality of our photos can make or break our visual storytelling.
Imagine you’ve captured a breathtaking landscape during a once-in-a-lifetime trip. You want to share the sheer beauty of that moment with your friends and family. However, when you review your photos, you notice something distracting—color fringing or strange color artifacts around high-contrast edges. That’s where chromatic aberration sneaks in, undermining the visual impact of your image.
The Purpose of This Blog Post
So, why are we talking about chromatic aberration? We want to teach you how to overcome this common photography challenge. We believe that all photographers, from beginners to experts, should be able to take pictures that look their best.
Throughout this blog post, we’ll walk you through the causes of chromatic aberration, help you identify it in your photos, explain its detrimental effects on image quality, and provide practical tips for both prevention and correction. By the time you’ve finished reading, you’ll have a clear understanding of chromatic aberration and the confidence to tackle it head-on.
Understanding Chromatic Aberration
In trying to unravel the secrets of photography, it’s essential to start with the basics. One fundamental aspect that can significantly impact your photo quality is chromatic aberration. In this section, we’ll break down what chromatic aberration is, explore its different types, and understand how it can affect the overall quality of your precious shots.
Definition and Explanation of Chromatic Aberration
Let’s begin with the foundation: what exactly is chromatic aberration? At its core, chromatic aberration is an optical phenomenon that occurs when a camera lens fails to focus all colors of light at the same point. As a result, you end up with color fringing or unwanted hues around objects in your photos. It’s like a subtle rainbow of colors appearing where they shouldn’t be.
To put it simply, when you capture an image, the light passing through your camera lens should converge to form a sharp and well-defined image on your camera’s sensor or film. However, due to the nature of different wavelengths of light, they bend differently as they pass through the lens. This bending leads to colors not coming together perfectly, causing the unsightly color fringes known as chromatic aberration.

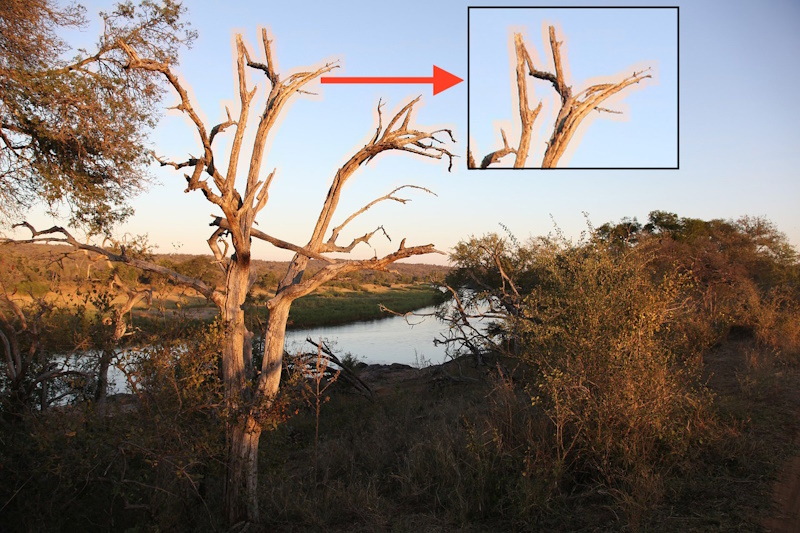
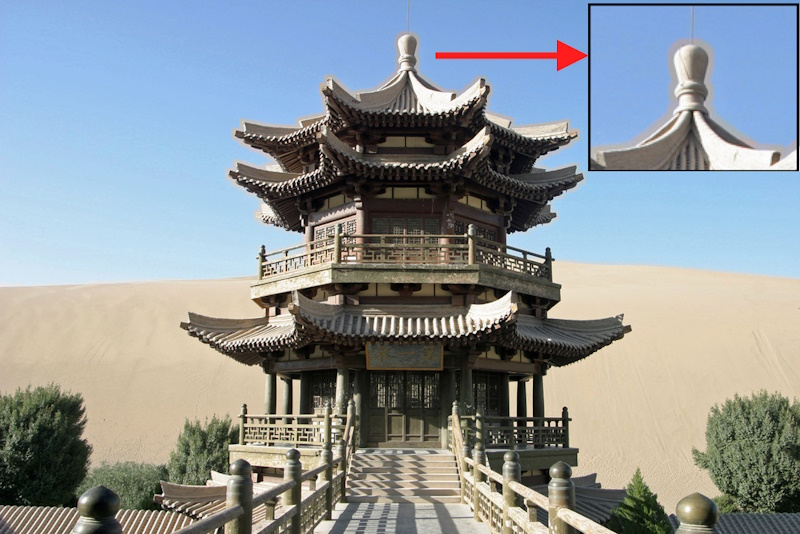
Photo by Depositphotos
Types of Chromatic Aberration
Now that we’ve grasped the concept, let’s explore the two primary types of chromatic aberration:
-
Lateral Chromatic Aberration:
Lateral chromatic aberration (LCA) is a type of chromatic aberration that causes colors to be dispersed or spread out in the lateral direction, meaning that the different colors of light do not all focus at the same point on the image sensor. This can result in colored fringes around the edges of objects, especially high-contrast edges.
LCA is caused by the different wavelengths of light refracting at different angles as they pass through the lens. This is because different wavelengths of light have different optical properties. For example, blue light refracts more than red light. This means that blue light will focus slightly closer to the lens than red light.
-
Longitudinal Chromatic Aberration:
Longitudinal chromatic aberration (LoCA), also known as axial chromatic aberration, is a type of chromatic aberration that causes different wavelengths of light to focus at different distances from the lens. This can result in a loss of sharpness and color fringing in the image, especially in areas that are out of focus.
LoCA is caused by the different wavelengths of light refracting at different angles as they pass through the lens. This is because different wavelengths of light have different optical properties. For example, blue light refracts more than red light. This means that blue light will focus closer to the lens than red light.
LoCA is most pronounced in telephoto lenses, as they have a longer focal length and therefore amplify the difference in focus between different wavelengths of light. It is also more noticeable in lenses with low-quality optical elements.
How Chromatic Aberration Affects Photo Quality
Now that we know what chromatic aberration is and the types it comes in, let’s explore how it can impact the quality of your precious photographs.
- Reduced Sharpness and Clarity: Chromatic aberration can be a silent assassin of image sharpness. Those colored fringes around objects make them appear less crisp and defined. In your quest for a tack-sharp image, chromatic aberration can be a frustrating hurdle.
- Influence on Color Accuracy: If you’re a stickler for color accuracy, chromatic aberration is your nemesis. It distorts colors, often resulting in odd color shifts around the edges of objects. Your beautiful blue sky might have a hint of magenta, and the lush green leaves might show traces of purple.
- How Chromatic Aberration Affects Overall Image Aesthetics: Beyond technicalities, chromatic aberration can negatively impact the overall aesthetics of your photo. Those distracting color fringes can draw the viewer’s eye away from your intended subject, disrupting the visual harmony you aimed to achieve.
Causes of Chromatic Aberration
Now that we’ve understood the basics of chromatic aberration, it’s time to know the reasons why this optical phenomenon occurs. Understanding these causes will not only satisfy your curiosity but also equip you with the knowledge needed to combat chromatic aberration and enhance the quality of your photographs.
1- Optical Factors
A significant portion of chromatic aberration can be attributed to the characteristics of optical components within your camera lens. Let’s explore these optical factors:
- Refraction and Dispersion
When light enters a camera lens, it’s refracted or bent due to the differences in refractive indices for different colors. This phenomenon, known as dispersion, occurs because different colors of light travel at varying speeds through the lens. As a result, they converge at slightly different points on the camera sensor or film. This variance in focal points creates chromatic aberration.
- Lens Design and Quality
The design and quality of your camera lens play a significant role in determining the extent of chromatic aberration in your photos. High-quality lenses are designed to minimize chromatic aberration through careful engineering and the use of specialized lens elements.
One common approach is to use extra-low dispersion (ED) or fluorite lens elements. These elements help in reducing the dispersion of light, ensuring that different colors converge more accurately. Cheaper or older lenses may lack these elements, making them more prone to chromatic aberration.
2- Environmental Factors
While optical factors are at the core of chromatic aberration, environmental conditions can exacerbate this issue. Let’s explore how external factors come into play:
- Temperature and Humidity
Believe it or not, the temperature and humidity levels in your shooting environment can influence chromatic aberration. Extreme temperatures can cause materials within your lens to expand or contract, altering the lens’s optical properties. Similarly, high humidity levels can affect the way light passes through the lens.
For instance, shooting in freezing cold conditions might lead to increased chromatic aberration compared to a balmy summer day. Understanding these environmental influences can help you anticipate and minimize chromatic aberration in your shots.
- Lighting Conditions
The quality and direction of light in your photography setup are crucial factors in determining the presence and severity of chromatic aberration. Bright, harsh lighting conditions, such as direct sunlight on a clear day, can exacerbate chromatic aberration, especially in low-quality lenses.
Conversely, shooting in soft, diffused light or using backlighting techniques can help reduce the prominence of chromatic aberration. Understanding how different lighting conditions interact with your equipment can give you a strategic advantage in capturing high-quality images.
In summary, chromatic aberration is a complex interplay of optical and environmental factors. While some of these factors are inherent to your camera lens, others can be controlled or mitigated through careful shooting techniques and equipment choices.
Identifying Chromatic Aberration
Now that we’ve covered what chromatic aberration is and what causes it, it’s time to roll up our sleeves and learn how to identify this pesky photographic problem. Understanding how to spot chromatic aberration in your photos is the first step towards effectively addressing it and improving your image quality.
1- Visual Signs of Chromatic Aberration in Photos
Chromatically aberrated images often exhibit some distinctive visual signs that are relatively easy to identify once you know what to look for:
- Color Fringing: The most common sign of chromatic aberration is the presence of colorful fringes around the edges of objects in your photos. These fringes can be purple, green, or even blue and typically appear in areas of high contrast, where dark objects meet bright backgrounds.
- Reduced Sharpness: Chromatic aberration can also cause a decrease in overall image sharpness. When the lens fails to bring all colors of light to the same focus point, objects may appear slightly blurred or hazy.
- Color Shifts: Keep an eye out for unexpected color shifts within your images. For instance, a white background might exhibit subtle color variations, or skin tones may appear unnatural due to chromatic aberration.
- Loss of Detail: Fine details in your photos, such as tree branches against the sky or architectural lines, may lose their crispness and clarity due to chromatic aberration.
- Contrast Issues: Chromatic aberration can create contrast problems within your images. It might cause dark objects to appear less distinct against a bright background, robbing your photos of their visual impact.
2- Using Image Editing Software to Pinpoint Chromatic Aberration
Modern image editing software can be your best friend when it comes to identifying chromatic aberration. Here’s how you can use these tools to spot and highlight this issue:
- Zoom In: Open your image in image editing software like Adobe Photoshop or Lightroom and zoom in on areas where you suspect chromatic aberration.
- Use Color Channels: Many image editing software programs allow you to view individual color channels (red, green, blue) separately. Examining these channels can reveal color fringing caused by chromatic aberration.
- Adjust Levels: Experiment with adjusting levels, contrast, and color balance to enhance the visibility of chromatic aberration. You can often make it more apparent by manipulating these settings.
Preventing Chromatic Aberration
Now it’s time to turn our attention to prevention. Just like any challenge in photography, chromatic aberration can be mitigated and even avoided with the right techniques and equipment. In this section, we’ll delve into practical tips for preventing chromatic aberration and ensuring that your photos are free from those pesky color fringes.
Tips for Selecting High-Quality Lenses
The foundation of chromatic aberration prevention lies in the lenses you choose. High-quality lenses are engineered to minimize this optical issue. Here are some tips for selecting the right lenses:
- Invest in Prime Lenses: Prime lenses (fixed focal length) often exhibit less chromatic aberration compared to zoom lenses. They have fewer glass elements, reducing the potential for color fringing.
- Look for ED or APO Lenses: Lenses equipped with Extra-Low Dispersion (ED) or Apochromatic (APO) elements are designed to combat chromatic aberration. These specialized elements help in controlling the dispersion of light.
- Check Lens Reviews: Before making a lens purchase, research reviews and user experiences. Look for lenses with positive feedback regarding their chromatic aberration performance.
- Consider Lens Coatings: Anti-reflective coatings on lens elements can also aid in reducing chromatic aberration. Look for lenses with multiple coatings for improved optical quality.
Techniques for Minimizing Chromatic Aberration During Shooting
While selecting quality lenses and maintaining them properly are essential, there are also shooting techniques that can help minimize chromatic aberration:
- Adjusting Aperture Settings: Chromatic aberration is often more prominent at extreme apertures like wide-open or fully closed. Opt for mid-range apertures (e.g., f/8 to f/11) where lenses tend to perform better in terms of chromatic aberration.
- Using Lens Hoods: Lens hoods aren’t just for blocking stray light; they can also reduce the chances of chromatic aberration. They help prevent light from entering the lens at extreme angles, where chromatic aberration is more likely to occur.
- Avoid Overly Harsh Sunlight: Shooting in direct, harsh sunlight can exacerbate chromatic aberration, especially with low-quality lenses. Opt for diffused or softer lighting conditions when possible.
- Experiment with Backlighting: Backlighting can reduce chromatic aberration because the light source is behind the subject. This reduces the chances of color fringing around objects.
Correcting Chromatic Aberration using post-processing techniques
We’ve covered the ins and outs of chromatic aberration, including its causes and effects on photo quality. Now, it’s time to roll up our sleeves and explore how to correct this optical hiccup using post-processing techniques.
Before we dive into the step-by-step guide, let’s talk about the software you’ll need for effective chromatic aberration correction. There are several powerful image editing programs at your disposal, but some of the most popular ones for this purpose include:
- Adobe Photoshop: Photoshop offers various tools and filters designed specifically for chromatic aberration correction.
- Adobe Lightroom: Lightroom’s lens correction panel includes an option to remove chromatic aberration automatically.
- Capture One: This software provides robust chromatic aberration correction tools, allowing for precise adjustments.
- DxO PhotoLab: DxO’s PRIME denoising technology includes chromatic aberration correction.
- RawTherapee: An open-source option, RawTherapee, offers chromatic aberration correction tools and is entirely free to use.
Now, let’s jump into a step-by-step guide on how to correct chromatic aberration in your photos using Adobe Photoshop as an example.
Step-by-Step Guide to Correcting Chromatic Aberration in Photos
Step 1: Open Your Image
Launch Photoshop and open the image you want to correct for chromatic aberration.

Step 2: Duplicate the Layer
In the Layers panel, right-click on your image layer and select “Duplicate Layer” This step ensures you’re working on a non-destructive copy of your photo.
Step 3: Activate Lens Correction
Go to “Filter” in the top menu, navigate to “Lens Correction,” and select “Custom.”
Step 4: Correct Chromatic Aberration
In the Lens Correction dialog box, go to the “Chromatic Aberration” section.
Step 5: Fine-Tune the Corrections
Use the three sliders to remove the color fringes.

Step 6: Apply the Correction
Once you’re satisfied with the correction, click “OK” to apply the changes.
Step 7: Save Your Image
Remember to save your corrected image separately, preserving the original in case you need it for reference or further adjustments.

Photo by Depositphotos
Common Mistakes to Avoid When Correcting Chromatic Aberration
While correcting chromatic aberration can vastly improve your images, there are common mistakes to watch out for:
- Overcorrection: Avoid overdoing the correction, as this can lead to unnatural-looking results. Keep adjustments subtle.
- Ignoring Other Issues: Don’t focus solely on chromatic aberration. Consider other factors that affect photo quality, such as exposure, composition, and sharpness.
- Not Shooting in RAW: Correcting chromatic aberration is more effective when you shoot in RAW format. RAW files contain more data for post-processing.
- Not Checking at 100% Zoom: To accurately assess chromatic aberration, zoom in on your image to 100% or more. Viewing it at lower zoom levels might not reveal the problem.
By following this step-by-step guide and avoiding common mistakes, you’ll be well on your way to effectively correcting chromatic aberration and enhancing the overall quality of your photos. Remember that practice makes perfect, so keep honing your post-processing skills to achieve the best results. Happy editing!
Conclusion
Chromatic aberration can affect your photos, but now you know how to deal with it. Prevention is key: choose good lenses, take care of them, and use smart shooting techniques. When needed, use software to fix it, but don’t overdo it.
Remember, photography is an art. Consider other factors too, like lighting and composition. With practice, your photos will get better, and chromatic aberration won’t be a problem. Keep taking great shots!
Thanks for reading, I hope you enjoyed the article, if you have any questions just drop them below & I will be happy to answer you.
The featured photo by Depositphotos
If you enjoy the site, don’t forget to subscribe, we will only inform you when a new article is posted.


Hey, I think demystifying chromatic aberration is a gift to every photographer looking to enhance the quality of their photos.
Your article breaks down this optical phenomenon in an easy-to-understand way, providing valuable tips for improving photo quality.
Have you encountered chromatic aberration in your own photography, and if so, do you have any personal tips or experiences to share?
I’m delighted to hear that you found the article helpful! Yes, I’ve certainly encountered chromatic aberration in my own photography. One tip I can offer is to shoot in RAW format, which gives you more flexibility to correct chromatic aberration in post-processing using software like Adobe Photoshop. Additionally, investing in high-quality lenses with elements designed to minimize chromatic aberration can significantly reduce its occurrence. If you have more questions or specific scenarios, feel free to ask – I’m here to help!
I’ve struggled with chromatic aberration but never really understood what it was until now. Your detailed explanation makes it so much easier to grasp. I’m glad to know that it’s not just about the equipment, but also the shooting conditions. Do you have any personal tips for handling chromatic aberration when shooting in challenging outdoor conditions, like bright sunlight with a basic lens?
I’m delighted to hear that the explanation helped you understand chromatic aberration better! When shooting in challenging outdoor conditions like bright sunlight with a basic lens, try to avoid shooting directly into strong sources of light, use a lens hood to reduce stray light, and consider post-processing software to correct chromatic aberration in your images. These tips can help minimize its impact. If you have more questions or need further advice, feel free to ask!