


Blending tools in Photoshop (or blending modes or mixing modes) are used to determine how two layers are blended into each other. The default blend mode in most applications is simply to hide the lower layer with whatever is present in the top layer. However, as each pixel has a numerical representation, a large number of ways to blend two layers is possible.
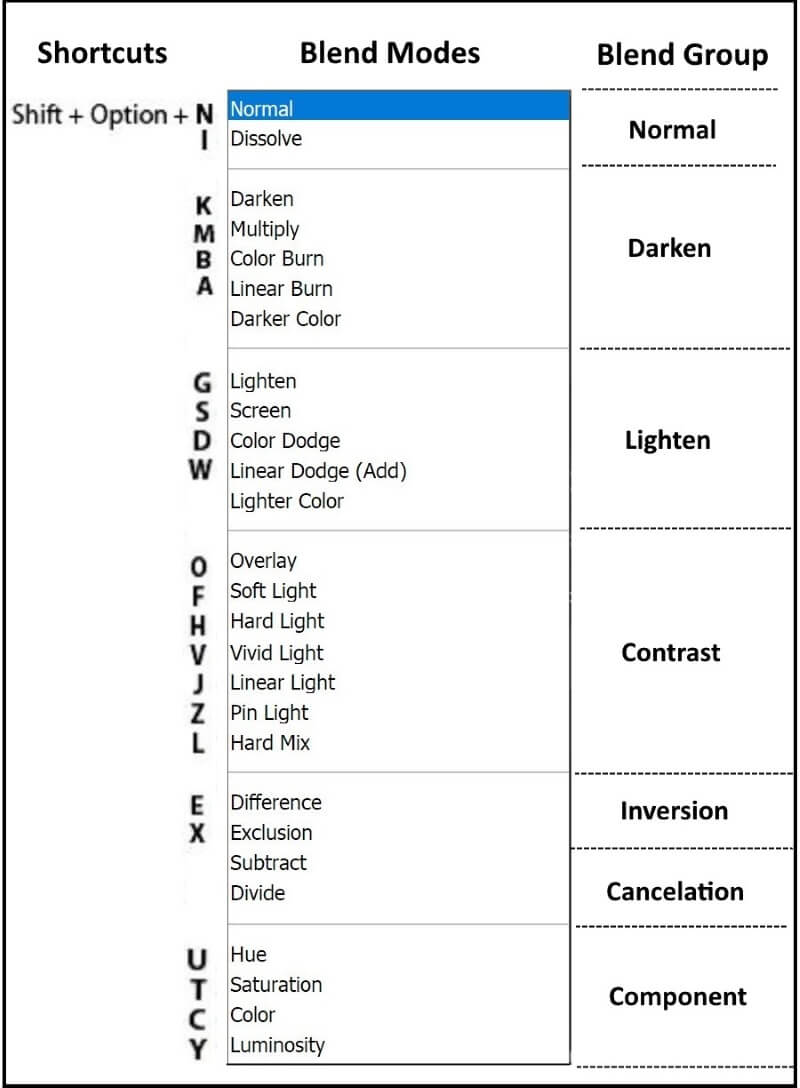
Blending Modes have been added to Photoshop since 1994 when Layers were first introduced in the software. Since that time, Adobe continuously adds more blending modes, currently, there are 27 Blending Modes in Photoshop. 30 Blending Modes if you include the two extra Blending Modes for the painting tools (Behind and Clear) and the extra Blending Mode for groups (Pass-Through).
The purpose of this tutorial is to show you how exactly each of one of the Blending Modes works, so you don’t have to experiment as much.
Terms and Definition
You should remember these three terms to understand how Blending Modes work.
The “Base” color is the original color in the image.
The “Blend” color is the color applied with the painting or editing tool to the Baselayer.
The “Result” color is the color resulting from the blend.
How the Base and the Blend colors mix depends on the algorithm or Blending Mode that you select.
The resulting color equals the blend and base colors according to the applied blending mode.
In Photoshop, and when working with layers, there are two layers:
An image layer with the original base color.
A top blending layer (it can also be referred to as the “blend layer” or “active layer”)

The top layer is not necessarily called a “layer” in the application. It may be applied with a painting or an editing tool.
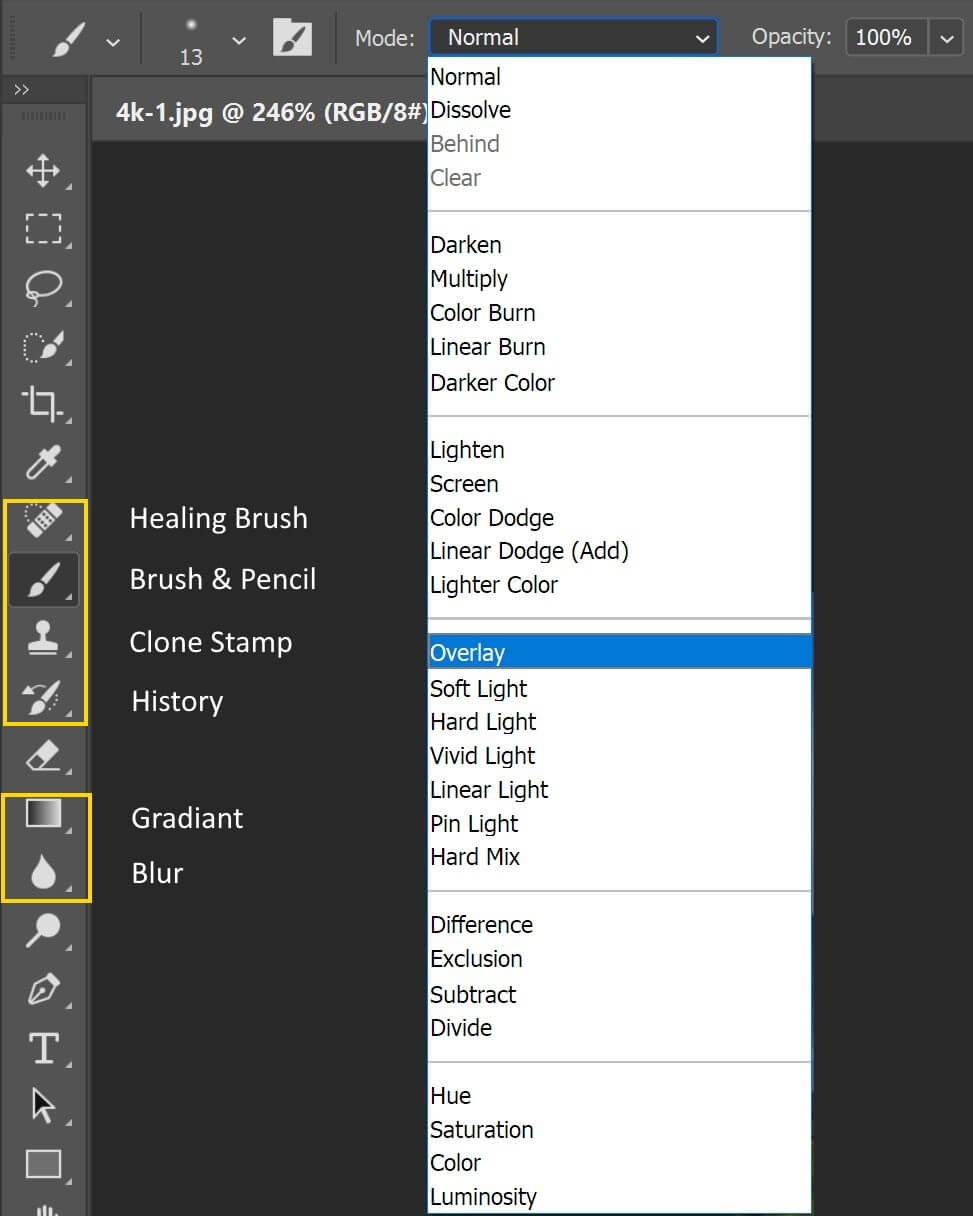
The blending modes are available when you are using one of the editing and painting tools as shown in the below figure. You can change the Blending Mode of a layer by clicking on the drop-down and selecting one from the list. Alternatively, you can use the Photoshop keyboard shortcuts for Blend Modes.
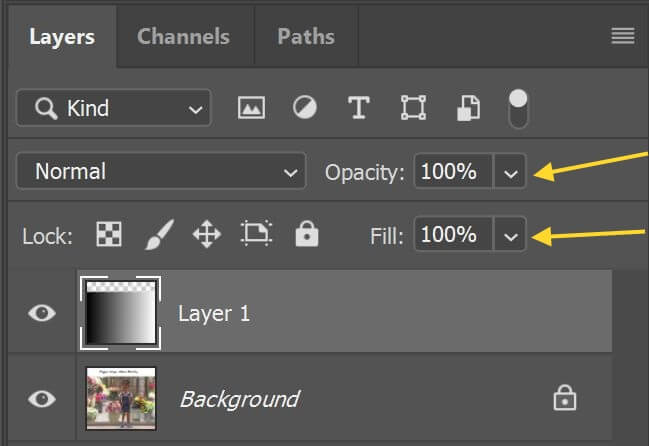
Opacity and Fill option
You can control the strength of the applied blending mode by changing the opacity or fill options. Both the Opacity and Fill options control a layer’s transparency. The main difference between Opacity and Fill has to do with Photoshop’s layer styles. If you haven’t added any effects (styles) to your layer, like a stroke, drop shadow, bevel and emboss or outer glow, you’ll get the same results when lowering either the Opacity or Fill values. If, on the other hand, you do have one or more layer styles applied, Opacity and Fill behave very differently.
The eight Blending Modes that are affected by fill option are Color Burn, Linear Burn, Color Dodge, Linear Dodge (Add), Vivid Light, Linear Light, Hard Mix, and Difference.
Blend Modes Explained
The blending modes are grouped in the following menu:
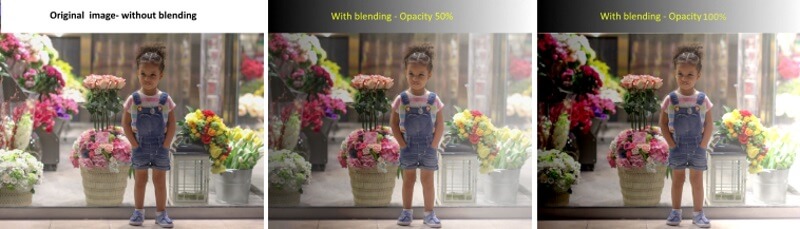
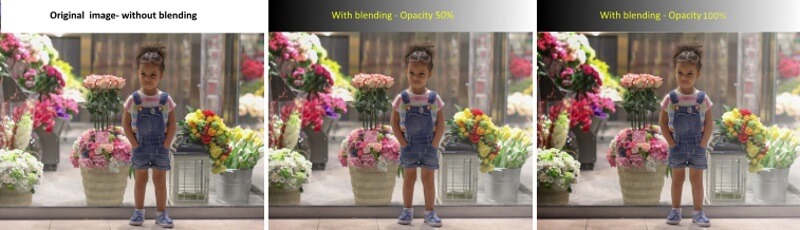
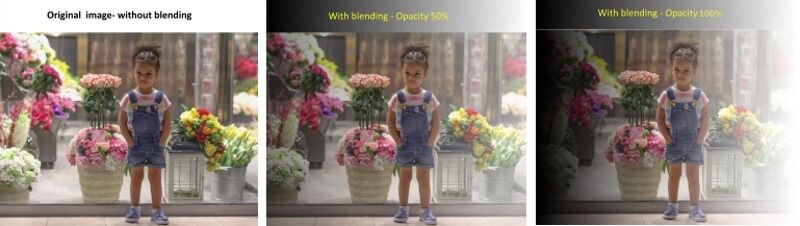
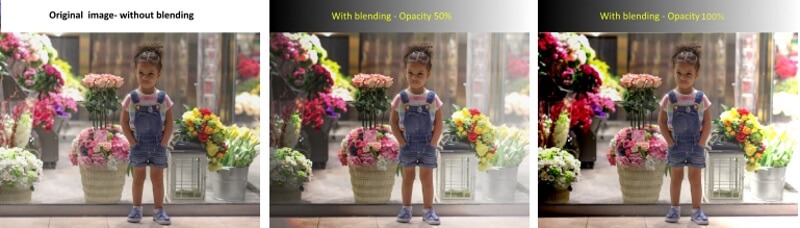
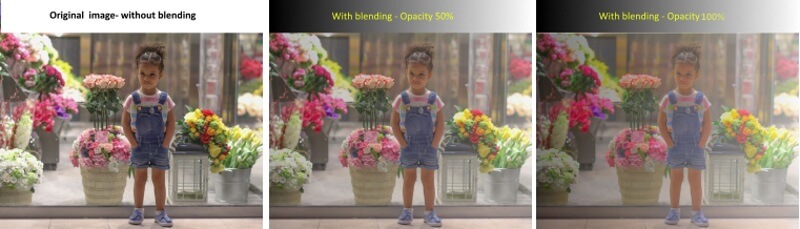
In the below explanation of the blending modes, I use a base photo and a blend layer of a grayscale luminosity to illustrate the effect of the white, grey, and black blending colors on the original photo.
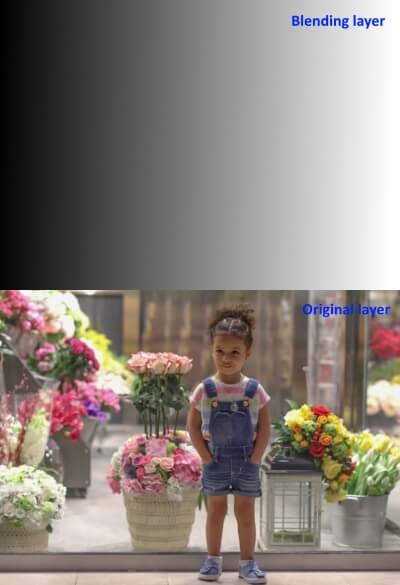
Also, I use an opacity of 50% and 100% for all the blending modes examples. (for the eight special modes, I use a setting of 50% for the fill opacity)
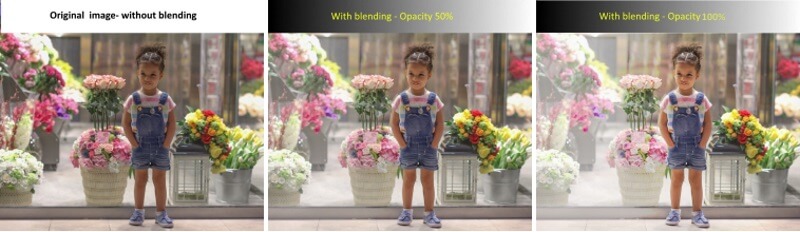
Group 1: Normal
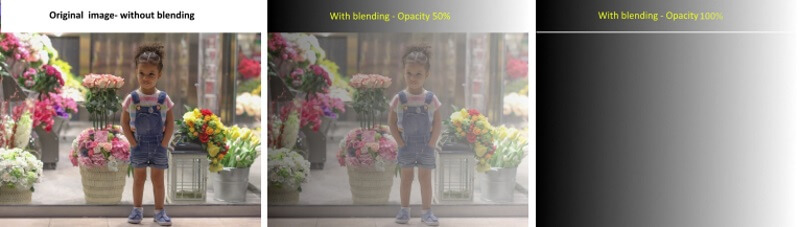
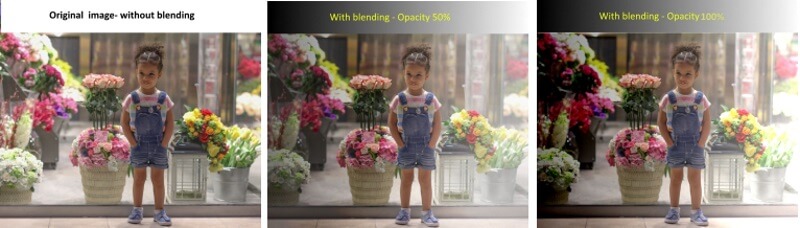
- Normal
Normal is the default Blending Mode for Photoshop layers. Opaque pixels will cover the pixels directly below them without applying any math or algorithm applied to them. This blend mode uses the top layer alone, without mixing its colors with the layer beneath it. You can, of course, reduce the opacity of the layer to reveal the pixels below.
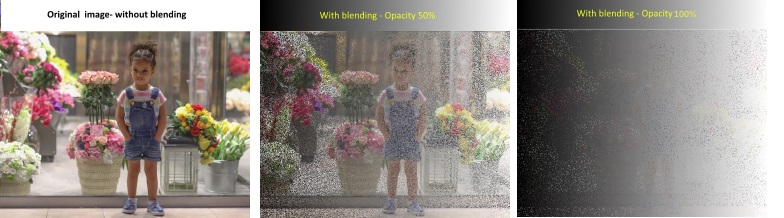
- Dissolve
The Dissolve Blending Mode also does not blend pixels. Dissolve only reveals the pixels below when the Opacity of the layer is reduced. The pixels below are revealed through a dither pattern (noise) whose intensity is based on the Opacity. The dissolve mode takes random pixels from both layers. With high opacity, most pixels are taken from the top layer. With low opacity, most pixels are taken from the bottom layer. No anti-aliasing is used with this blend mode, so the pictures may look grainy and harsh.
Group 2: Darken
The Blending Modes in the Darken category will turn the “Result” colors darker. Anything that is white in the blend layer will become invisible, and anything that is darker than white is going to have some darkening effect on the pixels below it.
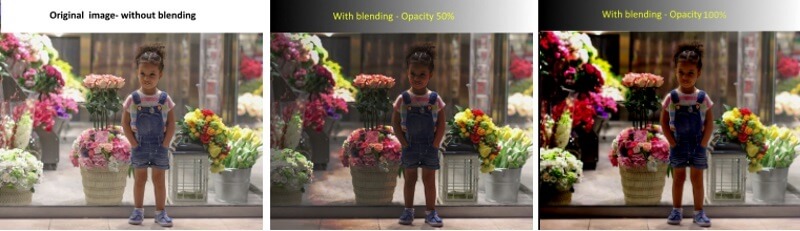
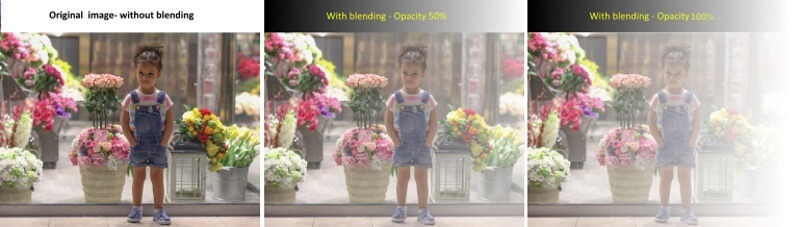
- Darken
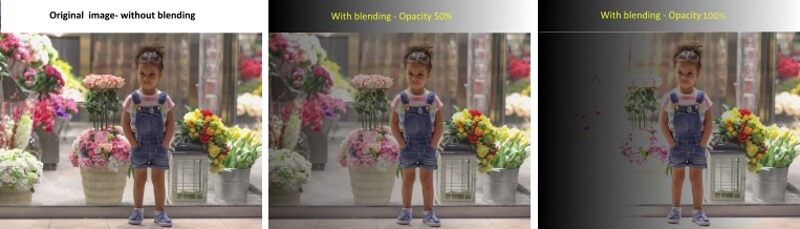
Darken blending mode Looks at the color information in each channel and selects the base or blend color—whichever is darker—as the result color. Pixels lighter than the blend color are replaced, and pixels darker than the blend color do not change.
This Blending Mode does not actually blend pixels, it only compares the base and blends colors, and it keeps the darkest of the two. If the blend layer and the base layer color are the same, then there is no change.
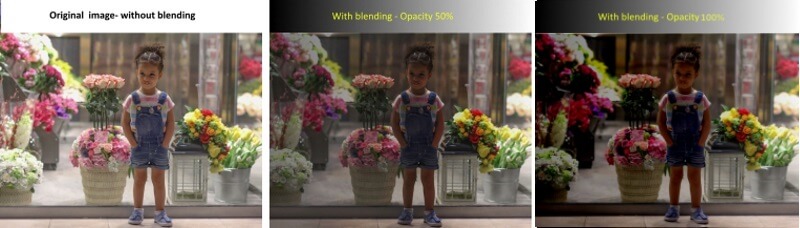
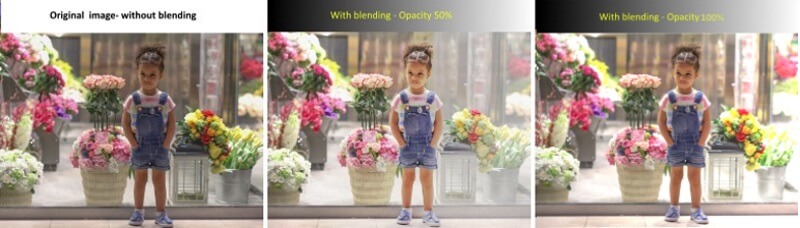
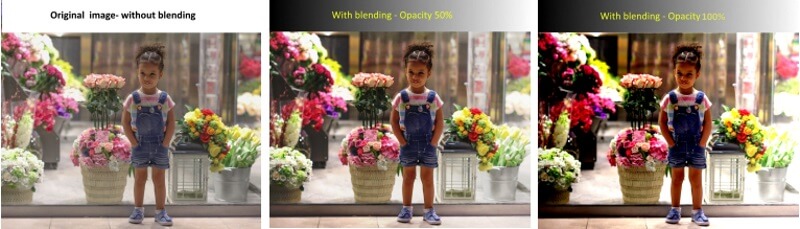
- Multiply
Look at the color information in each channel and multiplies the base color by the blend color. The resulting color is always a darker color. Multiplying any color with black produces black. Multiplying any color with white leaves the color unchanged. When you’re painting with a color other than black or white, successive strokes with a painting tool produce progressively darker colors. The effect is similar to drawing on the image with multiple marking pens.
Multiply mode can produce many different levels of darkening depending on the luminosity values of the blend layer, which makes it a great Blending Mode for darkening images or creating shadows.
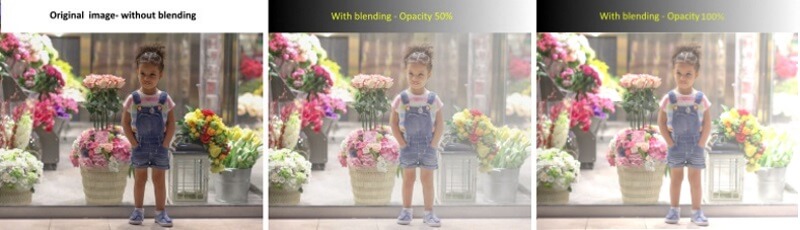
- Color Burn
Color burn mode Looks at the color information in each channel and darkens the base color to reflect the blend color by increasing the contrast between the two. Blending with white produces no change.
The Color Burn Blending Mode gives you a darker result than Multiply blending mode by increasing the contrast between the base and the blend colors resulting in more highly saturated mid-tones and reduced highlights. The result is very similar to the effect you would get when you use the Burn Tool to darken an image.
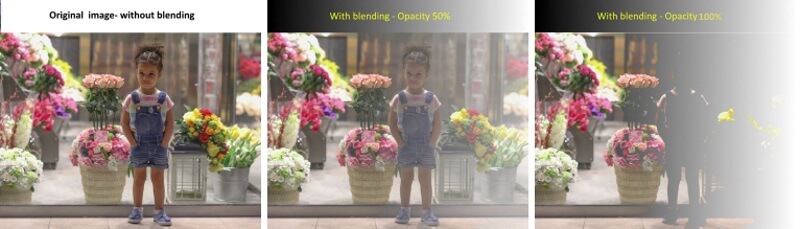
- Linear Burn
Look at the color information in each channel and darken the base color to reflect the blend color by decreasing the brightness. Blending with white produces no change. It has a very pleasing darkened and faded look over the underlying layer while it still retains more contrast than the standard Darken Blend Mode. Darker than Multiply mode, but less saturated than Color Burn mode. This is one of the “Special 8” that I mentioned earlier, where Fill and Opacity behave differently.
- Darker Color
Compares the total of all channel values for the blend and base color and displays the lower value color. Darker Color does not produce a third color, which can result from the Darken blend, because it chooses the lowest channel values from both the base and the blend color to create the result color. The difference is that Darker Color looks at the composite of all the RGB channels, whereas Darken looks at each RGB channel individually to come up with a final blend.
Group 3: Lighten
The Lighten Blending Modes will turn the “Result” colors brighter. Anything that is black in the blend layer will become invisible, and anything that is brighter than black is going to have some darkening effect on the pixels below it.
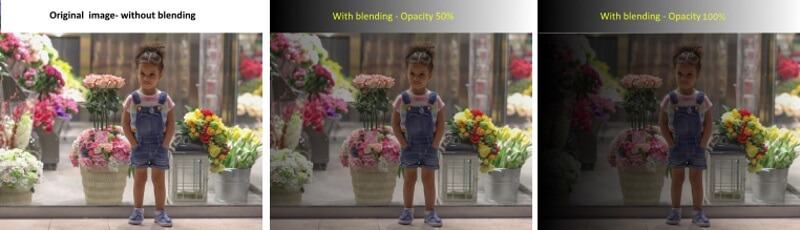
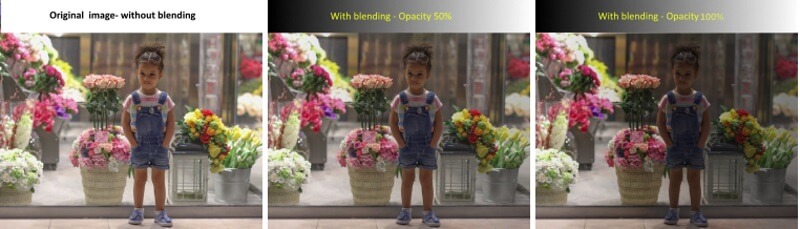
- Lighten
It does the opposite of the Darken blend mode. If the pixels in the layer are darker, they are replaced with the pixels on the layers below. It looks at the color information in each channel and selects the base or blend color—whichever is lighter—as the result color. Pixels darker than the blend color are replaced, and pixels lighter than the blend color do not change. As with the Darken Blending Mode, Lighten looks at the three RGB channels separately when blending the pixels.
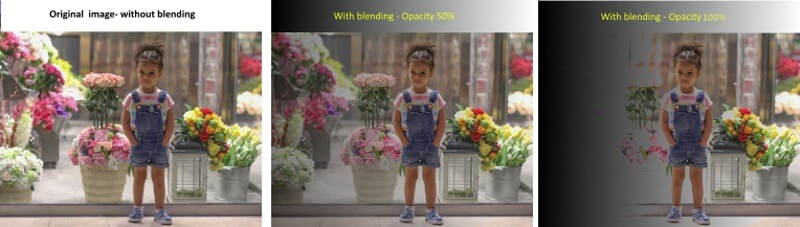
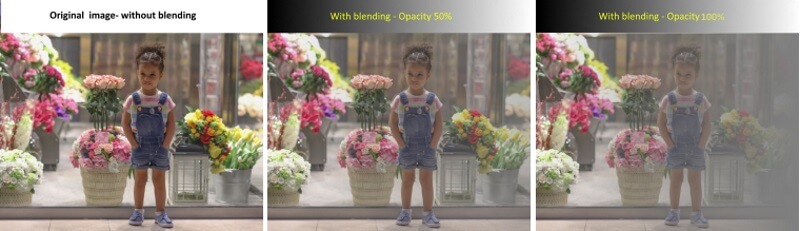
- Screen
It Looks at each channel’s color information and multiplies the inverse of the blend and base colors. The result color is always a lighter color. Screening with black leaves the color unchanged. Screening with white produces white. The screen can produce many different levels of brightening depending on the luminosity values of the blend layer, making Screen, a great Blending Mode for brightening images or creating highlights. It is similar to the Lighten blend mode, but brighter and removes more of the dark pixels, and results in smoother transitions.
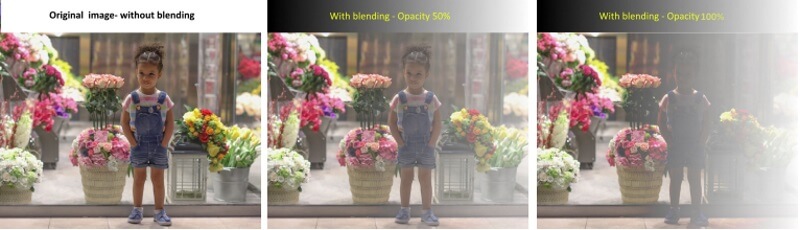
- Color Dodge
Color Dodge is the third of the eight special Blending Modes, which blends differently when fill is adjusted, compared to when Opacity is adjusted. The Color Dodge Blending Mode gives you a brighter effect than Screen by decreasing the contrast between the base and the blend colors, resulting in saturated mid-tones and blown highlights. The effect is very similar to the result you would get when using the Dodge Tool to brighten up an image.
- Linear Dodge (ADD)
It looks at the color information in each channel and brightens the base color to reflect the blend color by increasing the brightness. Blending with black produces no change. Linear Dodge (Add) produces similar but stronger results than Screen or Color Dodge. Linear Dodge (Add) blends differently when Fill Opacity is adjusted, compared to when Opacity is adjusted. This mode “Adds” the luminance levels.
- Lighter Color
It is similar to the Lighten blend mode, but lightens on the composite channel, instead of separate color channels. Compares each pixel and gives you the lighter of the two (and usually results in harsher transitions).
Group 4: Contrast
The Blending Modes in this category are a mixture between the Darken and the Lighten Blending Modes. They create contrast by both lightning and darkening the result colors by using complementary Blending Modes to create the blend.
Photoshop checks to see if the colors are darker than 50% gray or lighter than 50% gray. If the colors are darker than 50% gray, a darkening Blending Mode is applied. If the colors are brighter than 50% gray, a brightening Blending Mode is applied.
- Overlay
This mode is about shifting the mid-tones. Dark blend colors shift the mid-tones to darker colors, light tones shift the mid-tones to brighter colors. It is a combination of Multiply and Screen with the base layer always shining through. Overlay uses the Screen Blending Mode at half strength on colors lighter than 50% gray. And the Multiply Blending Mode at half strength on colors darker than 50% gray. 50% gray itself becomes transparent. Also, note that “half-strength” does not mean, Opacity at 50%.
- Soft Light
It Uses a combination of the Screen blend mode on the lighter pixels, and the Multiply blend mode on the darker pixels (a half-strength application of both modes). Similar to the Overlay blend mode, but results in a more organic effect that are softer—results in somewhat transparent highlights and shadows.
You can think of Soft Light as a softer version of Overlay without the harsh contrast.
- Hard Light
It uses a combination of the Linear Dodge blend mode on the lighter pixels, and the Linear Burn blend mode on the darker pixels. It uses a half-strength application of these modes, and logic similar to the Overlay blend mode, but favors the active layer, as opposed to the underlying layers. The effect is more intense than the Overlay blend mode and results in harsher light. The results with Hard Light tend to be intense. In many cases, you will have to reduce the Opacity to get better results.
- Vivid Light
Vivid Light is the fifth Blending Mode of eight that gives you different results when you reduce the fill compared to opacity.
You can think of Vivid Light as an extreme version of Overlay and Soft Light. Anything darker than 50% gray is darkened, and anything lighter than 50% gray is Lightened. Vivid Light is one of those Blending Modes where you may want to adjust the opacity since 100% opacity is generally too strong.
- Linear Light
Linear Lights blends differently when Fill Opacity is adjusted, compared to when Opacity is adjusted. Linear Light uses a combination of the Linear Dodge Blending on lighter pixels and a Linear Burn on darker pixels. Typically, the resulting colors are extreme, and you may want to use the Opacity or Fill sliders to adjust it.
- Pin Light
It uses a combination of the Lighten blend mode on the lighter pixels, and the Darken blend mode on the darker pixels (a half-strength application of both modes). This is a wild blend mode that can result in patches or blotches (large noise), and it completely removes all mid-tones.

- Hard Mix
This mode is considered another one of the extreme blends modes, but adjusting the Fill Opacity, the effect can be tempered and great results can be attained. It adds the red, green and blue channel values of the blend color to the RGB values of the base color. If the resulting sum for a channel is 255 or greater, it receives a value of 255; if less than 255, a value of 0. Therefore, all blended pixels have red, green, and blue channel values of either 0 or 255. This changes all pixels to primary additive colors (red, green, or blue), white, or black.
Group 5: Inversion
The Inversion Blending Modes look for variations between the base and blend layers to create the blend.
- Difference
It looks at the color information in each channel and subtracts either the blend color from the base color or the base color from the blend color, depending on which has the greater brightness value. Blending with white inverts the base color values; blending with black produces no change.
This blending mode can be extremely useful for aligning layers with similar content. Difference is the eighth and final Blending Mode that react differently when Fill is reduced compared to Opacity. With this blend mode, similar colors cancel each other, and the resulting color is black.

- Exclusion
It creates an effect similar to but lower in contrast than the Difference mode. Blending with white inverts the base color values. Blending with black produces no change.
Group 6: Cancelation
- Subtract
With this blend mode, similar colors cancel each other, and the resulting color is black. It looks at the color information in each channel and subtracts the blend color from the base color. In 8- and 16-bit images, any resulting negative values are clipped to zero.
- Divide
Divide produces the opposite effect as Subtract. White has no effect. Only as the blend values get darker, does the result get brighter. Dark areas of the blend layer produce bright colors, while the light areas of the blend layer produced a very small change.
Group 7: Component
The Component Blending Modes use different combinations of the primary color components (hue, saturation, and brightness) to create the blend.
- Hue
It keeps the Hue of the active layer and blends the luminance and saturation of the underlying layers (you basically get the image from the lower layer with the colors of the top layer).
In other words, it creates a result color with the luminance and saturation of the base color and the hue of the blend color.
- Saturation
It creates a result color with the luminance and hue of the base color and the saturation of the blend color. Painting with this mode in an area with no (0) saturation (gray) causes no change.
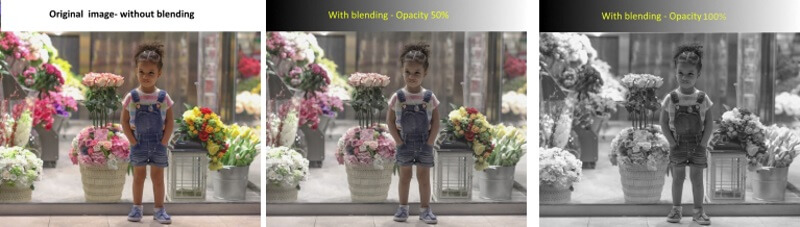
- Color
It creates a result color with the luminance of the base color and the hue and saturation of the blend color. This preserves the gray levels in the image and is useful for coloring monochrome images and for tinting color images.
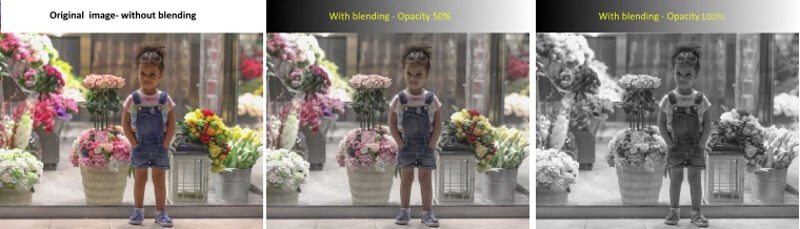
- Luminosity
It creates a result color with the hue and saturation of the base color and the luminance of the blend color. This mode creates the inverse effect of the Color mode.
Are you looking for Photo editing resources or editing Services?
Some photographers are struggling to learn and master editing software like Lightroom or Photoshop, they found the editing process is taking too much of their time. Therefore, assigning the editing tasks to an editing service may be the answer.
On the other hand, some others are looking for editing resources like actions, overlays, and textures to help them. For those I highly recommend paying a visit to my store, it has amazing professional photo editing tools.
In addition, you can check my editing tutorials, there are many tips and tutorials there.
Thanks for reading, I hope you enjoyed the article if you have any questions just post below & I will be happy to answer you.
If you enjoy the site, don’t forget to subscribe, we will only inform you when a new article is posted.


I love Photoshop and I’m learning about it every single day. I’m glad that I found this article because I’m really weak in the blending section and this article has everything I needed to know about Blending Tool .
I learned about the blend modes with different groups and every single of them were explained really good with pictures. It was really easy to understand and follow them.
Thank you so much for sharing this article with us. It is a well written article about Blending Tool In Photoshop.
Thanks for your comment and hope to see you again.