

Studio lighting plays a pivotal role in photography, acting as the unseen magician that shapes the atmosphere, accentuates details, and breathes life into images. The harmonious interplay between light and shadow elevates a simple snapshot into a captivating work of art.
Exciting News! To make learning studio lighting even more engaging, we’ve created a video walkthrough of this guide. Whether you’re just starting or looking to refine your skills, this video provides a concise and visually rich explanation of the concepts covered here. Watch it below for a step-by-step breakdown, helpful visuals, and practical tips to elevate your studio photography game. Don’t forget to like, comment, and subscribe for more photography insights!
TABLE OF CONTENTS
Definition and Importance of Studio Lighting
Considerations When Choosing Studio Lighting
- Continuous Lights (LED Panels, Fluorescent, and Tungsten Lights)
- Flash/Strobe Lights (Speedlite, Strobes)
Key Components of Studio Lighting Setup
Practical Tips for Effective Studio Lighting
Definition and Importance of Studio Lighting in Photography
Studio lighting refers to the intentional use and arrangement of artificial lights within a controlled environment, typically a studio, to illuminate subjects and scenes for photography. It involves skillfully manipulating light sources to achieve desired effects, emphasizing textures, colors, and forms in a way that natural light alone may not accomplish.
Studio lighting is extremely important because it acts as your paintbrush and canvas. It gives you the power to shape and create the visual story you want to tell. With the right lighting setup, you can evoke emotions, mold shapes, and capture the true essence of your subject in ways that even the most skilled photographers may find unexpected.
In this guide to Studio Lighting for Photography, we’ll cover everything you need. From basic setups to advanced techniques, explore the key components and tips for mastering studio lighting. Dive into various styles, avoid common mistakes, and discover how to create stunning photos with our comprehensive advice.
Considerations When Choosing Studio Lighting
Choosing the perfect studio lighting setup is like selecting the right ingredients for a recipe. Each element plays a vital role in shaping the light, setting the mood, and telling your story through every photo. With so many options available, it’s important to consider these bite-sized factors to find the ideal setup for your studio.
-
Budget and Affordability:
Lighting equipment can vary in price, from affordable options to extremely costly ones. It’s important to establish a practical budget before making a decision but keep in mind that the quality is crucial. It’s worth investing in durable gear that will last for a long time. If you’re just starting, it might be wise to rent equipment first before making a significant purchase.
-
Purpose and Photography Style:
Consider the type of photography you’ll primarily undertake. Portrait photography may need softer, diffused light, while product photography might require more controlled, intense lighting.
-
Space and Portability:
What is the size of your studio? If it’s small, portable speedlites may be more suitable. However, if you have a larger space, powerful strobes, and big modifiers can be easily accommodated. Remember to have a designated storage space for your bulky equipment.
-
Lighting Control and Modifiers:
The amount of control needed for lighting varies depending on the specific requirements of a setting. Adjustable settings and compatible modifiers are important for achieving desired lighting effects. Control includes adjusting intensity, color temperature, and shaping and guiding light.
-
Light Source Type:
Decide between continuous lighting and flash/strobe lights. Continuous lighting offers real-time visibility, while flashlights freeze action effectively.
-
Compatibility and Expandability:
Ensure compatibility with existing equipment. Look for systems that allow for expansion or integration with other accessories as your skills grow.
Basics of Studio Lighting
When diving into the basics of studio lighting for photography, understanding light sources is fundamental. Let’s shed some light on this crucial aspect.
Light sources are the heart of any studio setup. They dictate the quality, intensity, and direction of light falling on your subject. Here are the primary types:
1- Natural Light:
While not a studio-generated source, natural light plays a significant role. Utilizing windows or skylights can offer beautiful, diffused lighting for your shots.
2- Artificial Light:
Artificial light is categorized into different types, primarily based on duration. It can either be continuous or flash lighting. Moreover, each type has its own set of options. If you require assistance in understanding their features to make an informed decision about purchasing lighting equipment, let’s explore each of them together.
I. Continuous Lights:
Continuous lighting allows photographers to instantly see and modify the lighting arrangement, making it easier to achieve the desired effects. Moreover, it is particularly beneficial for beginners as it helps them comprehend how light interacts with the subject. They come in various forms:
1. LED Panels:
These are versatile, offering adjustable brightness and color temperature. LED panels provide soft, even illumination, making them suitable for various photographic needs.
LED lighting finds versatile applications in photography. Its adjustable brightness and color temperature make it ideal for portrait, product, and studio photography. Moreover, it’s favored for video shoots due to its consistent, controllable illumination.
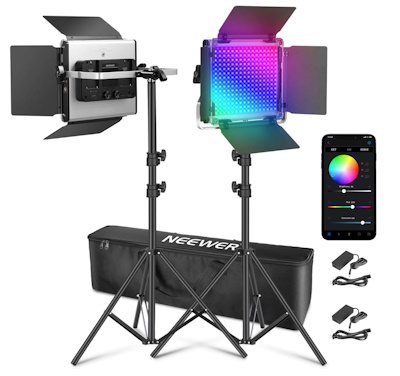
NEEWER Upgraded 660 PRO II RGB LED Video Light
2. Fluorescent Lights:
Known for their energy efficiency and cooler operating temperatures, fluorescent lights produce a diffused, broad light, ideal for reducing harsh shadows. It is often used in portraits, product shoots, and video shoots.
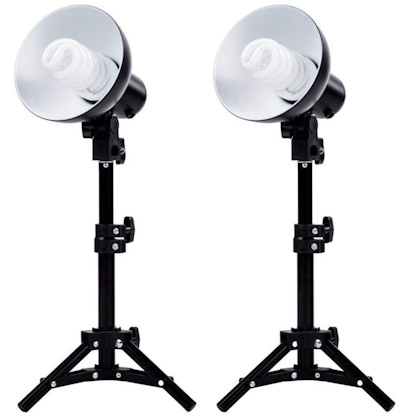
Fovitec 2-Light Table Top Fluorescent Lighting Kit
3. Tungsten Lights:
Tungsten lights emit warm, natural hues, making them popular for creating cozy, intimate atmospheres in photography. They’re commonly used for cinematic lighting setups and scenarios where a traditional, classic feel is desired. However, they tend to generate heat and consume more power compared to other options.
4. Halogen Lights: Halogen lights are prized for their high-intensity illumination, often employed in professional settings. They’re ideal for highlighting specific subjects or creating dramatic lighting effects in photography and film production due to their focused beam and intense output.
Comparison Table
The following comparison table provides an overview of the key characteristics of each type of continuous lighting, enabling photographers to make informed decisions based on their specific requirements and preferences.
| Feature | LED | Fluorescent | Tungsten | Halogen |
|---|---|---|---|---|
| Image Quality | Excellent color rendering and consistency, minimal color shift. | Good color rendering, but may have slight green or magenta cast. | Excellent color rendering with warm, flattering tones. | Good color rendering, similar to tungsten but brighter. |
| Color Temperature | Adjustable in a wide range (2700K-5600K). | Fixed color temperature depending on the bulb type (typically 3000K-6500K). | Warm color temperature (3000K-3200K). | Warm color temperature (3000K-3400K). |
| Brightness | Very high light output for the energy used. | High light output, but less efficient than LEDs. | Moderate light output, requires higher wattage bulbs for studio use. | High light output, brighter than tungsten. |
| Dimming | Most LEDs are dimmable. | Not all fluorescents are dimmable, depends on the ballast. | Not dimmable. | Most halogens are dimmable. |
| Energy Efficiency | Most efficient option, long lifespan (25,000+ hours). | Efficient compared to tungsten, moderate lifespan (10,000-20,000 hours). | Least efficient, shortest lifespan (1,000-2,000 hours). | Moderately efficient, longer lifespan than tungsten (2,000-5,000 hours). |
| Heat | Minimal heat generation. | Generates some heat. | Generates significant heat. | Generates significant heat. |
| Noise | No noise. | May have slight hum depending on the ballast. | No noise. | No noise. |
| Cost | Higher initial cost, but lower operating cost due to energy efficiency and long lifespan. | Moderate initial cost, moderate operating cost. | Low initial cost, but high operating cost due to inefficiency and short lifespan. | Moderate initial cost, moderate operating cost. |
Ultimately, the best light source for your photography studio depends on your specific needs and budget. If you prioritize color accuracy, efficiency, and long lifespan, LEDs are a great choice. If you’re on a tighter budget and prefer the classic warm tones of tungsten or halogen, consider those options. Fluorescent lights offer a good balance of affordability and performance, but may not be ideal for video due to potential flickering.
II. Flash/Strobe Lights:
These emit powerful bursts of light, ideal for freezing action and providing ample light for capturing detailed shots. They’re often used in professional photography setups. There are two main categories:
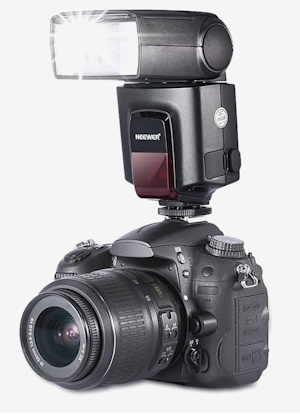
1. Speedlite
Studio photography often brings to mind the idea of large lamps and complex setups. However, there is a way to achieve professional-looking results without all the bulk. Introducing the speedlite, a portable and versatile lighting option that can be your secret weapon in the studio!
So, what exactly is a speedlite? Think of it as a smaller and more agile version of your camera’s built-in flash. Speedlites are capable of emitting bursts of light that can freeze action, enhance shadows, and bring a touch of drama to your portraits. The best part is that they are battery-powered, allowing you to be free from tangled cords and the limitations of a traditional studio setup.
But what makes speedlites special? Let’s dive into their key features:
- Lightweight and compact: Speedlites are small and easy to carry in your camera bag. Perfect for shooting on location or in tight studio spaces.
- Unleash your creativity: With manual power control, you can adjust the light intensity for dramatic or subtle effects. You can also remotely trigger them for wireless control over your lighting setup.
- Shape the light: Most speedlites come with a diffuser to soften shadows. You can also use barn doors and gels to further shape the light, creating spotlights or adding colorful accents.
- Fast and reliable: Whether you need to freeze a dancer’s leap or capture a fleeting expression, speedlites offer rapid flash durations, ensuring you never miss a moment.
Of course, no superhero is without flaws. Here’s a peek at the cons of speedlites:
- Limited Light Output: Compared to studio strobes, speedlites have lower power. This might not be ideal for large groups or expansive setups.
- Battery Drain: The convenience of battery power comes at a cost. Be prepared to swap batteries frequently for extended shoots.
- Learning Curve: Mastering manual controls and light modifiers takes practice and experimentation. But hey, the rewards are worth it!
2. Strobe
Studio photography requires precision, control, and creative freedom. Studio strobes are the ultimate lighting tool, offering unmatched intensity and versatility. Unlike your camera’s small flash, these strobes are like rockstars, capable of freezing action, creating dramatic shadows, and illuminating scenes with brilliance.
But what exactly is a strobe?
It’s a powerful flash unit connected to a power source. When triggered, it emits a burst of bright light, much stronger and faster than your camera’s built-in flash. This allows you to capture even the fastest movements, such as a gymnast in mid-air or a splashing water droplet.

Neewer Vision 4 300W Outdoor Studio Flash Strobe
But strobes offer more than just raw power. They provide a range of features that allow you to shape and control your light like a skilled artist:
- Adjustable Power: Modify the intensity of the light to create striking spotlights or subtle background fills.
- Quick Flash Durations: Capture fast-moving action with rapid flashes, ensuring you never miss a crucial moment.
- Modeling Lights: Certain strobes come with built-in continuous lights, allowing you to compose your shot and focus precisely.
- Wireless Triggering: Take control of your strobes wirelessly, granting you unlimited creative freedom and precise positioning.
- Light Modifiers: Attach barn doors, softboxes, and other accessories to shape the light, soften harsh shadows, and produce stunning effects.
Strobes have their unique characteristics:
- They are larger and bulkier compared to Speedlites, requiring dedicated stands and careful setup.
- There is a higher learning curve involved in mastering manual controls and modifiers, which requires dedication and practice.
- Strobes require a power source, so make sure you are prepared with outlets or portable generators.
The following table provides a comparison between Speedlite and strobe
| Feature | Speedlite | Strobe | ||
|---|---|---|---|---|
| Portability | Lightweight and compact - fits easily in your camera bag. Ideal for on-location shoots or tight studio spaces. | Bulkier and heavier - requires dedicated stands and careful setup. Less mobile than speedlites. | ||
| Power Output | Lower power compared to strobes. May not be ideal for large groups or expansive setups. | High-powered bursts of light - perfect for freezing action, sculpting shadows, and creating dramatic effects. | ||
| Control | Manual power control allows adjusting light intensity for creative effects. | Offers precise control over power, flash duration, and modeling lights. | ||
| Light Modifiers | Compatible with basic modifiers like diffusers and barn doors. | Wider range of compatibility with light modifiers for shaping and sculpting light in diverse ways. | ||
| Cost | More affordable - a budget-friendly option for beginners. | Higher cost - an investment for serious photographers seeking professional-grade results. | ||
| Learning Curve | Relatively easier to learn and use. | Requires practice and dedication to master manual controls and modifiers. |
3. Pack and Head Strobes
Pack and head strobes are powerful tools used in photography. They consist of a high-voltage power pack connected to a separate flash head. This combination produces intense bursts of light that surpass the capabilities of speedlites and single-unit strobes. They can freeze the wings of a hummingbird or shape light like an experienced sculptor.

However, their power is not their only advantage. Pack and head strobes also come with a range of features that enhance your creativity:
- Unrelenting Power: These strobes offer adjustable power outputs, allowing you to tackle any lighting challenge, from close-up shots of products to large group photos.
- Precision Control: You have precise control over flash duration, color temperature, and modeling lights. This means you can say goodbye to harsh shadows and welcome nuanced illumination.
- Maximum Flexibility: You can mix and match flash heads with different powers and configurations to customize your lighting setup according to your vision. This opens up possibilities for spotlights, softboxes, and various light-shaping techniques.
- Remote Triggering: With wireless triggering, you can unleash your creative freedom and move your flash heads around like magic wands.
- Built to Last: These strobes are built to be durable and reliable, capable of handling even the most demanding photoshoots.
Get the scoop on the downsides:
- Big and Bulky: These champions are not your small and light friends. You’ll need sturdy stands and handle them with care.
- Expensive Investment: Buying a pack and head strobe system will cost you a lot of money.
- Challenging to Learn: It takes time and practice to become skilled at using manual controls and shaping light.

Key Components of Studio Lighting Setup
1- Light Modifiers
Studio lighting is crucial for photographers to capture amazing portraits, product shots, and editorial images. However, simply using a flash is not enough. Light modifiers are the secret tools photographers use to manipulate light in different ways. They can transform harsh light into soft, diffused light or sharp, dramatic beams. Light modifiers come in different shapes and sizes, each with its own effect on the final image.
-
Softboxes
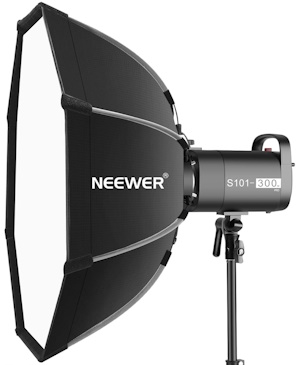
Softboxes are the gentle giants of light modifiers. They provide soft and even lighting, like wrapping your subject in a cocoon of diffused light. With softboxes, you can eliminate harsh shadows and achieve natural-looking illumination. They are perfect for portraits, beauty shots, and product close-ups.
-
Stripbox
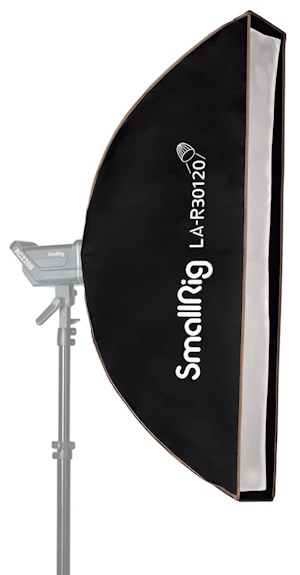
A strip box is a slim and rectangular softbox that is perfect for capturing long and narrow beams of continuous light. Additionally, when positioned behind a portrait subject, it can create beautiful rim lighting. The narrow beam of light allows for precise control over the lighting placement.
-
Reflective Umbrella
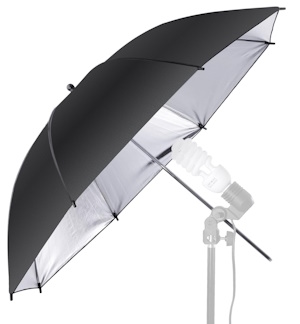
An umbrella is another common modifier. It doesn’t always produce the best studio lighting results compared to other modifiers. They come in silver or white.
The light is shot into the umbrella to reflect it into the scene. This helps you create a larger and, thus, softer light source.
The problem with umbrella lighting is that the light tends to spill. So umbrellas can be harder to work with.
-
Shoot Through Umbrella
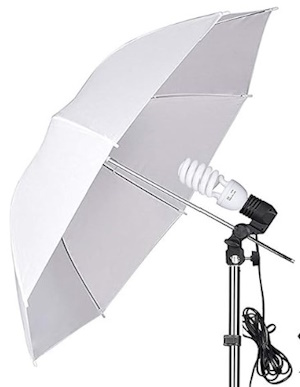
A translucent shoot-through umbrella is used to create softer light. However, it does not provide the same directional control as a regular umbrella.
Certain shoot-through umbrellas function similarly to a softbox. This type of umbrella is favored by renowned portrait photographers, however, it may result in flat lighting for other subjects such as food or products.
-
Beauty dish
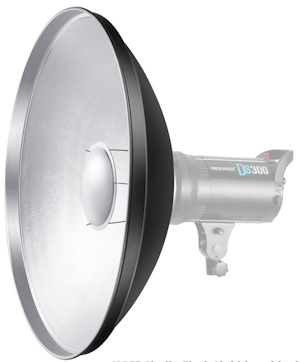
The beauty dish is a fantastic tool for portrait, beauty, and fashion photography. It allows you to shape facial features and produce stunning catchlights. Additionally, its distinctive shape ensures that light is evenly distributed from all directions.
-
Grids
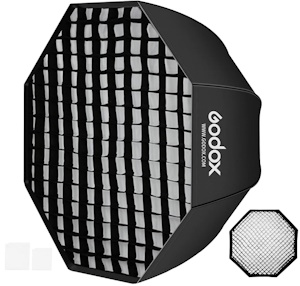
Grids are available in various sizes and shapes. They can be combined with other modifiers to produce lighting with a greater contrast.
Certain grids are made of a rigid material and can be attached to a dish reflector or beauty dish. Alternatively, there are soft grids that can be attached to the front of a softbox or stripbox. The main purpose of a grid is to enhance contrast, control the quality of light, and determine the coverage area.
-
Gels
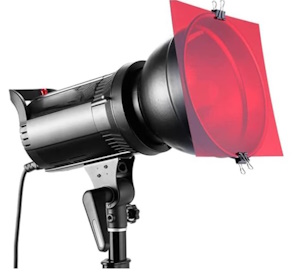
Gels are an affordable and convenient solution for adjusting color in challenging lighting conditions during photography.
For instance, if you are using lights with different color temperatures, you can harmonize them by applying the suitable gel color on your modifier.
Moreover, gels offer creative possibilities. They can add a subtle tint to your images without giving the impression of using a filter.
-
Reflector
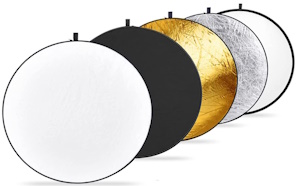
Reflectors come in different shapes and sizes, made of silver or gold. They are used to manipulate the shadows in a scene.
The gold reflector adds a touch of warmth to the scene, while the silver reflector creates a brighter effect compared to a white bounce card.
You can position the reflector opposite the light source to bounce some additional light onto your subject. It can also be placed on the lap of a person being photographed to soften the shadows under their eyes and chin.
-
Snoot
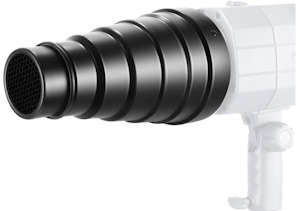
A snoot is a unique tool that helps you create a concentrated beam of light. It comes in handy for tabletop photography, especially when you need to illuminate a specific area. For instance, you can use it to add a background glow or highlight the delicious filling of a burger.
2- Lighting Stands and Supports
Stands and supports are often underappreciated workhorses play a vital role in keeping your lights shining bright and your shots picture-perfect. From towering giants to tabletop tripods, the right stand ensures stable positioning, precise control, and the freedom to bring your vision to life. So, let’s dive into the fascinating world of lighting stands and supports!
-
C-Stands

These robust metal titans are your go-to for heavy-duty lighting setups. Built like tanks, they handle strobes, large softboxes, and other pro gear with unwavering stability. Think studio portraits with massive light modifiers, high-impact fashion shoots, and intricate product setups.
-
Boom Stands:
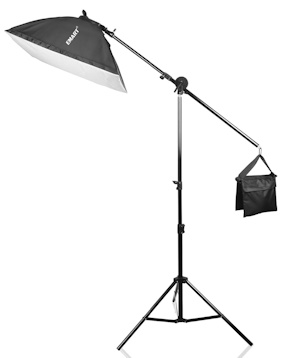
Need to extend your reach or create overhead lighting effects? Enter the boom stand! With their telescoping arms and adjustable counterweights, they let you position your lights at impossible angles, adding drama and dimension to your shots. Think overhead lighting for dramatic portraits, spotlighting for product close-ups, and creative light sculpting in any situation.
- Light Stands
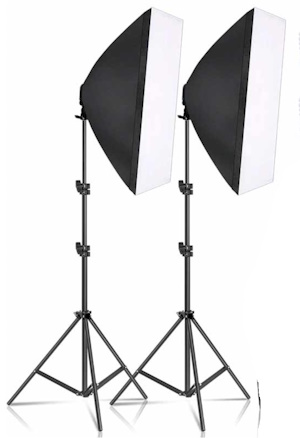
These versatile workhorses handle smaller flashes, umbrellas, and softboxes with ease. They often come in adjustable heights and collapsible designs, making them perfect for portable setups and on-location shoots. Think travel photography, quick portraits, and product shots where space is limited.
Beyond the stand itself, consider these supporting players:
- Sandbags: Add stability to your C-stands and boom stands with hefty sandbags. These unsung heroes counterbalance heavy equipment and prevent toppling disasters, especially when shooting outdoors in windy conditions.
- Clamps: These versatile tools attach reflectors, flags, and other accessories to your stands, expanding your light sculpting possibilities. Think barn doors for precise light control, gels for creative color effects, and flags for eliminating unwanted spill light.
Choosing the right stand depends on several factors:
- Weight of your equipment: Match the stand’s capacity to the weight of your lights and modifiers. Don’t tempt fate with a flimsy light stand holding a heavy strobe!
- Height needs: Consider the desired height of your lights and choose a stand with an adjustable range that reaches your vision.
- Portability: If you move your setup around often, opt for lightweight and collapsible stands.
- Budget: Stands range in price, so choose one that fits your needs and budget without compromising safety or stability.
3- Light Meters
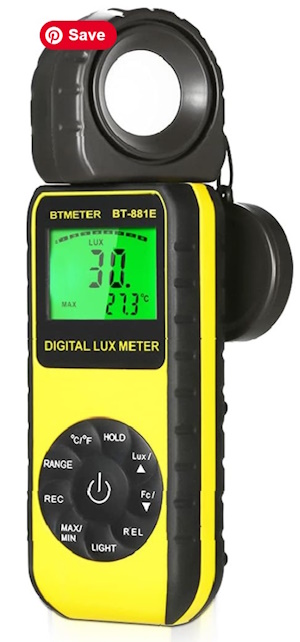
BTMETER BT-881E Digital Illuminance/Light Meter
No more guessing: Light meters show you the way to perfect photos!
Have you ever taken a photo only to realize it’s too dark or overexposed? Don’t worry, you’re not alone! Achieving the right exposure, especially in challenging lighting conditions, can be difficult. But don’t worry, adventurers, there’s a secret weapon in your photography toolkit: the light meter.
Think of it as your reliable companion, telling you exactly how much light your scene needs for a beautifully exposed shot. Whether you’re an experienced professional or a curious beginner, a light meter can be your guide to achieving photographic perfection.
For more information about light meters check: Photography Light Meter – Camera Metering Vs Handheld Metering
Studio Lighting Techniques
Studio lighting is like the secret ingredient that turns regular portraits into amazing works of art. But with all the different lights and tools, it can be overwhelming to know where to start. Don’t worry though, we’re here to help you navigate the world of studio lighting techniques and become a pro!
1. Three-Point Lighting Setup: Your Classic Trio
Think of this as the lighting version of the Three Musketeers – a versatile and dependable foundation for most portrait setups. Imagine three lights surrounding your subject as shown below:
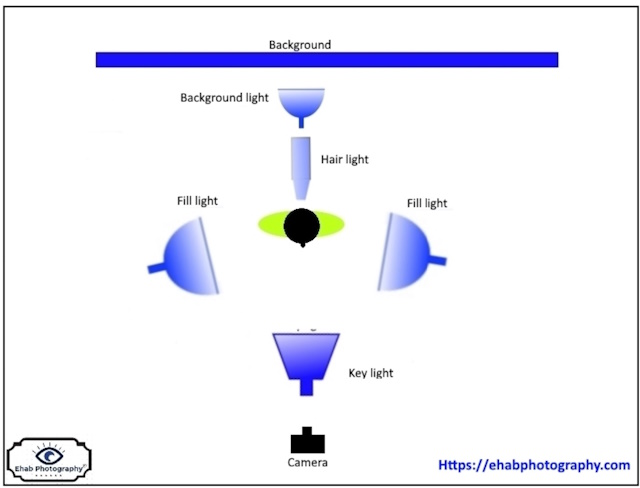
- Key Light: The main spotlight that illuminates your subject and determines the overall exposure. Place it slightly to the side and above for a natural look. A. Three-Point Lighting Setup
- The fill light: helps to soften shadows and enhance the details on the shaded side of your subject’s face. It is usually placed opposite the key light but at a lower power setting.
- Backlighting: Creates a distinction between your subject and the background, giving it a three-dimensional effect. Place it at the back and slightly above your subject, using gels or modifiers to adjust its influence.
2. High Key vs. Low Key Lighting
Consider the contrast between dramatic and delicate. High-key lighting floods your scene with a vibrant, uniform glow, resulting in a fresh and spacious ambiance. It works wonders for showcasing products, fashion photography, and minimalist portraits. Utilize white backgrounds, softboxes, and ample reflectors to achieve this effect.
In contrast, low-key lighting embraces shadows, producing a mysterious and moody atmosphere. Think of portraits with strong contrasts, well-defined shadows, and a hint of intrigue. Employ dark backgrounds, spotlights with snoots, and minimal fill light to master this technique.
3. Rembrandt, Split, and Butterfly Lighting Styles
These methods surpass simple setups and enhance the personality and narrative in your portraits:
-
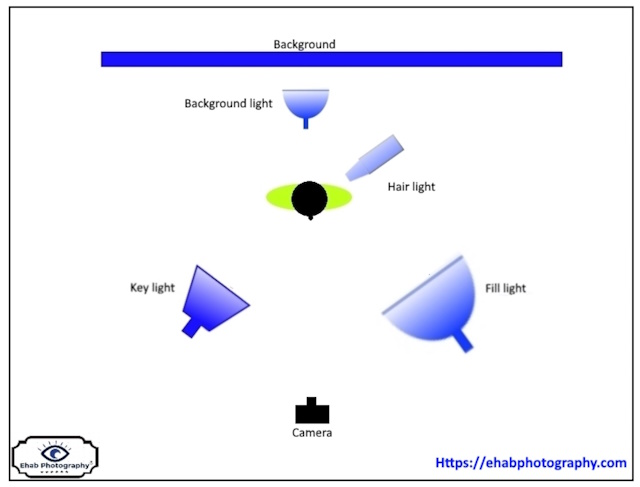
Rembrandt Lighting:
The Rembrandt style is known for having a small triangle of light on the cheek opposite to the flash. This lighting creates a dramatic effect and is often used with a weak fill light to enhance the shadow-side highlight.
-
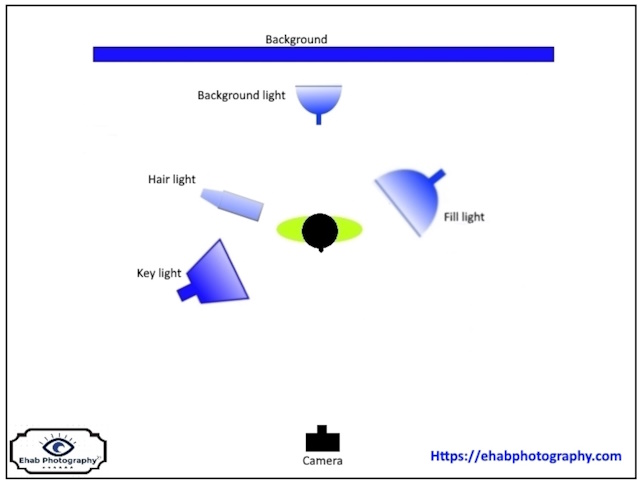
Split Lighting:
it creates a dramatic effect by illuminating one side of the face while leaving the other side in shadow. This technique is perfect for capturing expressive portraits with a touch of tension. The setting is shown below:
-
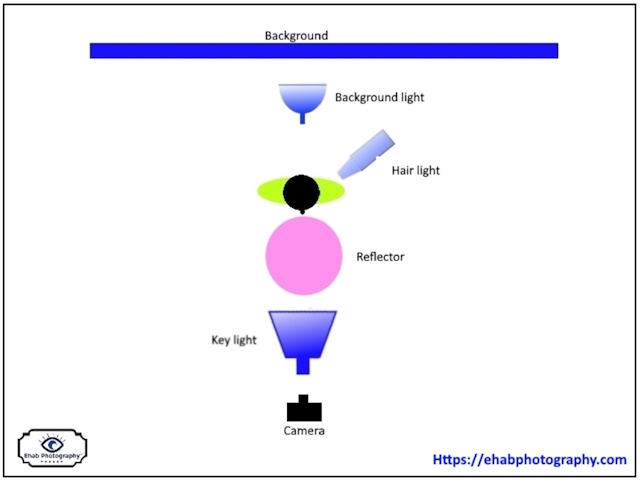
Butterfly Lighting:
Soft light shines on the face from the front, producing a gentle and attractive effect with few shadows. Ideal for capturing beauty shots and delicate portraits. The setting is shown below:
Remember, these are just the starting points! Experiment, combine techniques, and play with light modifiers to find your own unique voice. Mastering studio lighting is a journey, not a destination, so grab your camera, unleash your creativity, and paint your vision with light!
Practical Tips for Effective Studio Lighting
- Understanding Ratios: Light ratios determine the balance between the main light and fill light. A higher ratio creates more contrast, while a lower ratio results in a softer, more even look.
- Adjusting Intensity: Control the intensity of each light source to achieve the desired effect. Dimming or increasing the power alters the highlights, shadows, and overall mood of your image.
- Use of Light Modifiers: Employ modifiers like softboxes or reflectors to manipulate light intensity and ratios. Soften harsh lights or bounce and redirect them to control contrasts.
- Experimentation: Practice with different ratios to understand their impact on your subjects. Play with light angles and distances to create varied effects.
- Metering Techniques: Utilize light meters to measure and manage light ratios accurately. This ensures consistent and desired lighting effects.
- Balancing Multiple Lights: When using multiple light sources, maintain a balance in their intensities to avoid overexposed or underexposed areas.
- Test Shots: Take test shots to assess the effects of your lighting setup. Adjust light ratios and intensities based on the results until you achieve the desired look.
- Understanding Light’s Influence: Light shapes the mood and atmosphere of a photo. Soft, diffused light creates a serene mood, while harsh light adds drama.
- Use of Warm and Cool Tones: Warm tones evoke coziness and intimacy, while cool tones create a sense of calmness or detachment. Choose colors to match the desired mood.
- Play with Shadows: Manipulate shadows to add depth and mystery to your images. Controlling shadows influences the emotional response to the photograph.
- Direction and Angle of Light: Experiment with light placement to create different effects. Side lighting adds depth, while backlighting creates silhouettes for a moody vibe.
- Layering Light: Combine different light sources and intensities to add complexity and depth to your images. Layering light can create a more immersive atmosphere.
- Gels and Filters: Incorporate colored gels or filters over lights to add unique tones or accents, enhancing the mood and ambiance of the scene.
- Consider the Subject: Tailor the lighting to suit the subject and narrative. The same lighting setup can evoke different moods based on the subject’s context.
- Embrace Shadows: Shadows add depth and mystery. Experiment with their interplay to influence the emotional response to your images.
Conclusion
Mastering studio lighting is an art. Understanding its principles and techniques empowers photographers to create captivating images. Experimentation, practice, and attention to detail are key. By harnessing light’s power, you can shape mood, evoke emotions, and tell compelling visual stories through your photography. Keep exploring, learning, and refining your skills to elevate your craft and create stunning photographs.
Related posts
What Are The Different Types Of Light In Photography?
Photography Lighting Techniques – Portrait Lighting Setup
Thanks for reading, I hope you enjoyed the article, if you have any questions just drop them below & I will be happy to answer you.
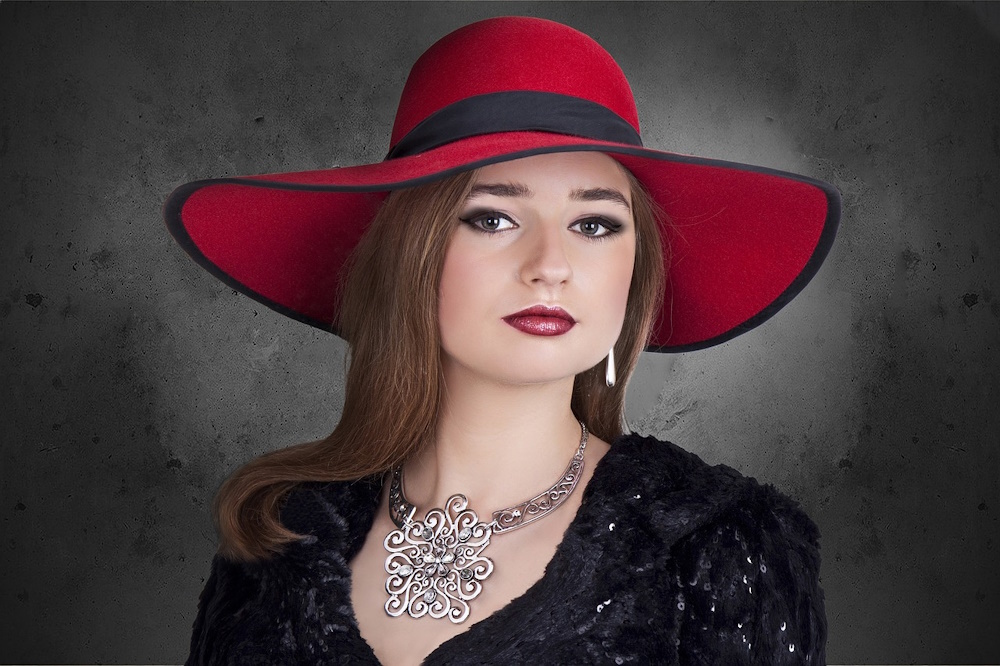
The featured Image by haidi2002 from Pixabay
If you enjoy the site, don’t forget to subscribe, we will only inform you when a new article is posted.


I have a studio photographic session coming up and needed to brush up on my lighting skills.
Thanks for the article!
very usefull and detailed explanation nice guide
Thanks