


If you’re interested in landscape photography, you’ve probably heard of ND filters. But have you heard of circular graduated ND filters? These filters are a game-changer when it comes to capturing stunning landscape photos.
What is a circular graduated ND filter?
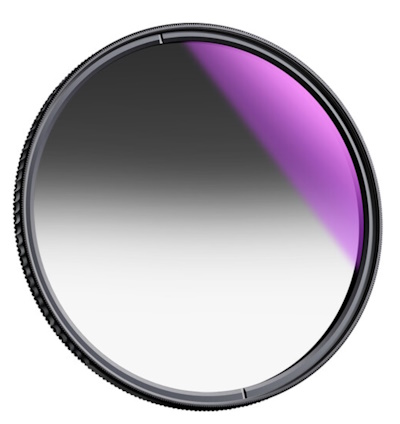
It’s a filter that’s designed to balance the exposure of your photo. It’s called “graduated” because it has a gradient effect, meaning that the filter is darker on one end and gradually becomes lighter towards the other end. This allows you to capture a scene with a bright sky and a darker foreground without overexposing the sky or underexposing the foreground.
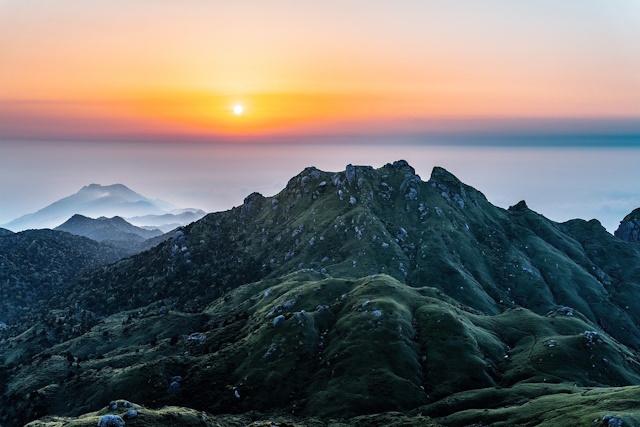
Image by Kanenori from Pixabay
The benefits of using a circular graduated ND filter
The benefits of using a circular graduated ND filter are numerous. First and foremost, it allows you to capture a scene as you see it with your own eyes. Without a filter, your camera may struggle to capture the full range of light in a scene, resulting in a photo that’s either too bright or too dark. With a circular graduated ND filter, you can balance the exposure and capture a photo that’s true to life.
Another benefit of using a circular graduated ND filter is that it can save you time in post-processing. Instead of spending hours adjusting the exposure and brightness of your photo, you can capture a perfectly balanced photo straight out of the camera.
In summary, a circular graduated ND filter is a must-have tool for any landscape photographer. It allows you to capture stunning photos that are true to life and saves you time in post-processing. In the next section, we’ll dive into the different types of circular graduated ND filters and how to choose the right one for your needs.
Types of Circular Graduated ND Filters
Soft-edge filter
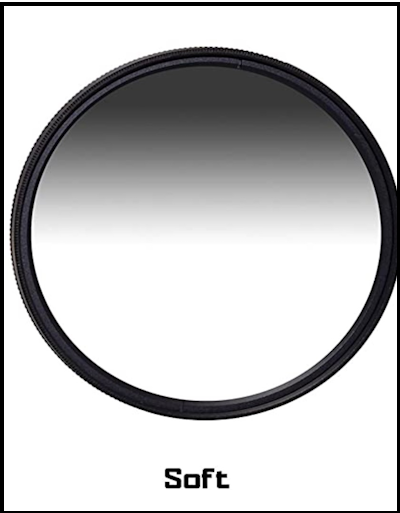
The soft-edge filter is a type of circular graduated ND filter that has a gradual transition from dark to clear. It’s perfect for landscapes with a gentle horizon line, such as sunsets, seascapes, and landscapes with a gradual transition from the sky to the foreground.
The benefits of using a soft-edge filter are that it helps balance the exposure between the sky and the foreground, resulting in a well-balanced image. It works by blocking out the light in the sky, which is often brighter than the foreground. This helps to prevent overexposure in the sky and underexposure in the foreground.
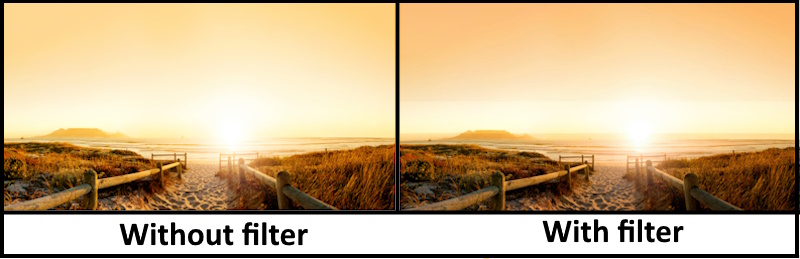
When to use a soft-edge filter? It’s best to use a soft-edge filter when you have a landscape with a gentle horizon line. This could be a sunset, seascapes, or landscapes with a gradual transition from the sky to the foreground. A soft-edge filter is also useful when you want to capture a more natural-looking image, as shown below
Hard-edge filter
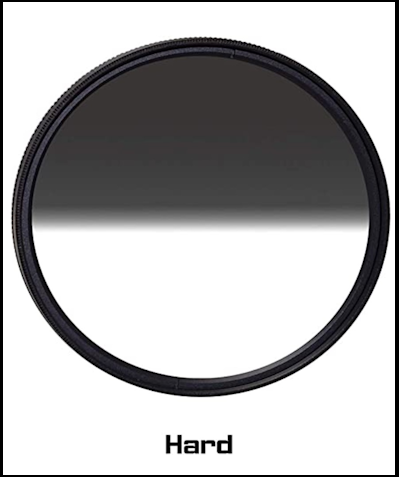
A hard-edge filter is a type of circular graduated ND filter that has a sharp transition from dark to clear. It’s perfect for landscapes with a defined horizon line, such as cityscapes, mountain ranges, and landscapes with a clear separation between the sky and the foreground.
The benefits of using a hard-edge filter are that it helps balance the exposure between the sky and the foreground, resulting in a well-balanced image. It works by blocking out the light in the sky, which is often brighter than the foreground. This helps to prevent overexposure in the sky and underexposure in the foreground.
When to use a hard-edge filter? It’s best to use a hard-edge filter when you have a landscape with a defined horizon line. This could be a cityscape, mountain range, or landscape with a clear separation between the sky and the foreground. A hard-edge filter is also useful when you want to capture a more dramatic effect in your images.
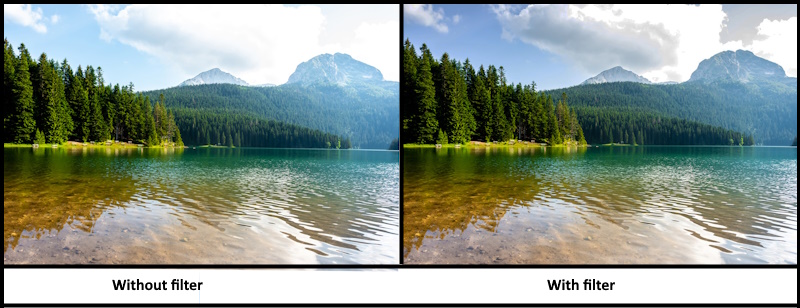
The below picture serves as an ideal illustration of when a hard-edge filter can be employed. The filter can be effortlessly aligned with the flat horizon, eliminating the need to be concerned about noticeable transition lines.

Reverse filter
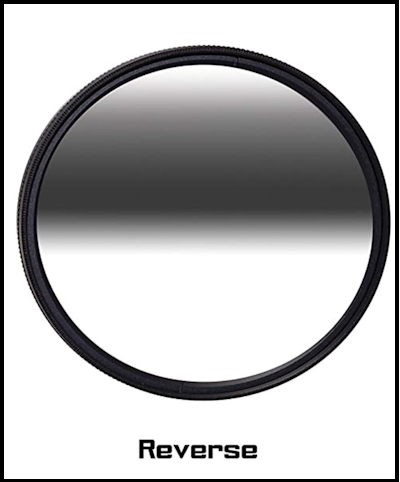
A reverse filter is a type of circular graduated ND filter that has a dark band in the center and a gradual transition to clear at the top and bottom. It’s perfect for capturing sunrises and sunsets, where the sun is on the horizon and the sky is brighter near the center.
The benefits of using a reverse filter are that it helps balance the exposure between the sky and the foreground, resulting in a well-balanced image. It works by blocking out the light in the center of the frame, where the sun is located, and gradually transitioning to clear at the top and bottom.
When to use a reverse filter? It’s best to use a reverse filter when you’re capturing sunrises and sunsets, where the sun is on the horizon and the sky is brighter near the center.
Filter mounting types
When it comes to mounting your circular graduated ND filter, there are a few different options to choose from. Here are the most common types of filter mounting:
-
Screw-in Filters:

These filters screw directly onto the front of your lens. They’re easy to use and don’t require any additional equipment, but they can be difficult to remove and may cause vignetting at wider angles.
-
Filter Holder Systems:
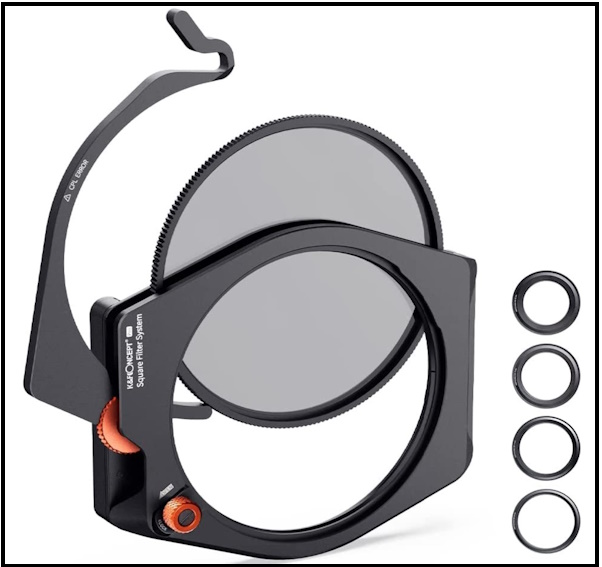
These systems use a filter holder that attaches to the front of your lens, allowing you to easily slide in and out different filters. They’re more versatile than screw-in filters and don’t cause vignetting, but they can be more expensive and require additional equipment.
-
Magnetic Filters:
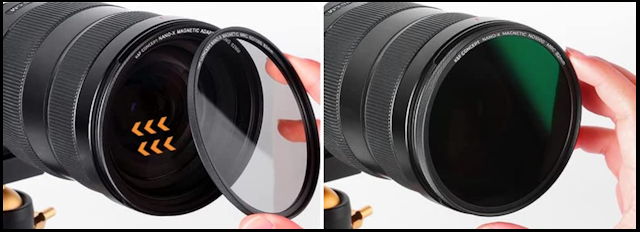
These filters use a magnetic ring that attaches to the front of your lens, allowing you to easily attach and remove the filter. They’re convenient and easy to use, but they may not be as secure as other mounting options.
When choosing a filter mounting option, consider your specific needs and preferences. Screw-in filters are a good option for beginners or those on a budget, while filter holder systems and magnetic filters offer more versatility and convenience.
Choosing the Right Filter
Choosing the right circular graduated ND filter is crucial to achieving the best results in your landscape photography. Here are some considerations to keep in mind when selecting the right filter:
-
Filter Type:
As we discussed earlier, there are three types of circular graduated ND filters: soft-edge, hard-edge, and reverse. Each type is designed for different lighting conditions and scenes. Soft-edge filters are ideal for scenes with a gradual transition between the sky and foreground, while hard-edge filters are better suited for scenes with a clear horizon line. Reverse filters are designed for sunrise and sunset scenes where the brightest part of the sky is near the horizon.
-
Filter Strength:
Circular graduated ND filters come in different strengths, usually measured in stops. The strength you choose will depend on the lighting conditions and the effect you want to achieve. For example, a 2-stop filter is ideal for balancing the exposure between the sky and foreground on a cloudy day, while a 4-stop filter may be necessary for a bright, sunny day.
-
Filter Size:
It’s important to choose a filter that’s compatible with your lens. Circular graduated ND filters come in different sizes, so make sure to check the diameter of your lens before purchasing a filter. You can usually find the diameter on the front of your lens or in the lens manual.
-
Brand and Quality:
Not all circular graduated ND filters are created equal. It’s important to choose a high-quality filter from a reputable brand to ensure that you’re getting the best results. Cheaper filters may produce color casts or reduce image sharpness.
In summary, choosing the right circular graduated ND filter involves considering the filter type, strength, size, and brand. By keeping these factors in mind, you can select a filter that’s best suited for your needs and achieve stunning results in your landscape photography. In the next section, we’ll dive into how to use a circular graduated ND filter to capture the perfect shot.

Image by Franz Bachinger from Pixabay
How to know the required strength of the filter
- Set your camera to Aperture Priority mode and select the aperture you want to use.
- Meter the foreground without the filter in place. Be sure to exclude the sky from your meter reading.
- Meter the sky and note the difference between the two readings.
- Choose a graduated ND filter that is one to two stops stronger than the difference in exposure between the sky and the foreground.
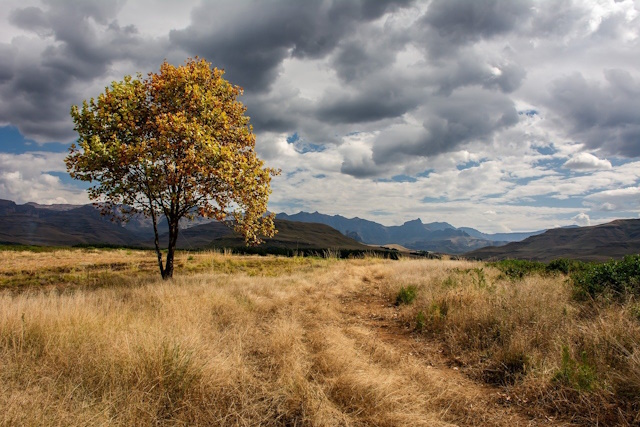
Image by Nadia Nikashina from Pixabay
How to Use a Circular Graduated ND Filter
Now that you’ve chosen the right circular graduated ND filter, it’s time to learn how to use it.
Here’s a step-by-step guide to using a circular graduated ND filter:
-
Attach the Filter:
Screw the filter onto the front of your lens, making sure it’s securely attached.
-
Position the Filter:
Position the filter so that the darker part of the filter is covering the sky and the lighter part is covering the foreground.
-
Adjust the Filter:
Use the filter holder to adjust the position of the filter until it’s in the right position. You can also rotate the filter to adjust the angle of the gradient.
-
Take the Shot:
Once the filter is in place, take the shot as you normally would. The filter will balance the exposure between the sky and foreground, resulting in a perfectly exposed photo.
Here are some tips for achieving the best results with your circular graduated ND filter:
- Experiment with different filter strengths to find the right one for the lighting conditions.
- Use a tripod to keep your camera steady and avoid camera shaking.
- Take multiple shots with different filter positions and angles to find the best composition.
- Check your histogram to ensure that the exposure is balanced.
- Use a remote shutter release or the camera’s self-timer to avoid touching the camera and causing the camera to shake.
Maintenance and care
Proper maintenance and care of your circular graduated ND filter is important to ensure that it lasts a long time and continues to produce high-quality results.
Here are some tips for cleaning and storing your filter:
- Cleaning: Use a microfiber cloth or lens cleaning solution to gently clean the filter. Avoid using harsh chemicals or abrasive materials that could scratch the surface of the filter.
- Storage: Store the filter in a protective case or pouch to prevent scratches and damage. Keep it in a cool, dry place away from direct sunlight.
- Handling: Handle the filter with care and avoid touching the surface with your fingers. Fingerprints and smudges can affect the quality of your photos.
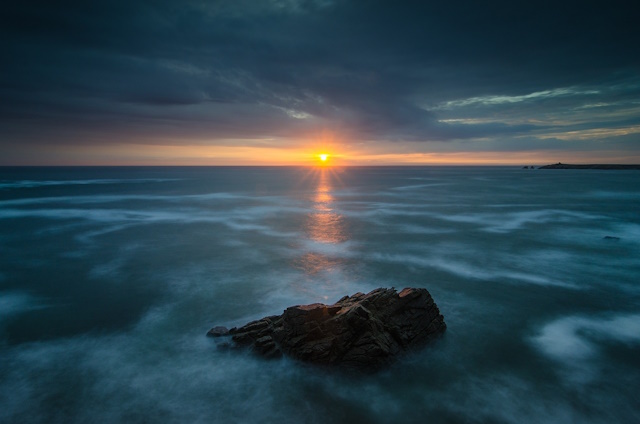
Image by Aurélien Barre from Pixabay
Here are some common mistakes to avoid when using a circular graduated ND filter:
- Using the wrong filter strength for the lighting conditions
- Not checking the filter position and angle before taking the shot
- Forgetting to remove the filter after taking the shot
- Using a low-quality filter that produces color casts or reduces image sharpness
By following these tips and avoiding common mistakes, you can ensure that your circular graduated ND filter produces high-quality results for years to come.
Recommended Graduated ND filters
K&F Concept 72mm Soft GND8 (3 Stop) Lens Filter Soft Graduated Neutral Density Filter
The 72mm Nano-X Graduated Soft-Edge ND8 Filter from K&F Concept is a glass filter that provides up to a 3-stop reduction in light in selective areas. The filter darkens bright areas of an image, such as skies, while the remaining areas of the image are affected progressively less.
The soft-edge transition is especially useful when there isn’t a well-defined separation between bright and dark areas of your shot. Featuring dual-sided multicoating, the filter is waterproof, oilproof, and scratch-resistant.
Specification
| Filter Type | Graduated ND |
|---|---|
| Graduation Type | Soft Edge |
| Density | 0.9 (3-Stop) |
| Circular Size | 72 mm Rear Filter Thread |
| Coatings | Multi-Coating |
| Filter Material | Glass |
Cokin Square Filter Gradual ND Creative Kit

The Cokin P Series Graduated Neutral Density Filter Kit includes three 84 x 100mm graduated neutral density filters that can be used individually or in combination to prevent overexposure in specific areas of landscape photography. The filters reduce the amount of light entering a lens by up to one, two, and three stops, respectively and feature hard or soft-edged lines of transition.
The kit also includes a filter holder for rectangular filters, which can hold up to three filters, and a microfiber cloth for cleaning and maintenance. A Cokin P Series lens adapter ring is required to connect the filter holder to a lens’s front filter threads.
Specification
| Filter Type | Graduated ND |
|---|---|
| Graduation Type | Hard Edge |
| Density | 0.3 (1-Stop) |
| Rectangular Size | 3.3 x 3.9" / 84 x 100 mm |
| Filter Holder System Compatibility | Cokin P |
| Filter Thickness | 0.06" / 1.6 mm |
| Filter Material | Resin |
Conclusion
In conclusion, a circular graduated ND filter is a valuable tool for any landscape photographer. Here’s a recap of the benefits of using a circular graduated ND filter:
- Balances the exposure between the sky and foreground
- Captures a scene as you see it with your own eyes
- Saves time in post-processing
- Produces high-quality, true-to-life photos
To get the most out of your circular graduated ND filter, remember to choose the right filter type, strength, size, and brand. Use a tripod to keep your camera steady, take multiple shots with different filter positions and angles, and check your histogram to ensure that the exposure is balanced.
Proper maintenance and care of your filter is also important to ensure that it lasts a long time and continues to produce high-quality results. Clean and store the filter properly, handle it with care, and avoid common mistakes.
In conclusion, a circular graduated ND filter is a must-have tool for any landscape photographer. It allows you to capture stunning photos that are true to life and saves you time in post-processing. By following the tips and recommendations in this beginner’s guide, you can take your landscape photography to the next level and capture breathtaking photos that you’ll be proud to share.
Related posts
The Neutral Density Filter Tutorial- Your Simple Guide!
Best Neutral Density Filters – Use Long Exposure In The Morning
Thanks for reading, I hope you enjoyed the article, in case you have any questions just drop them below & I will be happy to answer you.
The featured
Image by PayPal.me/FelixMittermeier from Pixabay
If you enjoy the site, don’t forget to subscribe, we will only inform you when a new article is posted.


I have read a lot of your articles and to be honest I never stop being amazed by how many things there are to learn about photography. Although I do not consider myself a big fan of photography I like to learn more because this is an exciting field. I never knew you could use such filters to balance the exposure of a photo. Amazing and very useful trick for certain situations. Great read!
Thank you for taking the time to read my articles and for your kind words! I’m glad to hear that you find the field of photography exciting and that my articles have been helpful in expanding your knowledge. The use of filters can indeed be a useful technique for balancing exposure and achieving creative effects in photography.
Your breakdown of the different types of filters, such as the soft-edge, hard-edge, and reverse filters, along with their respective applications, was really helpful!
I appreciate that you also discussed the various filter mounting options, considering factors like ease of use, vignetting, and cost. It’s great to have that additional information when making a decision.
Thank you for your feedback! I’m glad to hear that my explanation of the different types of filters and their applications was helpful to you. It’s important to consider all factors, including mounting options, when choosing the right filter for your needs. If you have any further questions or need additional information, please don’t hesitate to ask.