

Who doesn’t want to showcase their attires online in the most interactive way? Today top-rated fashion brands are inclining more towards the ghost mannequin effect for their apparel photography. Why? Because it enhances the outlook of the clothing and gives it a naturalistic vibe. Besides, the presentation of fashion apparel on mannequins is also fascinating and cost-effective.
In this write-up, we will focus on all the things to describe the ghost mannequin effect.
What is a Ghost Mannequin Effect?
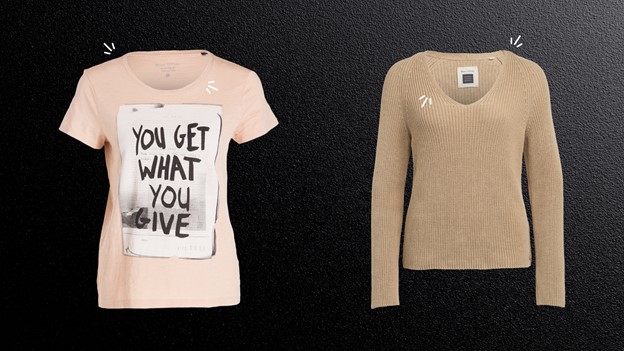
Ghost mannequins or the invisible effect refers to the process where retailers eliminate the dummy from garment pieces like shirts, jackets, tops, etc. This specialized effect aims to illustrate both the inner and outer parts of the apparel.
There are a few reasons why content creators or retailers might want to use this effect for their business:
- It’s more cost-effective than hiring a model. You don’t need a model to nail your shots.
- It gives customers a better idea of how the product looks without a visual distraction.
- It helps viewers to visualize the fit of the product.
That’s why the ghost mannequin effect is becoming widely popular when it comes to selling apparel online.
How to Create the Ghost Mannequin Effect:
Ghost mannequins have been used in the clothing industry for a long time. So, it takes skilled hands to photograph, pick, and edit wisely to produce something appealing for the customers. So, here we’ve put together an
- Choose Appropriate Mannequins:
The first step to starting ghost mannequin photography should be choosing the correct mannequin. You must find something suited to your needs and choose something that matches the apparel you will be selling. Also, remember to choose white and matte mannequins as they work the best for the invisible effect.
- Pick Your Gear:
Before diving into the photoshoot, you must pick the right gear for the product shots. Basically, the effect demands a high-quality camera, tripod for stability, white backgrounds, and lighting softboxes.
- Plan the Shoot:
Now, it’s time for the most crucial aspect of ghost mannequin photography. A good result on the attire requires robust planning, and it all begins with product selection.
Once you’ve made the selection, prep the background and mannequin. Then, you need to fix the lighting in the studio and figure out the setting that works the best for the shoot. Remember, each finalized image will require at least three to four shots. It can sometimes take more, especially when the product has an atypical or abstract shape. You’ll probably need an extra set of hands to get the shots right for a good composition.
- Place the Products:
How you are placing the outfits is just as essential as lighting for ghost mannequin photography. The products should hang naturally, whether they are placed on models or mannequins. You should also drape the sleeves naturally to the side and fix the collars. Set the camera at chest level for tops and at hip height for bottoms. Deviating from these standards might give unflattering results.
- Capture the Images:
You’ll need at least three to four shots for each outfit, like:
- Front and back shots on a mannequin
- Front and back shots on a white foam surface. Once you retouch the images, these shots work as a visual filler to remove the dummies. Besides, the foam board shots also allow you to highlight the inner details like stitching, lining, etc.
- Inside shot or inlay images of the outfit to fill the gap when removing the mannequin
- Try Different Postures:
Flaunting different poses in apparel photography makes it more unique and appealing. Today’s buyers expect to see a product from different angles before purchasing it. So, make sure you are fulfilling their needs through the process. However, remember to keep the postures static.
- Photo Editing:
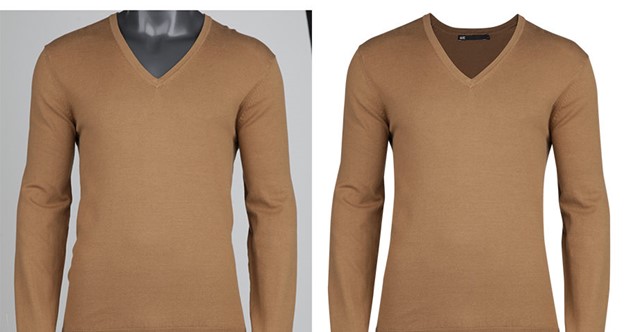
Now, it’s time for the main showdown, where we learn to remove the mannequins from the photos. Many of us employ Photoshop to eliminate the dummies. But, we all know it’s a time-consuming process. And others appoint different photo retouching services, such as the “Ghost Mannequin Service,” to do the highly-tedious task.
However, we believe the invisible effect doesn’t have to be complicated. How? We suggest using autoRetouch to automatically eliminate the dummies from the photos
This is how the software conducts the task in a few minutes:
- First, the backdrop is removed from the product and inlay image.
- Next, the inlay and product photos are naturally combined.
- Then, the inlay seam is warped to apply a 3D effect.
- Lastly, image depth is added with a shadow effect.
- If necessary, refine the edges for a polished look.
The software will present you with outfit photos without the mannequins in five seconds.
Why Use autoRetouch Instead of the Conventional Way?
Until now, the ghost mannequin effect was a purely manual, multi-step, time-consuming, and costly editing process. Today, Artificial Intelligence lets us create ghost mannequin images that are quick and affordable.
In addition, the tool exports file in PSD format so that you can add any finishing touch you want without hampering the quality. In the same workflow, you can also integrate the ghost mannequin with vector paths or Fabric Swatch extraction. The software also can compare the edited and original images. The result is life-like and won’t deter your e-commerce sales.
Tips for Impeccable Ghost Mannequin Effect:
Here are some tips to ace ghost mannequin photography:
- Ensure the mannequin’s arms are hanging down and legs are uncrossed. For better results, choose models with detachable body parts.
- Clip back long hair or jewelry.
- Keep the camera and light in the same spot when photographing the inlay images.
- Choose neutral and non-reflective backdrops, like white or gray.
- Before shooting, steam or iron the garments. Also, ensure the attires are fitting the mannequin perfectly. Use clips or pins to fill the gaps.
- Hold the bottoms taut by hand, and keep the waistline straight for inlay images.
- Be careful of the camera angle. Otherwise, the mannequin effect won’t come out well.
Bottom Line:
The ghost mannequin effect is a surefire way to attract customers in the fashion industry. Whether you plan to increase sales or create a brand identity, this technology should be implemented most conveniently. With autoRetouch, you can automate the entire process to level up your product photography imagery. The software also offers pay-as-you-go credits, so it’s also a cost-effective solution.
Related Topics:
Thanks for reading, I hope you enjoyed the article, in case you have any questions just drop them below & I will be happy to answer you.
If you enjoy the site, don’t forget to subscribe, we will only inform you when a new article is posted.


Nice article. It really needs a lot of practice to make some good mannequin photos. For me the hardest part is to combine the inlay so it feels seamless with the rest and doesn’t show like you have stitched together the two shots. I guess the 3d effect along with the shadow applied is what makes it so convincing.
Thanks, Stratos for your input!
Hello Ehab and thank you for writing such an informative post. I had no idea that creating ghost mannequin shots were so technical. The autoretouch program seems like it will save people a ton of time and frustration when editing for their final shot. I know that when I am shopping online for cloths, I like to see how they would fit naturally. This process for making people more secure about buying their products is priceless. Again, very informative and well written.
Glad that you find the article useful Wes!