


On-camera flash often produces a coarse light that draws flat, shapeless subjects with harsh highlights and black shadows. The idea behind off-camera flash is that rather than mounting your flash on your camera’s hotshoe and shooting with the light facing forward the subject, you instead remove your flash and position it anywhere you like in relation to your subject. While front-facing flash can sometimes be effective, it can also lead to a flatter and more one-dimensional subject looking. By moving your flash off-camera, the light bathes your subject at an angle creating a scene with a much greater sense of depth. A more advanced technique is to position several flashes at different angles, set them at different positions, and control them to fire simultaneously so, you can convey the scene with a much better and creative shot.
Before we go into the required setup for off-camera flash photography, I’ll first discuss some of the common terms used in this type of photography.
Basic terms & terminologies
It should be generally understood that off-camera flash simply means that you are using one or more external flashes to light the scene, and your camera will be communicating with these flashes using some kind of remote method, either a hard-wired connection or a wireless one. Beyond this, there are also two distinct ways to determine how to expose properly when using flash: TTL and manual flash. TTL flash is similar to the way a camera computes its automatic exposure information, whereas manual leaves all of the settings up to you, with no automatic interface determining exposure settings.
TTL and Manual Flash Metering
Through-the-lens (TTL) metering with flash is a system that balances your camera’s exposure settings to that of the flash output and the distance of the subject. TTL metering functions by using a brief pre-flash just before the exposure are taken; this pre-flash will strike the subject and then the proper exposure settings are determined based on the ambient light and the distance your subject is from the camera. Once this has been calculated, both the flash power and the camera’s settings will lead to a properly lit subject. On the other hand, when working with manual flash, you have to set both the flash’s power level as well as your camera’s settings to properly expose your subject.
Direct and wireless trigger & data transmission
In On-camera flash, the trigger signal and the TTL data are transmitted from the camera to the flash unit throw out the hotshoe adaptor located in the top of the camera. But when using off-camera flash, you need some equipment to either directly or wirelessly transmit the signals between the flash and the camera. There are two types: the direct and the wireless connection.
Direct connection
The direct connection between the camera and flash is done through a cable, there are many types, and lengths available in the market. The important thing to consider is to know to wither the cable transmit only the trigger signal or also the TTL data. The following is an example of a direct cable that can transmit both trigger signal and TTL data.
Wireless connection
Wireless triggering can be one of three distinct methods for firing a flash without the use of a cable. These methods are optical, infrared and radio.
- Optical: is the most basic way to trigger flashes wirelessly, as it requires no additional power. These flashes contain light receptors that can respond to another flash.
- Infrared: is similar to optical triggering with the exception that the receptor functions after detecting a burst of infrared light, rather than a visible one. This is beneficial because you are not dependent on a visible beam that emanates from either your camera or a flash directly wired to your camera; you can use a single flash off-camera and wirelessly trigger it from anywhere. An infrared system functions best indoors, or in other situations where you have direct line-of-sight between the transmitter and receiver.
- Radio: is a modern system of wireless triggering, and allows you to trigger flashes without direct line of sight, and often at greater distances than the optical or infrared transmitter. The range is extended to around 30m and slave flashguns can be hidden behind obstacles or subjects without fear that they may not fire.
Working with multiple flashes (Speedlites) gives you creative control over your subject lighting. The main light can be used away from the camera, and other units can be used to provide backlighting or illuminate the background. It has been possible to work with two or more flash units almost since the day they were invented. However, the problem has always been getting the exposure correct. Just synchronizing the flash outputs is not enough. You also need to control each output to give the correct amount of light for the subject.
Advantages of off-camera flash photography
- You’re not limited to the ambient light.
- By manipulating the flash and changing its position you can get a gorgeous shaped light around your subject.
- You can correct bad lighting or color casts with flash.
- You have control over ambient exposure and the light falling on your subjects from the flash.
- You can put the light in places a bounced flash couldn’t go, like behind your subject or an obstacle for dramatic effects.
Wireless Flash with TTL
I will explain the system using the following illustrations
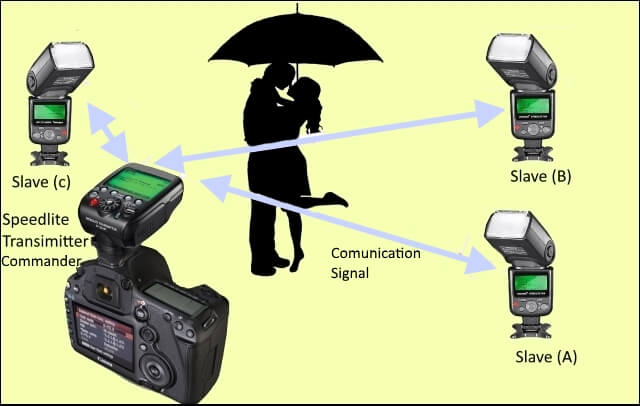
The master unit can be the Speedlite 600EX-RT (if it is mounted on the camera and set as a master) or a non-flash transmitter (Commanders) such as Canon Speedlite Transmitter ST-E2, Speedlite Transmitter ST-E3-RT, or YONGNUO Speedlite Transmitter YN-E3-RT. The diagram below shows how the Canon wireless flash system operates. (Via Canon information Bank)
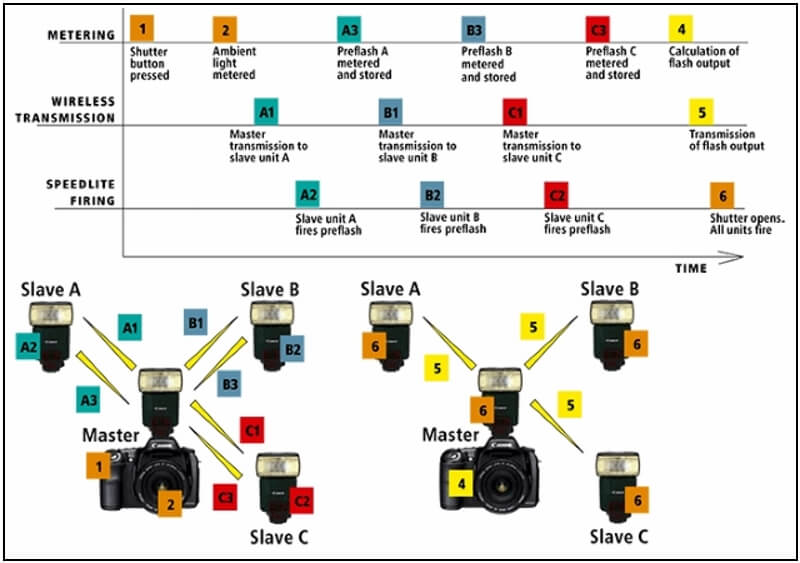
As soon as the shutter button is pressed, the camera takes an ambient light meter reading. This is stored in the memory. Next, the master unit transmits a signal to slave unit A (or all slave units set to group A if there is more than one). This triggers a pre-flash from the unit (or units). This flash is metered and stored in the memory. This sequence is repeated in turn for the unit or units in group B, and then in group C.
The master unit knows if you are not using units set to group B or C because it will not receive back any pre-flash data.
The memory now has readings for the ambient light, plus the pre-flashes from groups A, B and C. With this information, the camera can calculate the output needed from each of the flash units for a balanced exposure. This information is transmitted to the units and they all fire in synchronization with the opening of the camera shutter.
Canon Speedlite TransmitterST-E2 (Commanders)
It is an infrared transmitter that acts as a master flash unit. Although it emits no visible light when it fires, it can control two separate slave groups of flashguns. Indoors, the ST-E2 can control flashguns up to 15 meters away. Outdoors this drops to 10 meters because of ambient light. Being infrared, ideally, the unit should have a line-of-sight view to the flashguns, although if you’re working inside you may find that infrared bouncing from the ceiling and walls is enough to allow you to trigger the flashguns without needing precise line-of-sight. The ST-E2 is attached to the camera hotshoe, facing forwards. It retains all E-TTL capability with E-TTL cameras and even allows you to use high-speed sync flash and flash exposure lock if your camera has an FEL button.
Canon Speedlite Transmitter ST-E3-RT (Commanders) radio flash transmitter
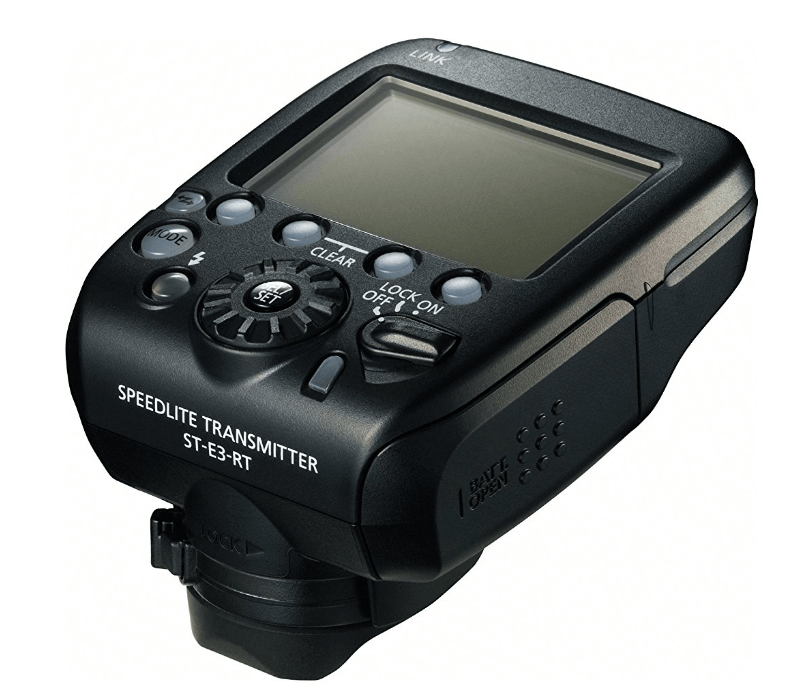
It allows the use of up to five groups of slave Speedlites, with up to three flashguns in each group for a total of 15 slaves. When used with some modern Canon models like 5D Mark III, the radio wireless settings allow more complex flash setups with the Group Firing Mode. This mode allows you to set different flash modes for each of the five firing groups, so Group 1 and 2 may be E-TTL, Group 3 and 4 set to Manual and Group 5 using Auto external metering with the built-in thyristor. With earlier camera models, the maximum number of groups is reduced to three, and the remote Speedlites in each group will switch to E-TTL automatically.
YONGNUO Speedlite Transmitter YN-E3-RT
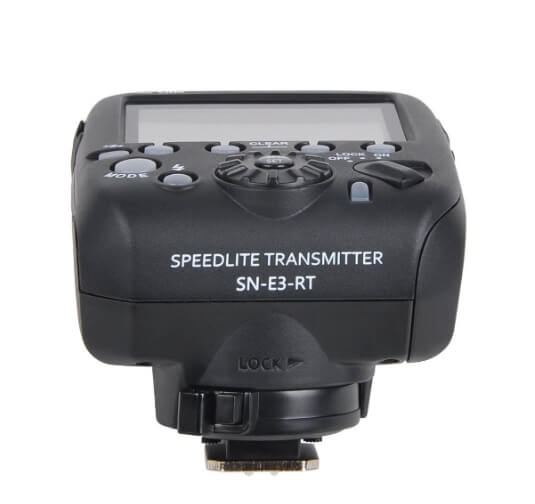
A similar type of off-flash system includes a transmitter unit that is directly connected to the hotshoe of the camera and two or three receivers where the flashes or speedlites are mounted on them as shown in the below figure.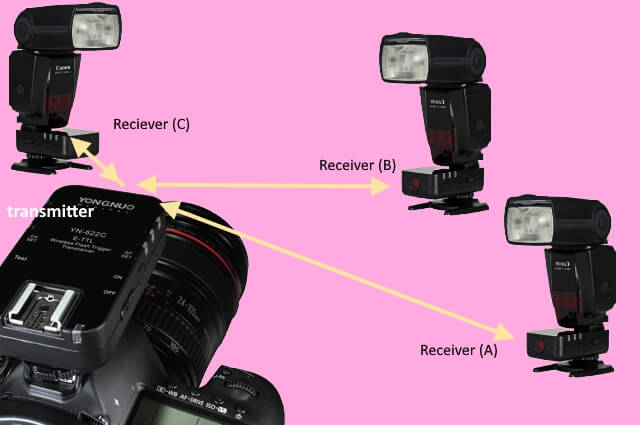
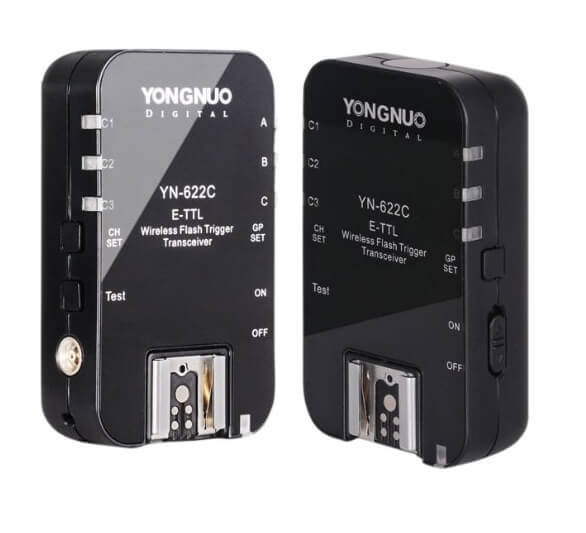
YONGNUO Wireless ETTL Flash Trigger YN-622C (Transceiver)
Flash Mounting options
-
Flash bracket
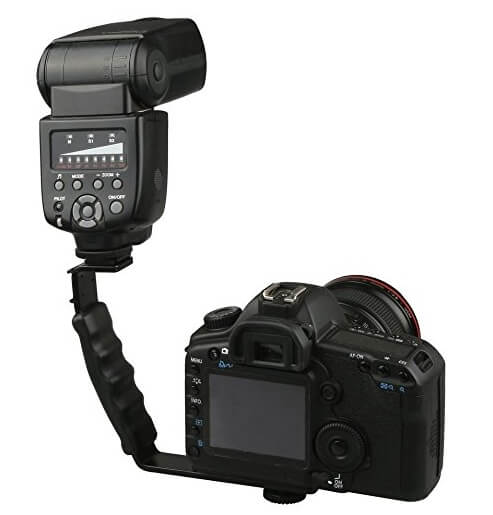
One of the simplest ways to remove a flash from the camera to provide you with more options and control is to use a flash bracket, and then connect your flash to your camera using a cable. A flash bracket is a structured grip or plate that attaches to a camera, typically via its tripod screw, and then allows you to attach a flash to it in order to move the flash away from the lens. Aside from giving you a wider range of positioning for the flash by moving it away from the axis of the lens, it will also help to prevent red-eye at your subjects.
-
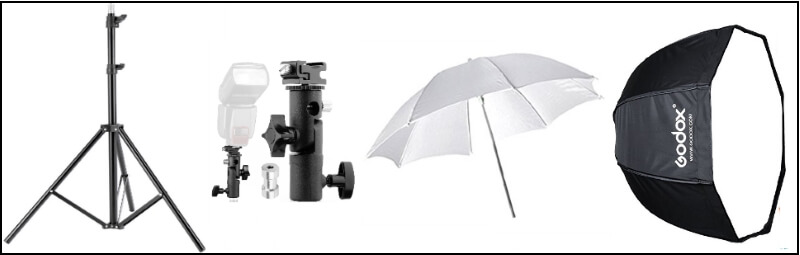
Stand Mount
The flash is mounted to a stand via an adaptor (swivel) that allow also to the mounting of softbox or umbrella, as shown in the below photo.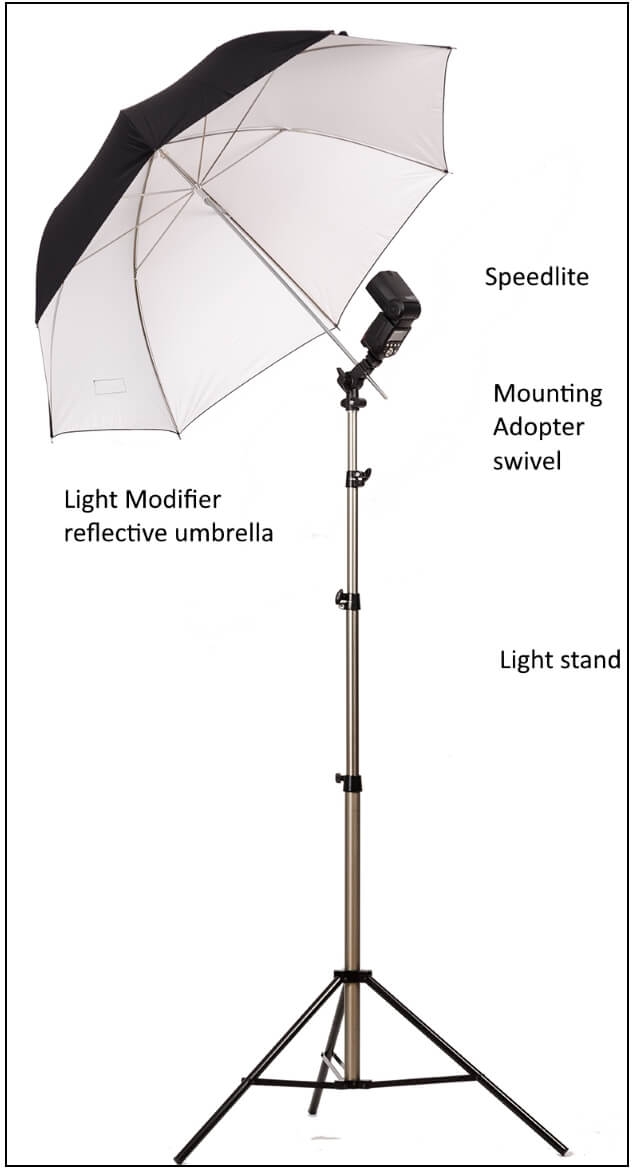
Camera Settings
With flash, you have two different exposures to think about; the exposure of your background, and the exposure of your flash. Before you even turn on your flash you need to think about how much ambient light you want in the frame and how much light you want to add (ie. light on your subject).
-
Sync Speed & shutter speed
Most flashes have a maximum sync speed. Mine is 1/250. So your shutter speed should be under this value, if you do not stay under your sync speed you will get a black bar across your image. When choosing your shutter speed you should decide on how much ambient light you want in your image. If you want the background to look the way you see it, then choose a slower shutter speed (around 1/60). If you want to darken it for a more dramatic look, then raise it (maybe 1/200). But never go above your sync speed.
Also, you can drag the shutter by using slow shutter speed to allow more ambient light to enter the lens. Keep in mind, however, that if you drag the shutter and there is a lot of ambient light on your subject, it will affect them if they are moving.
-
Aperture setting
Aperture controls the intensity of the light from your flash. A lower number gives you more power. If your flash is too bright, raise your aperture number. It’s an easy way to adjust the power in-camera without having to walk over to your flash to change it. However, if a shallow DOF/shooting wide open is important to the shot, then leave your camera settings wide open and lower your flash power on the actual flash if it’s too bright.
-
ISO setting
ISO affects both ambient light and flash output. It is another way to control the intensity of the flash. A good example would be if you are shooting at ISO 400 and your flash is too bright and you can’t reduce it anymore, you could use your ISO to tone it down.
If you are looking for more power from your flash you can do 3 things: Turn up the power on the flash, lower the aperture number in-camera, or increase the ISO.
Finally, I hope this gave you a good intro to off-camera flash photography and inspired you to learn more.
Thanks for reading, I hope you enjoyed the article if you have any questions just post them below & I will be happy to answer you.
If you enjoy the site, don’t forget to subscribe, we will only inform you when a new article is posted.

Related Posts
How To Use Flash In Photography- The Full Guide
Thanks for reading, I hope you enjoyed the article, in case you have any questions just drop them below & I will be happy to answer you.
If you enjoy the site, don’t forget to subscribe, we will only inform you when a new article is posted.


Thanks for providing the information with this post. Post is very nice! By the way, I want to share with you information about the best.
You are always welcomed and thanks for your comment.
Great and well detailed post up here, you have really provided great information about the camera flash and also the terms and terminologies. Please I need step by step guide about the direct connection, what if the cable fails to transmit the TTL data, what is the alternative connection? Thank you.
Thanks for the comment, If your cable fails to transmit the TTL data but still can transmit the trigger signal, you can adjust the flash manually. But if the trigger signal is also lost, you have to change the cable and buy a new one.
This article is another clarion call to my desire to have photography niche with a unique features like what you just revealed. This is worthy to note , that cameras can do wonders in photo taking if one can acquire the and use the right cameras. Thanks for the insight.
Another great post for my son. if he can keep up with all of your teachings and suggestions he should be able to open soon a photo lab…I hope because his dedication to photography is becoming a little expensive for me(his mum)….nevertheless he has gained so much knowledge from your post I can only say thank you
Many thanks for the comment, hope all the success for your son.
I have suggested this web site through my friends. I’m not sure whether or not this post is written via him as nobody else understands such distinctive about my trouble. You’re amazing! Thanks!
Thanks a lot, glad that u liked the post, if you have any questions don’t hesitate to contact me at support@ehabphotography.com.