

The important factor in HDR photography is the quality and the power of the processing software. Photomatix Pro 5.0 is considered one of the top software that is capable of producing amazing and astonishing HDR photos.
In this article I will go through the software, exploring its menus and define its cons and pros. But before that let us shortly discuss what HDR photography is?
HDR photography is about shooting a scene that has a great dynamic range, for example when shooting a subject (that has shadows in its details) against a very bright background. When trying to set your exposure to show the details in the shadow part of the scene, the bright side of the scene will be over-exposed. Vice versa when trying to set your exposure to suit the bright side of the scene, you will lose much of the details on the darker side. This situation happened because of the large dynamic range of the scene compared to the dynamic range of your camera. Here exactly the HDR technique is the solution.
The HDR technique involves two main steps:
- Taking three or more photos at a varying exposure setting, this process is called bracketing, you may view my detailed post about bracketing and how to do it.
- Use special software to align and merge the bracketed photos and get the final HDR photo.
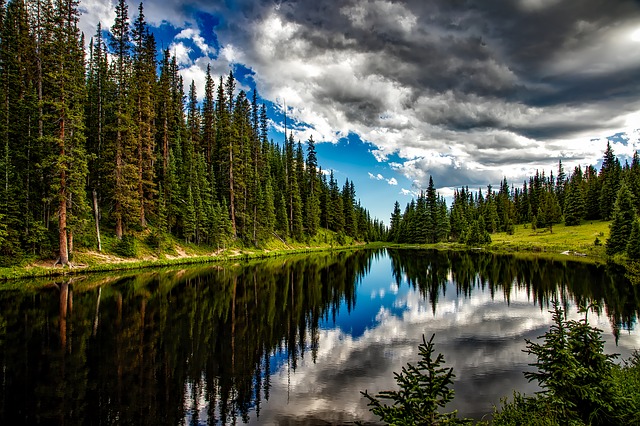
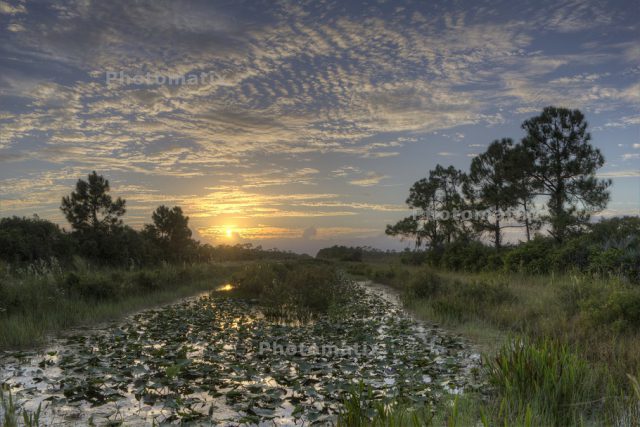
Here are some sample photos that were taken by the HDR techniques


Photomatix Pro 5.0 Software
Photomatix Pro used to be my favorite HDR software. It is easier to use, faster, and has more presets for you to choose from. It is in the photography market since 2003. It has gone a long way in improving and adding new updates.
Basic workflow
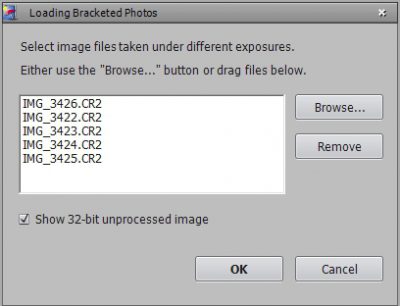
In the main menu of Photomatix, you will start by loading the bracketed images.
1- Loading images into Photomatix
Photomatix Pro loads images in the following file formats:
- JPEG
- TIFF 8-bit and TIFF 16-bit
- PSD 8-bit and PSD 16-bit
- Camera RAW (see more details below)
Photomatix Pro also supports 32-bit HDR image file formats:
- Radiance RGBE (Open and Save)
- OpenEXR (Open and Save)
- TIFF 32-bit (Open and Save)
You can load the images in any order, regardless of their Exposure Value. The following image shows the loading file menu.
2- Aligning and merging
The aligning option lets you select from four different preset settings:
- On Tripod
- Handheld (minimal movement)
- Handheld (standard)
- Handheld (large shifts)
You can also enable or disable removing ghosts, noise reduction, chromatic aberrations and some simple raw settings.
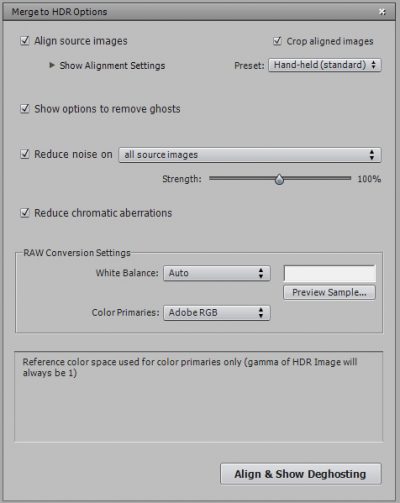
If you enable the “remove ghosts” function, you will then see the ghost removal window. You can choose the manual or automatic mode. Check this option when you having moving objects or people in your scene.
After processing the images according to the privies setting the merged photos appears.
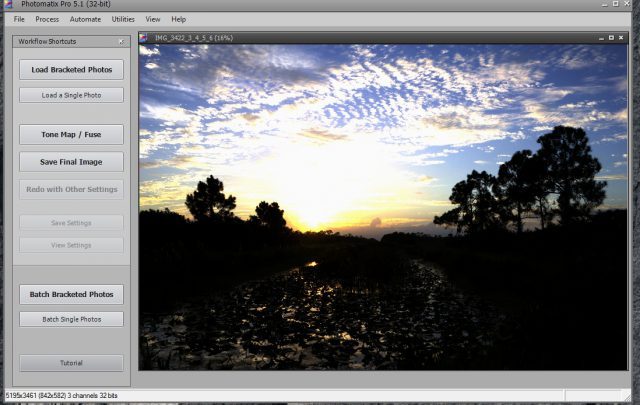
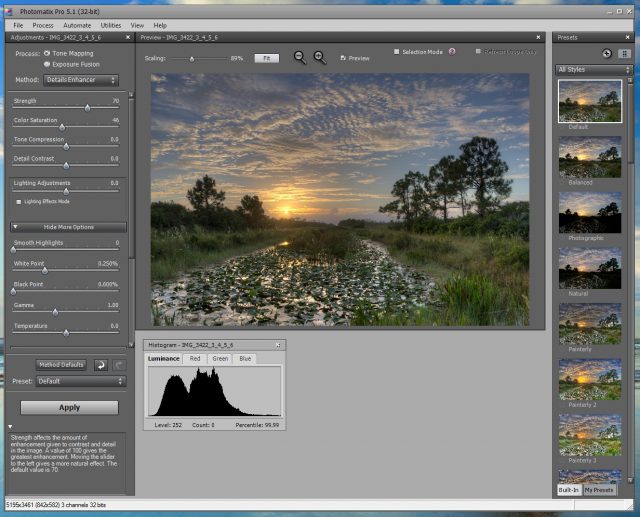
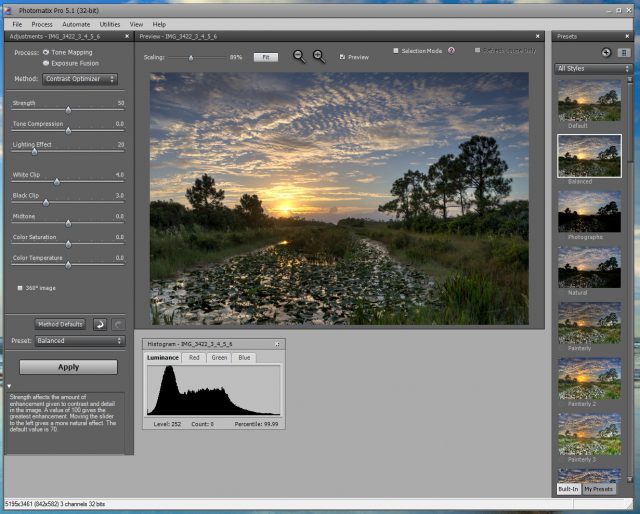
3- Tone mapping / Exposure Fusion
Here is the main menu for adjusting the final photos. You can choose a style for your image by clicking one of the thumbnails on the preset panel on the right. The preview panel in the middle shows a preview of the final image. The setting panel on the left lets you refine the effect by adjusting the setting. You can always undo or redo the setting, and restore to the default setting with the buttons at the bottom of the sliders.
There are two main setting options to choose from:
- HDR Tone Mapping is composed of two steps. The first step merges differently exposed photos to a 32-bit/channel unprocessed HDR image. Such image cannot be displayed properly on standard monitors, which is why a second step called Tone Mapping is necessary. Tone Mapping consists of scaling each pixel of the HDR image so that details in highlights and shadows show correctly on monitors and prints (these details are available in the unprocessed 32-bit image but not directly visible because of the low dynamic range of the display).
- Exposure Fusion combines the source photos in such a way that highlight details are taken from the underexposed photos and shadow details from the overexposed ones. The fused image is, therefore, a weighted average of the source images. Exposure Fusion has the advantage of being easy to understand and is familiar to photographers who are used to doing this process manually in image editing applications. Also, Exposure Fusion has the nice side effect of reducing noise.
The table below lists the main pros and cons of both processes:

The figures below show the results of different settings:

After you are satisfied with your setting, click the ”Apply” button to get the final image.
The cheapest place to get Photomatix Pro 5.0 Software is from Here.
Related Post:
Bracketing – The Best Way To HDR Photography
Aurora HDR 2018 Review – Tools & Performance
Thanks for reading the post, hope that you found it useful and helpful. In case you want to leave a comment or want some more details please drop it in the box below.
If you enjoy the site, don’t forget to subscribe, we will only inform you when a new article is posted.


You had some great points in your article. I admire your knowledge of photography.
Thanks a lot appreciate your comment, glad that you find the post helpful you can subscribe to receive the new updates.
Great site and beautiful pics!! It is amazing what they can do with software nowadays. and this one is AWESOME. thank you for sharing.
Thank you for your lovely comment, very glad you liked the site and pics.
I suggest trying the free version of the software.
Hi There,
Great info here, myself and my wife have set up a photography business which is still in the making at present, This article has come in very handy just when we needed it, thanks for sharing your credible knowledge, this is really going to help us going forward, I look forward to trying the free trial out,
Thanks again…
Thanks for your comment, Go on try the software, I’m sure you well like it. Happy photographing!
I find the courses in this site very helpful, easy to learn and informative.
I have a little knowledge about photography but your Q&A page satisfies my curiosity in my mind.
Now I can take my best shot to capture every moments of my life.
Thanks for sharing your passion.
Thanks for your comment, glad to know that you liked the site, hope to see you again.
Hi Ehab
Thank you for sharing this awesome product!
I have been looking for something like this after I joined Dreamstime recently and most of the photos submitted are rejected due to all sorts of technical reasons, some which you mention in your post.
This software looks like it will solve those problems 🙂
Your photos look stunning by the way! Thanks again and all the best.
Regards,
Kamil
Hi Kamil
Thanks for your comment, yes, the Photomatix pro 5 is an amazing software, it has much fantastic presets and you can use it not only for processing bracketing photos but also for tweaking a single photo to enhance its quality. You can also download a free trial copy for practicing.