

Meet Generative Fill — the revolutionary and magical new suite of AI-powered capabilities grounded in your innate creativity, enabling you to add, extend, or remove content from your images non-destructively using simple text prompts. You can achieve realistic results that will surprise, delight, and astound you in seconds.
To use Generative Fill, simply select the area of the photo that you want to edit, and then click on the Generative Fill button. Photoshop will then analyze the image and generate a number of possible results. You can then choose the result that you like best.
The Generative Fill is still under development, but it is already a powerful tool that can be used to improve photos and create new images. If you are a subscribed member of Adobe Creative Cloud, then you can download Photoshop Beta, and start practicing with the amazing creative fill.

Examples of what you can do with this Magic A.I. Generative fill.
-
Remove objects from photos:
Generative Fill is a powerful tool that allows you to remove unwanted objects from your photos with ease. This technology uses advanced A.I to analyze the photo and generate new ones to fill in the gaps left by the removed object. The result is a seamless and natural-looking photo that looks like the object was never there in the first place.
You can even use it to remove entire backgrounds or replace them with something else entirely.
One of the best things about Generative Fill is that it saves you time and effort. Instead of spending hours manually editing your photos, you can use this tool to quickly and efficiently remove unwanted objects. This means you can spend more time taking photos and less time editing them.
-
Generate new objects:
Generative Fill is not only useful for removing unwanted objects from photos but it can also be used to add new objects to them. This feature is particularly handy for those who want to change the composition of their photos dramatically. With Generative Fill, you can add new objects such as people, dogs, buildings, and more.
When adding new objects to a photo, the Generative Fill algorithm takes into account various factors such as lighting, perspective, and matching with the original photo. This ensures that the new object seamlessly blends in with the rest of the photo, making it look like it was always there.
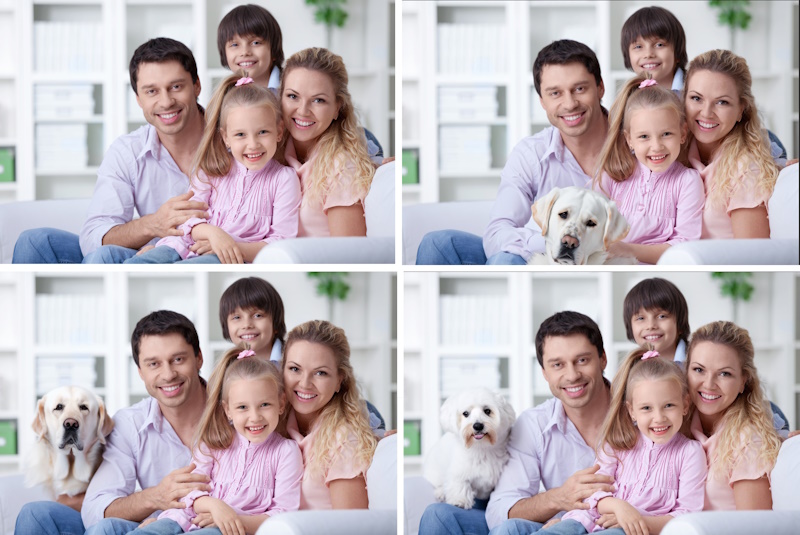
For example, let’s say you have a photo of a beautiful family, but you feel like it’s missing something. With Generative Fill, you can add an adorable cat or dog to the photo.
Simply select the area where you want to place the pet, then write a prop such as “white dog”, then press generate, the filter will do it with three variables, you can choose any one of them. This can completely transform the photo and make it more interesting to look at.
In addition, Generative Fill can also be used to replace existing objects in a photo. For instance, if you have a photo of a building with an unsightly billboard in the background, you can use Generative Fill to replace the billboard with something more aesthetically pleasing.
-
Add water reflection:
You can easily add a water area such as a lake, or calm sea to part of your image, it will make the matching and add the reflections.
-
Extend images:
It allows you to extend the canvas of your image, then make a selection of the empty region, then it will fill the empty spaces by creating scenes from the photo. The generative filter can create a harmonious extension of your scene.
-
Change the feature of your subject:
You can use the generative filter to change the hair color and style of a portrait of a girl, change what a man is wearing, etc.
-
Generate new images from scratch:
The generative filter can be used to generate new images from scratch. This can be a great way to create new ideas or to generate content for your projects.
Examples of using the generative fill
Example 1 (Removing subject & objects)
I will use the below photo to remove the man on the right side of the below photo.

- Open the file in Photoshop beta
- Use The lasso tool to select the subject to be removed

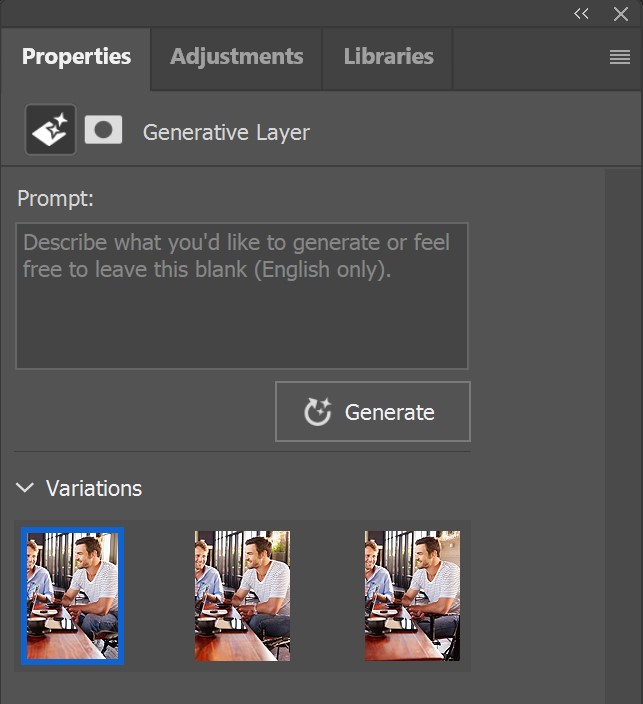
- When finishing the selection the generative fill toolbar shows up automatically
![]()
- Click on the generative button
- The prompting box shows up
![]()
- Do not write anything, and click on Generate button
- Photoshop starts processing (in the cloud), then when finishes, it removes the selected subject and generates three variations. You can see the variations in the property window as shown below
- The final image is shown below

Example 2 (Changing the background)
I will use the same photo to change the background of the photo.
I will follow the same steps as the previous example, however instead of selecting the person, I will select the background
- Use the lasso tool to select all the subjects and the foreground of the photo as shown below
- Inverse the selection (Shift + Control + I)

- Continue the same steps to have three variations with different backgrounds.

Another example of changing the background

Example 3 (Generate new objects)
To add a new subject to your photo, make a selection (use the Lasso tool or Marquee tool), then in the prompt dialogue box write a description of what you want to add such as “white dog” as shown in the below example
Another example
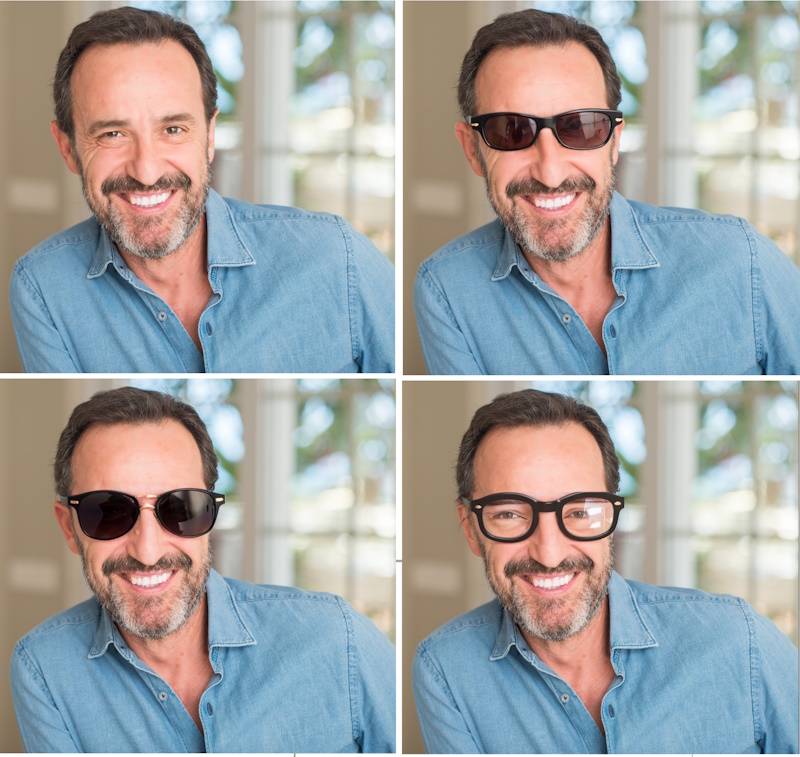
To make your subject wear a glass make a selection around the eyes, and write “sunglasses” or “reading glasses” as the below example
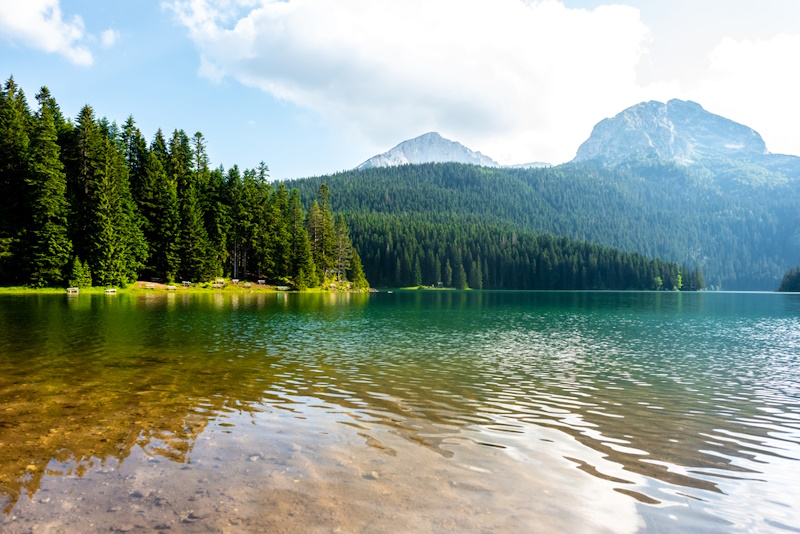
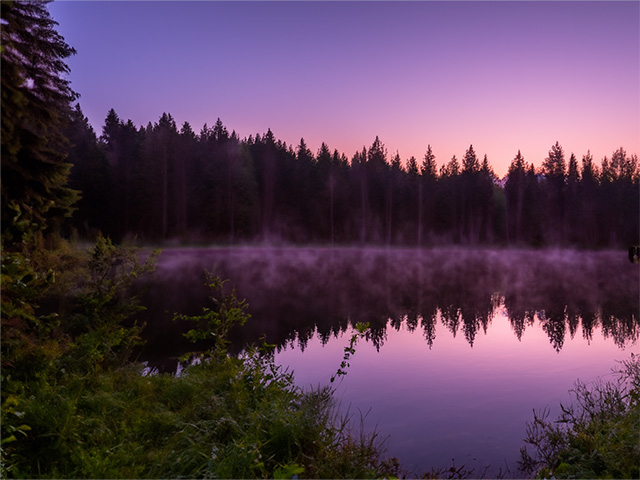
Example 4 (Add water reflection)

Here is an example to change the scene of the photo totally, I added a lake to the scene of an old castle, and the amazing thing is that the lake comes out with reflection. I made a selection on the foreground part of the photo using the marque tool, then I wrote “A calm lake with reflection “in the prompt box, here are the results.

Another example
Here is another example of adding a water reflection:
Example 5 (Extend images)
The generative fill can easily extend photos to whatever new dimensions, in the following example I will use a landscape photo, then I will use the Crop tool to extend the image as shown below:
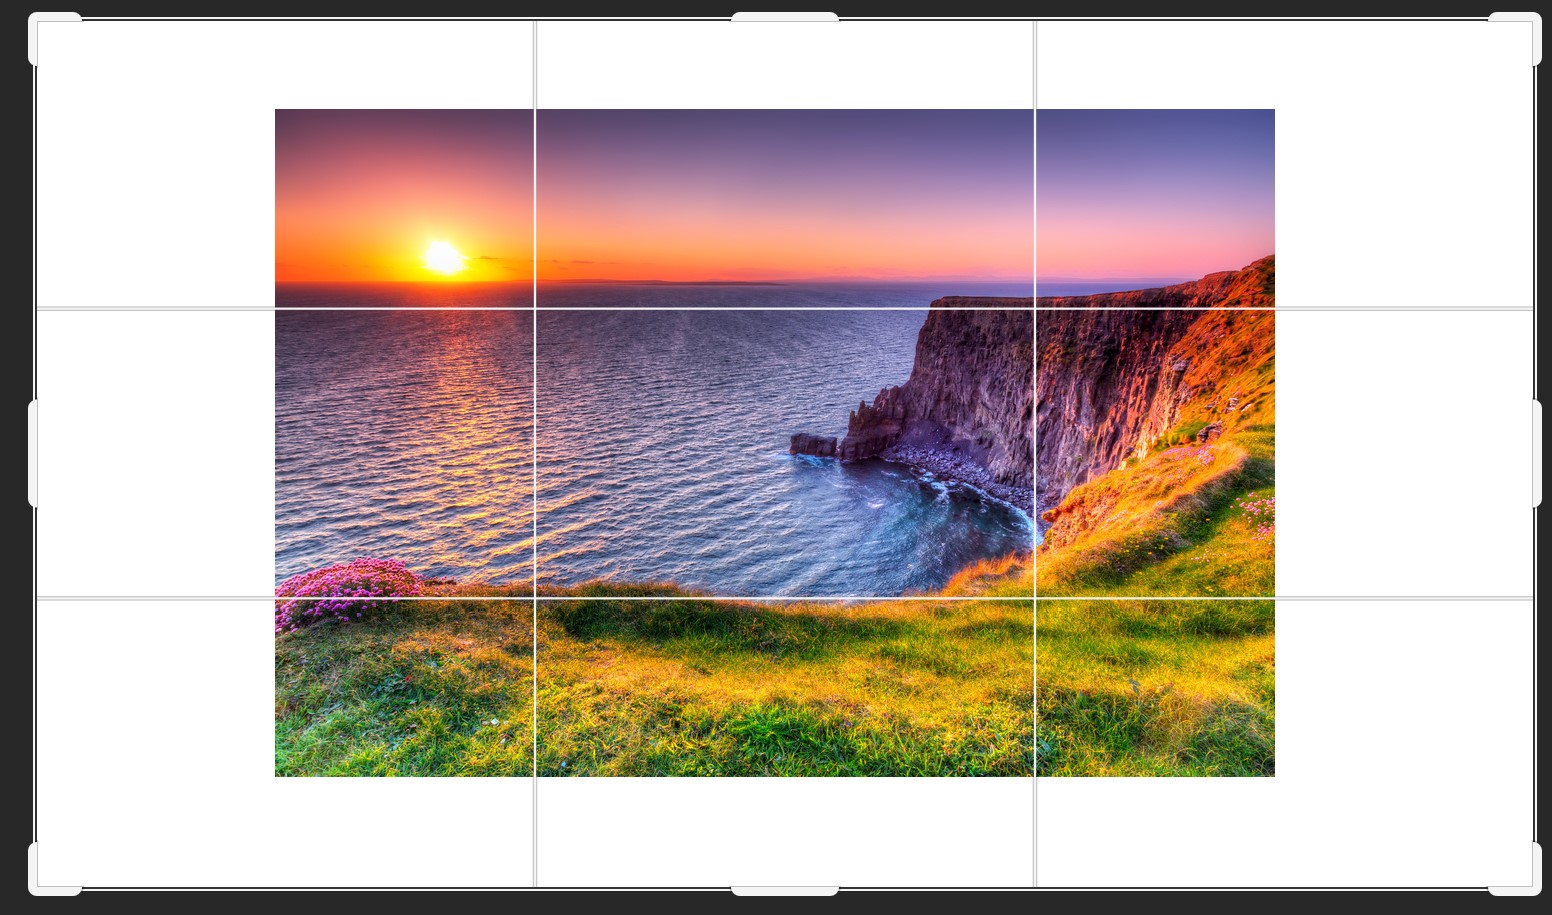
Then I use the rectangular Marquee tool to select the empty areas. After that I will use the generative fill to fill the empty areas, I will not use any prompt to do so.
The final result is incredibly amazing

Another example
to show the capability of the generative fill, I will use a portrait photo of a young man, and extend it.
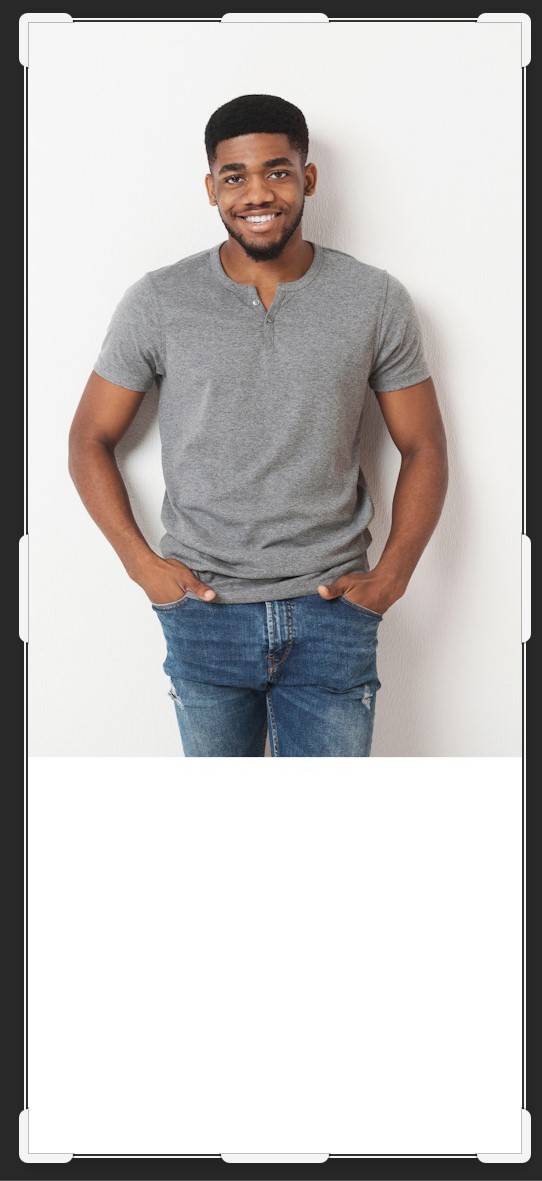
The same steps are used, use the crop tool to extend the image, then use the generative fill to fill the empty areas.

Example 6 (Change feature of your subject)
I think the steps of using the creative fill are now very clear, just make a selection with your favorite selection tools, and then use the generative fill with or without prompts to change the content of the selected areas.
The following two examples show the result of changing the color of the hair of a girl and changing the shirt of a young man.


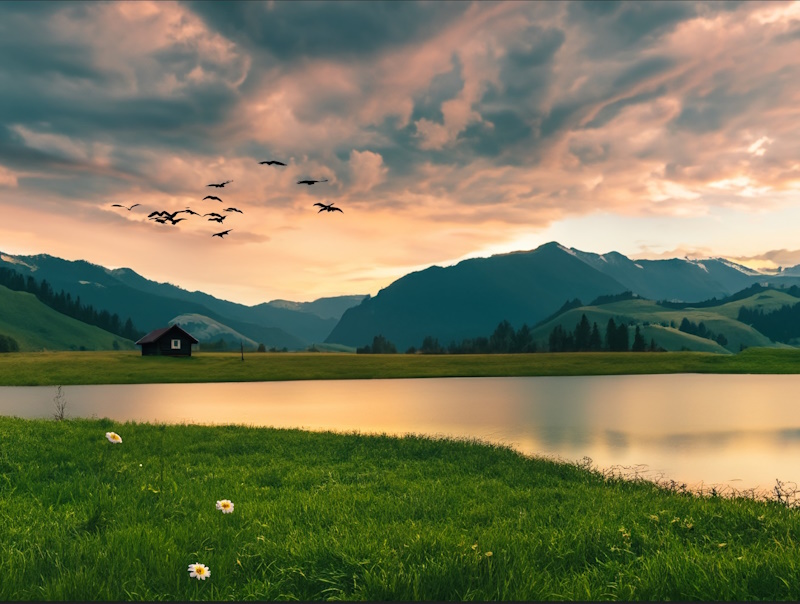
Example 7 (Generate new images from scratch)
You can create a new image, open a new file in Photoshop, make a selection of the whole empty frame, write the suitable prompt, then generate, and that it is!!
For example, I use the following prompt “Mountains with cloudy sky at sunset, a calm lake, and green field in the foreground; Old house, and flaying birds” to create the below image.
Tips and tricks while using Generative Fill
To maximize the benefits of Generative Fill, consider the following suggestions:
1- Craft impactful text prompts for impressive outcomes:
Use clear, concise language with 3-8 words that encompass a subject and its attributes. Avoid using commands like “add” or “remove”; instead, describe your desired result. For instance, try “A house in the woods” or “A red house in the woods.” Click Generate to explore multiple possibilities.
2- Employ layers for non-destructive image editing:
When you click Generate, a new Generative Layer is created based on your text prompt. Utilize Photoshop layers to manipulate and arrange various images or elements until you achieve a satisfactory composition. Merge several generated images for unique and surprising results.
3- Ensure adequate pixel selection for image extension:
If you wish to expand an image, select a portion that the AI model can reference. Choose a sufficient part of the image so the model can seamlessly extend your visuals, blending them with the original image while enlarging its dimensions.
4- Enhance your image further with Photoshop:
After generating a new image, refine it using Photoshop’s extensive tools to transform, edit, remix, or composite your visuals. Unleash your creativity within the Photoshop (beta) app.
Are you looking for Photo editing resources?
If are looking for editing resources like actions, overlays, and textures, I highly recommend paying a visit to my store, it has amazing professional photo editing tools.
In addition, you can check my editing tutorials, and my YouTube channel there are many tips and tutorials there.
Thanks for reading, I hope you enjoyed the article, in case you have any questions just drop them below & I will be happy to answer you.
All the images in this article are credited to Depositphotos
If you enjoy the site, don’t forget to subscribe, we will only inform you when a new article is posted.


I marvel at the power of AI and how it is transforming our work and world. Features of Generate Fill give it the ability to recreate the entire picture. Thank you for this tool. It is going to make my work easier. That means I do not need to worry about creating different effects when I snap pictures any longer. Great to know that I can easily add water reflections and other images to my photo
Thank you for your comment! I’m glad to hear that you find the Generate Fill tool useful. AI technology has indeed made significant strides in recent years, and it’s exciting to see how it’s transforming various industries, including photography. With Generate Fill, you can easily add various effects to your photos, such as water reflections, and create stunning images without the need for extensive editing skills. I hope you continue to enjoy using this tool and that it helps you create even more amazing photos!
Generative Fill looks awesome and is a great update to the already awesome photoshop software. I think with so many other alternatives coming out, the competition is high and they need to make sure that they stay on top of their game.
Love the water reflection feature, especially the fact that it automatically generates the shadows and reflections for you. The castle pic looks stunning with the water in front of it.
I am definitely going to take a look at your tuturials as there is just so much you can do, but probably don’t know about. Any suggestions for a comprehensive online course to learn photoshop better?
Thank you for your comment! I’m glad to hear that you found Generative Fill to be an awesome update to the already amazing Photoshop software. I completely agree with you that with so many other alternatives coming out, the competition is high, and Adobe needs to stay on top of their game.I’m also happy to hear that you love the water reflection feature and found the castle picture stunning with the water in front of it.
Regarding your question about a comprehensive online course to learn Photoshop better, there are many great options available. Some popular ones include many videos on YouTube, and of course, don’t hesitate to check out my tutorials as well! Thank you for your interest, and happy learning!
Thank you for your article. It was sufficient for readers to be well introduced to Generative Fill as a suite of AI-powered
capabilities in Adobe Photoshop that allows users to non-destructively add, extend, or remove content from images using text prompts. You have successfully highlighted the ease of use, the ability to achieve realistic results quickly, and the time-saving benefits compared to manual editing. Very reliable and interesting.
Thank you for your feedback! I’m glad to hear that you found my article informative and helpful in introducing Generative Fill as a suite of AI-powered capabilities in Adobe Photoshop.
It’s great to know that I was able to highlight the ease of use, realistic results, and time-saving benefits of this feature compared to manual editing.
Thank you for taking the time to read my article and share your thoughts!
Oh, yes, I was reading about this capability a couple of days ago. It is amazing. Photoshop is approaching being a user-friendly program that anyone can use.
I hope that one day one does not need a learning curve to get into Photoshop. Its capabilities are enormous. I love the program but I am not a user since I look at how my graphic design friends use the program, and I feel intimidated. With such new features, this intimidation will soon be obsolete for anyone who wants to use such a great program.
I completely agree with you! The advancements in technology and software capabilities are truly amazing. With the new features being added to Photoshop, it is becoming more user-friendly and accessible to a wider range of people. It is great to see that the learning curve for using such a powerful program is becoming less steep.
I am excited to see how these advancements will continue to shape the future of graphic design and other creative industries.