


Photoshop offers a number of selection tools and commands to select your desired portion of your photo. By selecting specific areas, you can edit and apply effects and filters to portions of your image leaving the unselected areas untouched. This is called localized or selective image editing.
The power of Photoshop lies within its huge number of tools and editing options. These tools and options offer you great versatility. Among these powerful tools is the ability to select areas of an image for more precise handling.
Knowing the selection tools and their power and limitation will help you a lot when you want to change the brightness, contrast, and other characteristics of a certain area instead of the whole picture.
Selection Tools
In the following paragraph, I will list the selection tools used in Photoshop 2020
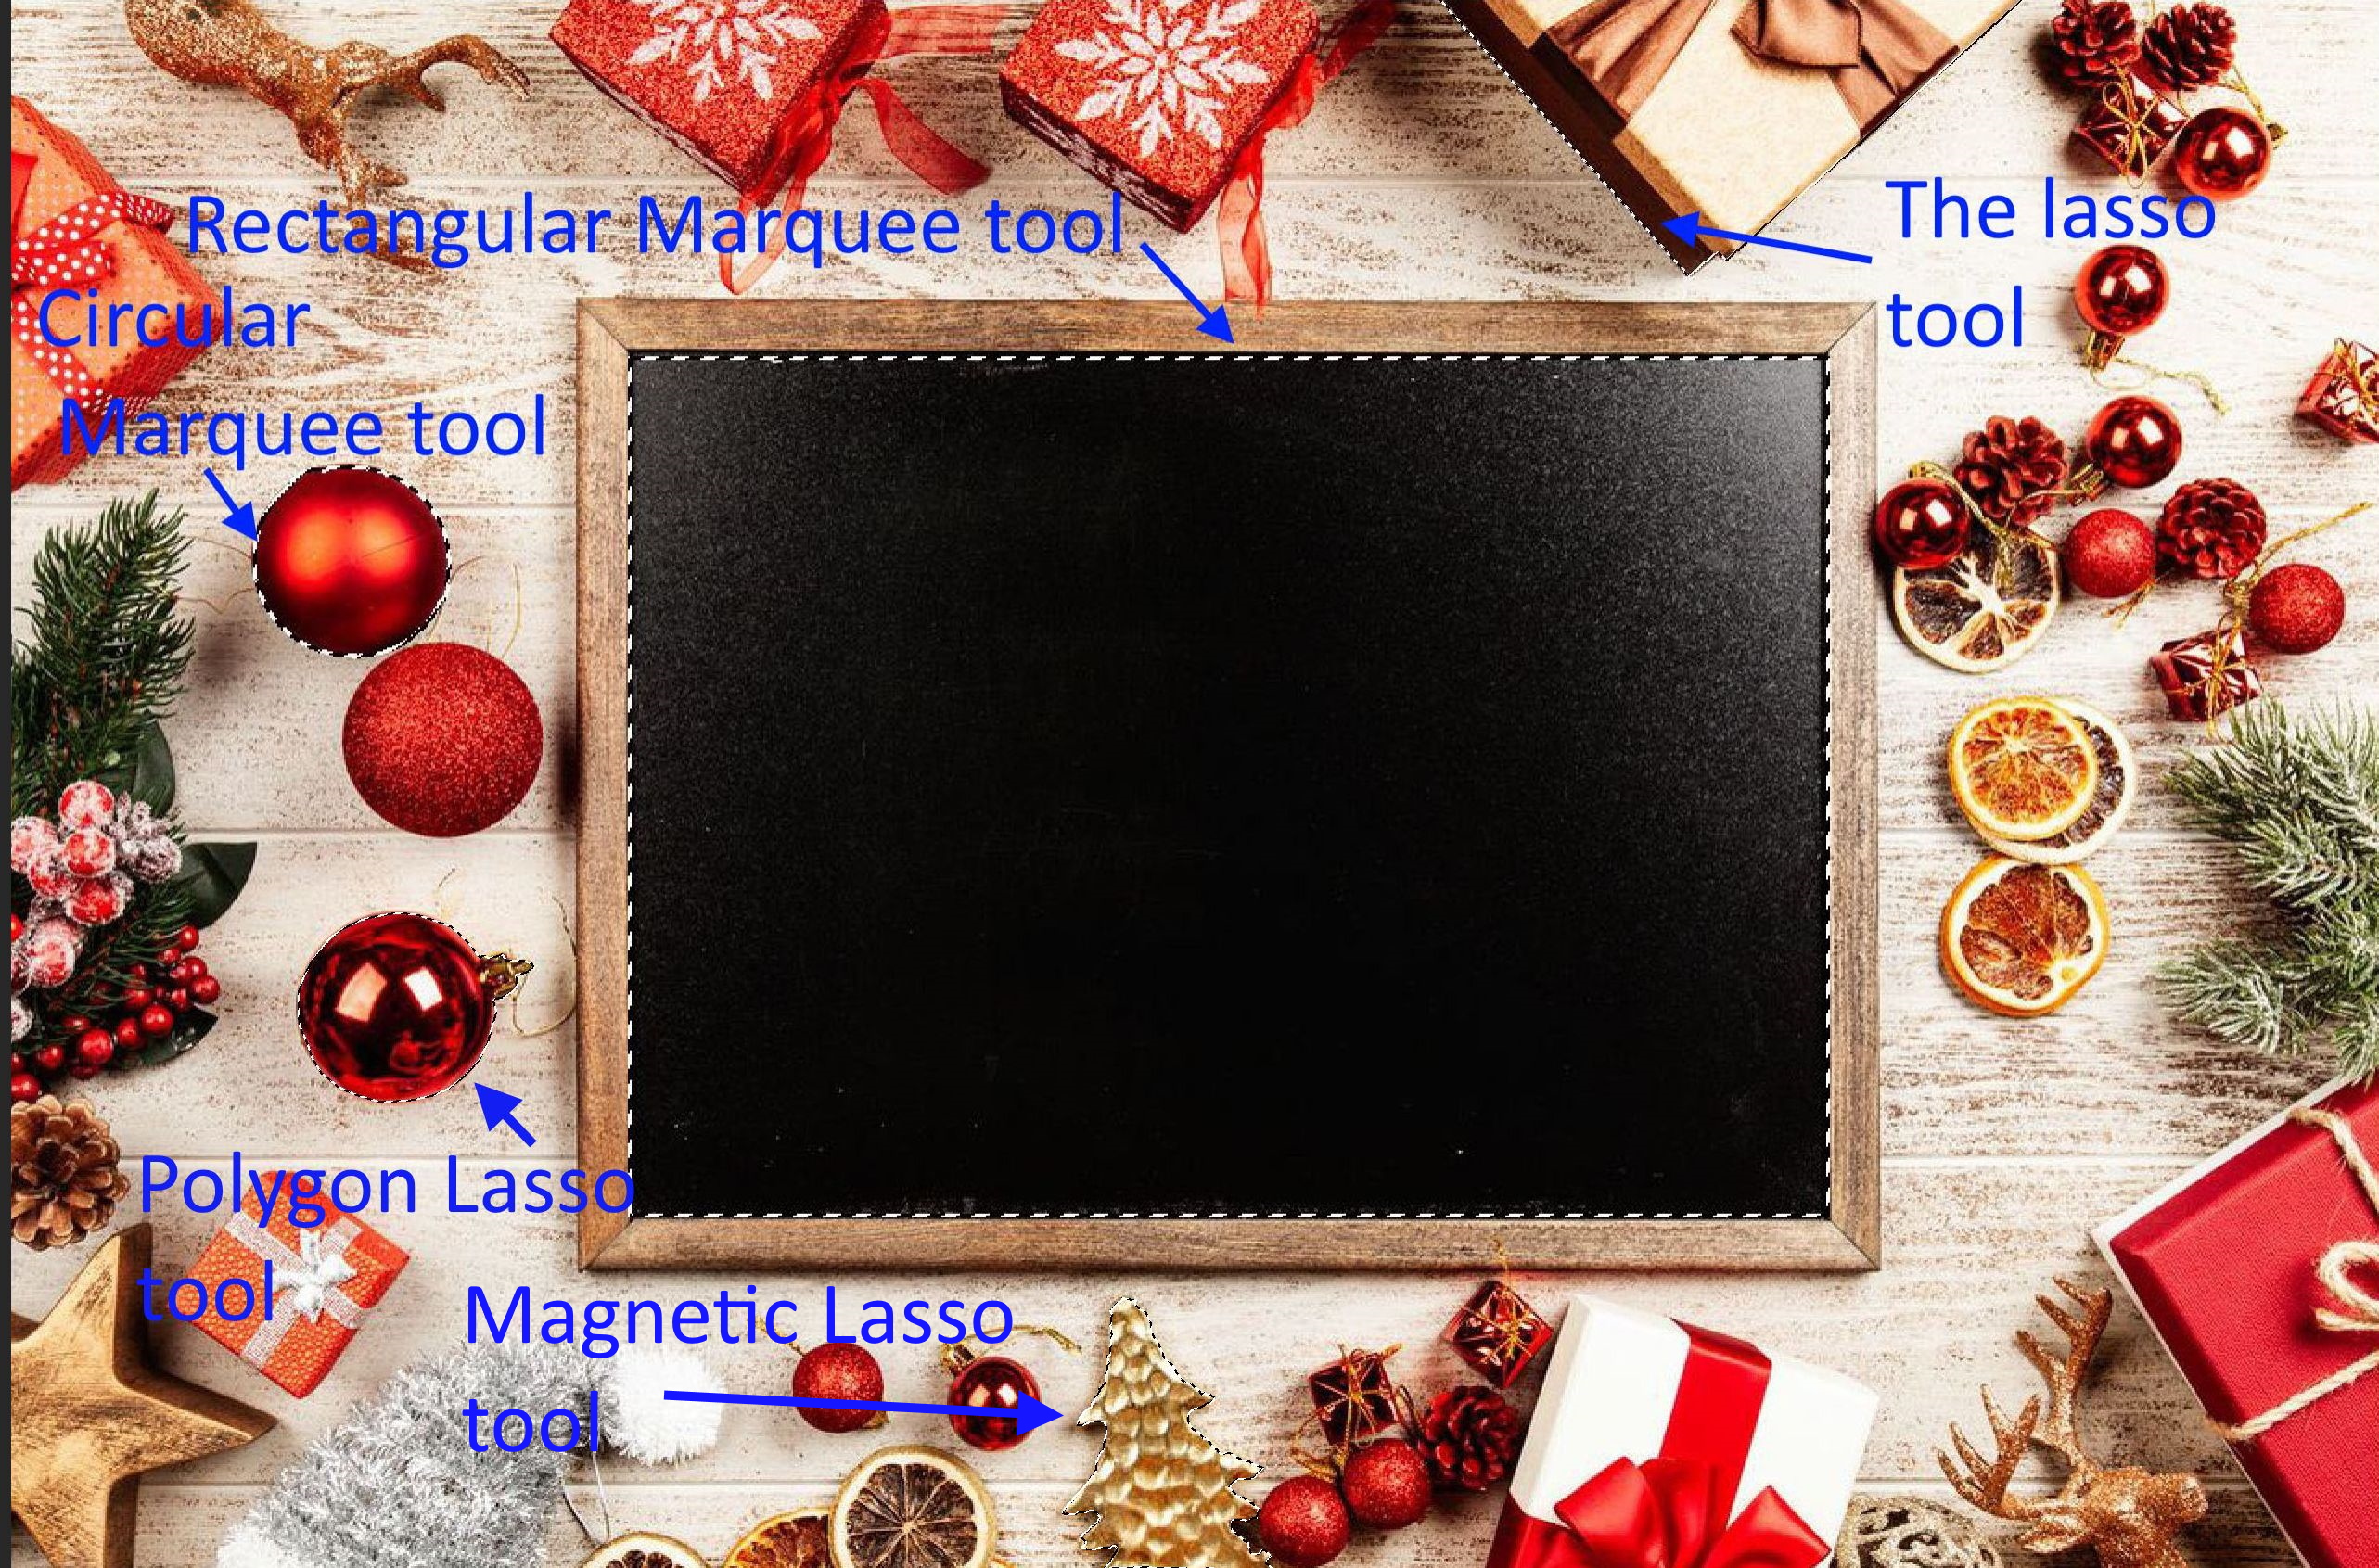
The Marquee tool
The Marquee tool is the most basic selection tool available in Photoshop. There are two types of this tool the rectangular and the circular tool. You can find them in the main toolbar. The marquee tool is limited by selecting rectangular and circular shapes.

To use it, just click, hold, and drag around an area you want to select. You would use this for things that are circular or rectangle, obviously, but they have to be perfect shapes. You can use this to get a general shape selection, and then use other Photoshop selection tools for more complicated shapes.
Single Row & Column Marquee Tool

It defines the border as a 1-pixel wide row or column.
The Lasso tool
The lasso tool works like the marquee tool except that it gives you the ability to move around areas freely without restriction. This allows you to avoid areas that you do not want to include. To do this, just click and drag the pointer around an area you want to select. There are two types of lasso tool:

The lasso tool allows you to create a freehand selection.
The polygon lasso tool allows you to make freehand selections, but its contour is made up of straight lines. This selection tool is restricted to polygonal outlines but is easier to use than the lasso tool because you do not have to drag the pointer around. Instead, just click on different points along a path that you want to select. It allows you to select freely based on the points.
The Magnetic Lasso Tool

It is a very useful outlining tool as it is more precise than the other lasso tools. It follows lines and outlines like a magnet, which makes it easier to select elements with contours.
Just click on the first point and move the pointer along the path or outline you wish to follow and finish the selection by going back to the original point.
Object selection tool
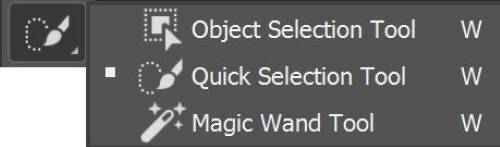
The Object Selection Tool is brand new as of Photoshop CC 2020. Let’s take a quick look at a few important options for the Object Selection Tool in the Options Bar. Note that these options need to be set before drawing your selection since they only apply to the next selection you make. There are two selection types that we can draw with the Object Selection Tool: Rectangle and Lasso. The rectangle is the default mode, and it lets you draw a simple rectangular box, just like you could with the Rectangular Marquee Tool. And Lasso works like the Lasso Tool, letting you draw a freeform selection around the object. Also, you can add or subtract from your selection by choosing from the menu on the top of the screen.
The way the Object Selection Tool works is that we draw a selection outline around the general area where the object appears. Photoshop then looks inside the boundaries of that selection to find the object, and it wraps the selection outline around it. Once the initial selection is in place, we can add missing areas to the selection, or subtract areas from the selection, again just by dragging around them with the Object Selection Tool.
The following example photo shows a selection of the woman in a photo.

Photo By Ehab Amin
Quick selection tool
To select the Quick Selection Tool, click on its icon in Photoshop’s Tools panel, or press the letter W on your keyboard to select it. There are two ways to use the Quick Selection Tool. One is to click on different areas of the image just as we would with the Magic Wand. The more common way, though, is to click and drag over the area you need to select as if you were painting with a brush. As you drag, Photoshop continuously analyzes the area, comparing color, tone, and texture, and does its best job to figure out what it is you’re trying to select, often with amazing results.
You can add or subtract to your initial selection by choosing from the options menu on the top of the screen.
The following example photo shows a selection of the woman in a photo.

Photo By Ehab Amin
Magic Wand
The Magic Wand Tool, known simply as the Magic Wand, is one of the oldest selection tools in Photoshop. Unlike other selection tools that select pixels in an image based on shapes or by detecting object edges, the Magic Wand selects pixels based on tone and color. The ‘Magic Wand tool’ will select a consistently specified colored area without having to trace its outline. We specify the color range or tolerance for the Magic Wand tool’s selection. By pressing the Shift key we can add selection and by pressing the Alt key we can subtract the selection.
One of the most important factors to consider when using the magic wand tool is choosing a suitable tolerance. The Tolerance option tells Photoshop how different in tone and color a pixel can be from the area we clicked on for it to be included in the selection. By default, the Tolerance value is set to 32, which means that Photoshop will select any pixels that are the same color as the area we clicked on, plus any pixels that are up to 32 shades darker or 32 shades brighter. Setting the tolerance value to 0, which tells Photoshop not to include any pixels in the selection except those that are an exact match in color and tone to the area where you click on.
The following is an example of using the magic wand tool when selecting the blue color of the T-shirt of a boy.

Photo By Ehab Amin
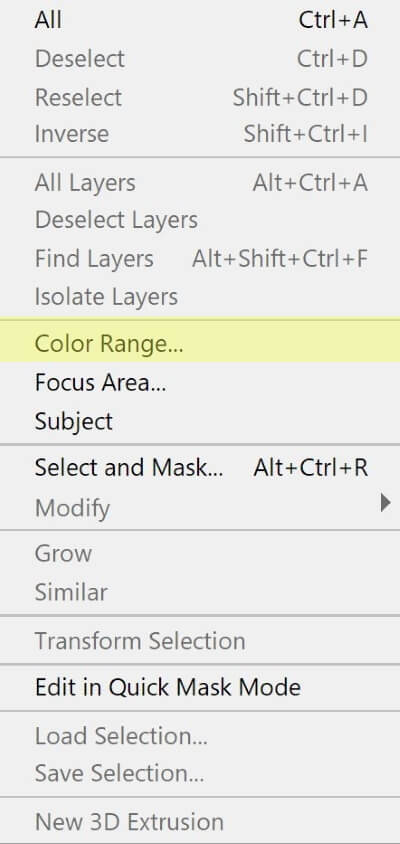
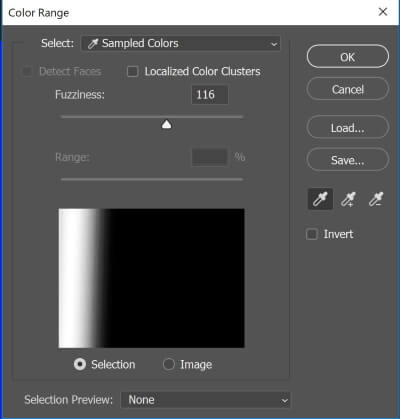
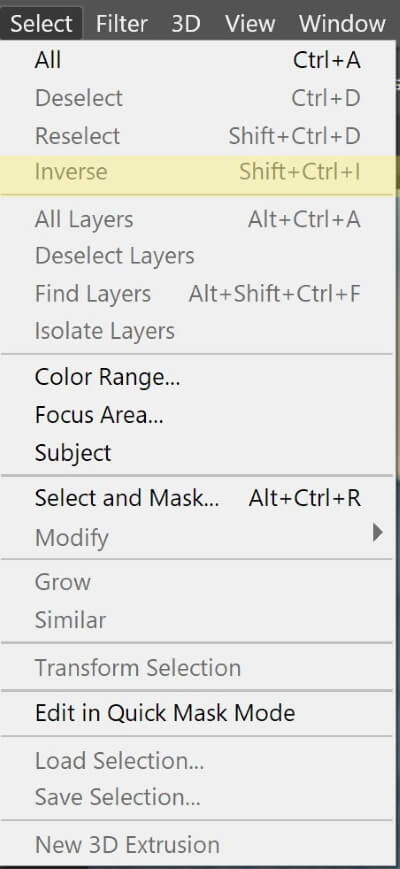
Color Range
You can pick up the color range tool from the main menu “select” as shown below
If an image has an array of different colors spread out, it would be time-consuming to select them all using the Magic Wand or any other tool. When choosing the color range selection tool another menu appears to allow you to pick up the colors you want to include in the selection and to control the fuzziness of the color i.e. the range of this color.
Inverse
If selecting an area is more difficult than selecting the areas around it, you can use inverse by selecting those areas outside and choosing to inverse the selection later. It is accessible through the Select sub-menu.
The inverse tool is used only with a pre-existing selection. It automatically selects the area that isn’t selected initially and deselects the pre-existing selection, therefore inversing the process. This makes the process faster.
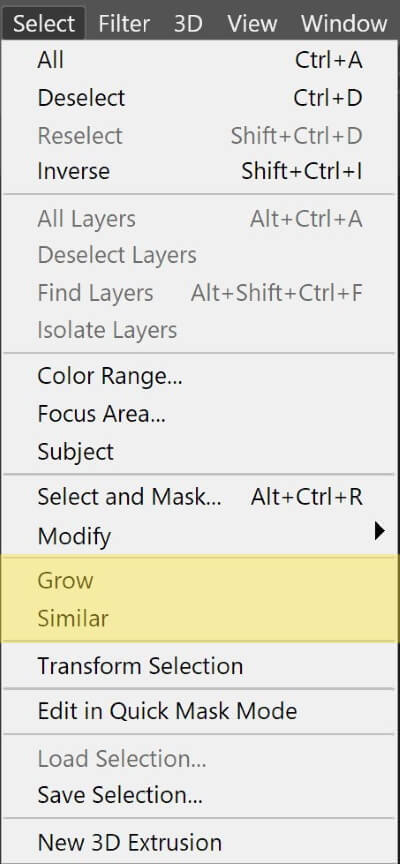
Grow
After making the initial selection, you may use the grow tool to widen the selection. Grow is growing your selection based on adjacent or contiguous pixels. Contiguous means touching or connected. In Photoshop, it describes pixels of the same color touching each other.
Similar
After making the initial selection, you may use the Similar tool to increase the selection of similar color and tone of pixels that are not connected to your initial selection pixels. Similar is selecting all similar, non-adjacent pixels on the entire image.
Thanks for reading, I hope you enjoyed the article if you have any questions just post them below & I will be happy to answer you.
The future photo by Ehab Amin
If you enjoy the site, don’t forget to subscribe, we will only inform you when a new article is posted.


Magic wand tool is one of the amazing tools of Adobe Photoshop.
Hello there thanks for sharing this interesting piece of review I must say I really did enjoy reading this review. No doubt the power of photoshop lie in the hands of the editors because without them the whole thing would not be made possible. I hope to see more of your articles
Thanks!
Hi,
Thanks for sharing this educative topic, I enjoyed every bit of it, I heard about photoshop before but I don’t know it as features or tools like it was discribe in your article. Knowing these tools can be of added value to me when I want to work with photoshop,
Aluko.
Thanks
Hello there Amin, thanks a lot for sharing this beautiful piece of information here with us. I must say i really did enjoyed going through your review as it contains valuable informations one needs to be aware of. This is my first time hearing of these tools that can be used in photoshop. Although I’m not really into this but the plan to get into it. Knowing these tools definitely would help me in becoming good at photo shop. Thank you so much
Thanks, Sophia for your nice comment and hope you all success in learning Photoshop. You can find lots of tutorials Here.