

Modern digital cameras have a diopter that helps improve the clarity of the viewfinder. By adjusting a dial, lever or knob located near the viewfinder, sharpness, and focus of the scene in the viewfinder changes. In this post, I will explain the diopter function, how to adjust it, and finally, I will explain and give some tips for how to take photos if you are wearing eyeglasses.
What is the diopter and where I can find it?
The dictionary definition of a Diopter is ad follows:
Diopter: (noun): A unit of refractive power that is equal to the reciprocal of the focal length (in meters) of a given lens.
A Diopter is basically a tool that allows a photographer to use the camera without needing glasses (If you are wearing eyeglasses). Therefore, by just adjusting the Camera Diopter to suit the photographer’s eyesight, you are able to ditch any external eye aids and use the camera freely without something bumping in between.
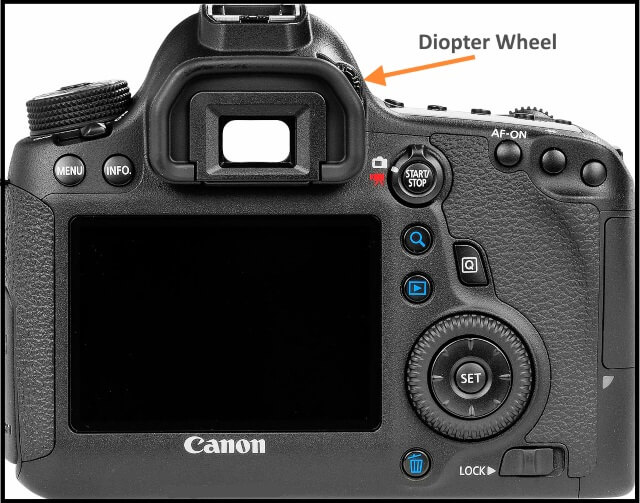
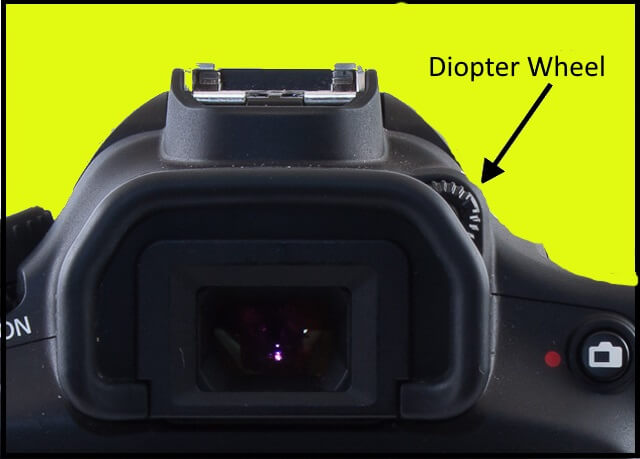
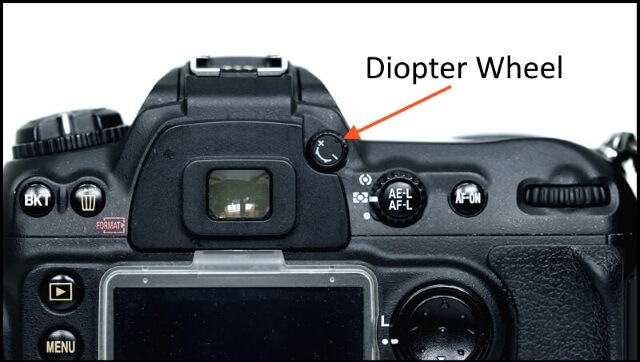
The best way is to check your camera manual. The following photos show some examples of a diopter position within your camera.
What is the function of the diopter?
Photographers as human beings normally do not have equal visual perception. There are many of them suffer from shortsightedness, long-sightedness, presbyopia, there are many vision problems. That is why many people are wearing eyeglasses. The glasses or contact lenses that an optometrist might prescribe on such occasion is to just help the light rays focus better on the retinas. These external eye aids are nothing but convex or concave lenses that help the light converge properly. The Camera Diopter is designed to mimic exactly this phenomenon.
The main function of the camera diopter is to allow any person to customize its vision through the viewfinder.
How do you know your diopter needs adjustment?
Since the diopter is only connected to the viewfinder, the focus of the camera lens itself is not changed nor does it affect autofocus. Therefore, to be sure that your diopter is accurately adjusted for your eyes, look through the viewfinder and check the symbology (grid, exposure information, focus points, digital data, etc.) and the image to see if they are in focus or not. Now you have three scenarios:
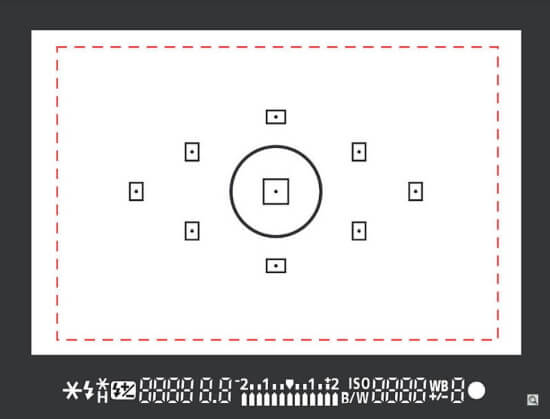
- If both the image and the symbology are in focus, you do not need any adjustment of the diopter.
- If the numbers, letters, and grid of your viewfinder are tack sharp and the image is not, the camera is out of focus or the autofocus is not working.
- If the image is accurately “focused” image and the symbology is out of focus, you need to adjust your diopter.
How to adjust the diopter?
It is really an extremely straightforward and simple procedure to set up your camera diopter with your own custom change. You can complete the whole thing in under a few minutes.
Follow the underneath steps to adjust your Camera Diopter:

- Fix your camera to something stable; lay it on a tabletop or best set it up on a solid tripod. It should not move during the procedure of modification.
- Then, aim your camera at something that is sufficiently bright and has a lot of contrast.
- Set your camera to Autofocus mode.
- Press the shutter button halfway and let the camera autofocus on the subject.
- Look through the viewfinder and see if everything looks perfectly clear, sharp, and in focus. The ‘everything’ includes the image of the subject and the symbology showing on the viewfinder.
- If ‘everything’ looks sharp, then you do not need to tamper with anything. Your Diopter is set all right. However, if you find the image or especially the symbology to be blurry, you have to start adjusting the Diopter.
- Keep looking through the viewfinder and turn the Diopter dial slightly till all you see turns sharp.
- Just to twofold check and play it safe, point your camera towards some other subject, and attempt to autofocus once more. Is everything looking tack sharp? In the event that it does, at that point congrats you have quite recently balanced your camera’s Diopter to your own custom setting.
Tips for Taking Photos if you are wearing glasses
The built-in diopter adjustments range from about +1 to -3, depending on your camera. If your prescription falls within that range, you can easily use your camera while taking off your eyeglasses.
Adjusting the diopter of the viewfinder means you will be able to look through it and see everything as if you were wearing your glasses. All the information like shutter speed and aperture will be sharp
If your prescription is stronger than that, do not worry. Both Canon and Nikon offer additional viewfinder lenses.
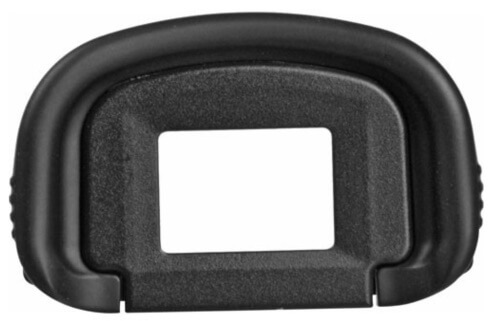
They come in different prescriptions as:
- For far-sighted users +1, +2, +3
Canon Dioptric Adjustment Lens E (+1) for EOS 1D, 10D, 20D, D30, D60, Digital Rebel & 1v SLR Cameras
The Dioptric Adjustment Lens EG (+1) for Select Canon EOS Cameras by Canon provides far-sighted users a clear viewfinder image without the use of eyeglasses. The Dioptric Adjustment lens fits into the eyepiece holder of the compatible camera.
- For near-sighted users -2, -3, -4
Canon Dioptric Adjustment Lens E (-2) for EOS 1D, 10D, 20D, D30, D60, Digital Rebel & 1v SLR Cameras
The Dioptric Adjustment Lens EG (-2) for Select Canon EOS Cameras by Canon provides near-sighted users a clear viewfinder image without the use of eyeglasses. The Dioptric Adjustment lens fits into the eyepiece holder of the compatible camera.
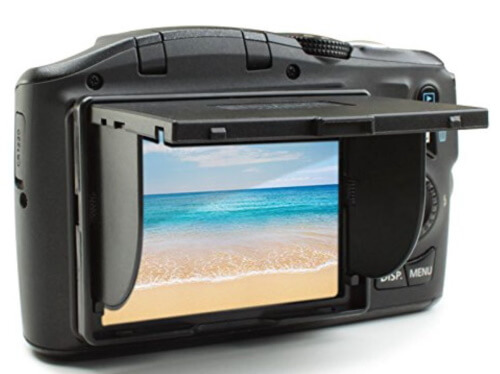
Use the Live View Screen and Zoom
Another alternative is using the live view screen of your camera while you are wearing your eyeglasses.
If you still having trouble seeing the live view screen on the back of your camera, then use the zoom feature—there’ll be a button with a magnifying glass on it to activate it. By zooming in, you can blow the small details up as big as they will go on a 3” screen.
There are some disadvantages when using your Live View Screen: It is difficult to see clearly through your LCD during sunny days. You also need to consider the impact of viewing the LCD if the sun is behind you in some shots. It may wash out the display. While you can block it with your hand, that means you are holding the camera with one hand and lose more stability. You also want to cover the viewfinder opening so extra light does not impact the picture. A simple solution for this issue is to use a sun shield for the LCD, one option is to use the following product:
Related Posts:
What Is Live View In DSLR Cameras
Thanks for reading, I hope you enjoyed the article if you have any questions just post them below & I will be happy to answer you.
If you enjoy the site, don’t forget to subscribe, we will only inform you when a new article is posted.


Hello Amin.
Thank you for sharing this information on camera diopter. I never had a understanding and knowledge of the diopter, how it works and how to utilise it for better sight view during photography. I have learnt all of that, thanks to this article you’ve put together for this purpose. The view finder is really a great help for people with sight complications. I don’t think I am going to ever use it anyways because I have not used it before.
Best regards!
Thanks, glad that you find the article interesting for you
Thank you for this detailed and informative post.
I’ve been a photographer for over 25 years and, to this day, I’ve never had to use the diopter, believe it or not. That said, my eyes are not as sharp as they used to be and it’s only a matter of time until I do.
I appreciate the detailed info and how-to you’ve provided (and the Canon example as I an original 5D user).
Thanks again,
Scott
GOD bless you! I hope you never use it. A couple of months ago I lend my camera to one of my dearest friends when he turned it back to me, that was the first time I have to check and adjust it again.