

Welcome to our guide on creating stunning photo mosaics in Photoshop!
A photo mosaic is a captivating form of digital art created by assembling numerous small images to form a larger picture. Imagine a puzzle made up of hundreds of tiny photographs, each contributing to the overall masterpiece. It’s a fascinating technique that adds depth, complexity, and visual interest to any project.
Photo mosaics are highly valued in the world of digital art and design. They provide a special means of expressing a message, narrating a story, or stirring emotions through images. Whether utilized in ads, social media posts, or personal endeavors, photo mosaics possess the ability to captivate viewers and make a lasting impact. Their adaptability allows for various applications, such as crafting personalized presents or enhancing interior decorations.
Get ready to unleash your creativity and dive into the world of photo mosaics! Let’s embark on this artistic journey together.
Definition of a photo mosaic
A photo mosaic is a captivating artwork created by assembling numerous smaller images to form a larger picture. Think of it as a patchwork quilt made of photographs, each contributing to the overall composition. This technique adds depth and complexity to digital art projects.
For inspiration, let’s look at some stunning examples of photo mosaics. From intricate portraits to elaborate landscapes, these artworks showcase the incredible versatility and creativity achievable with this technique. Whether it’s a mosaic of famous landmarks or a personalized collage of family photos, the possibilities are endless.
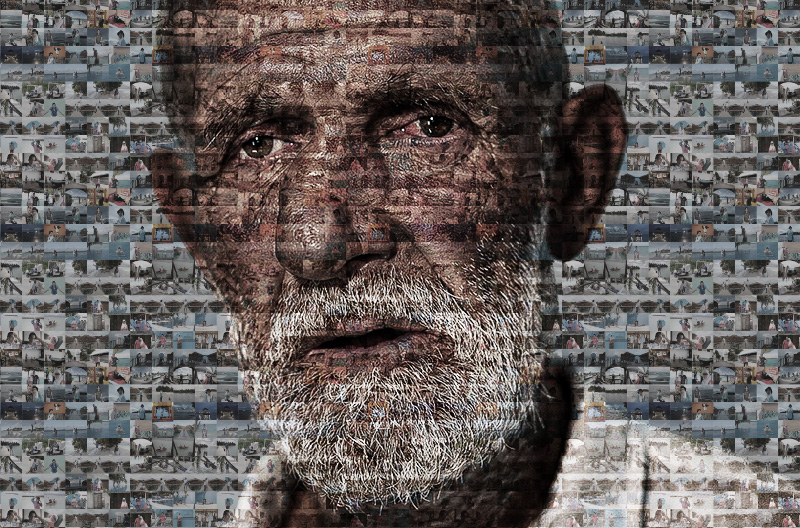
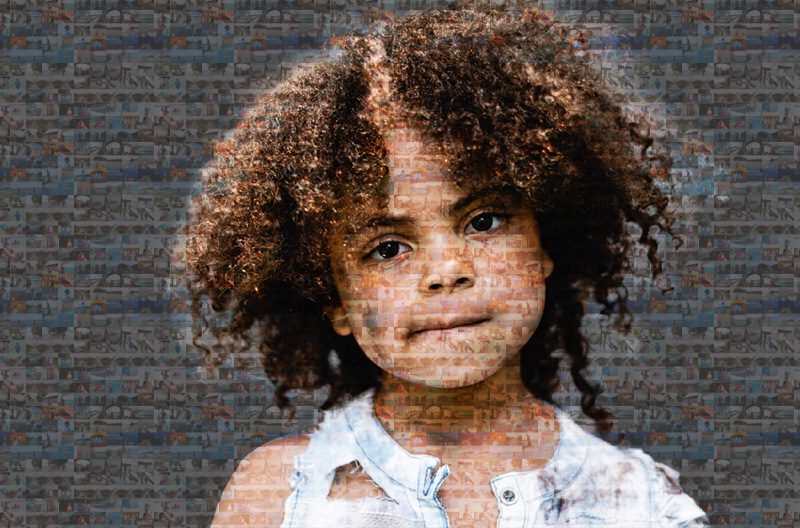
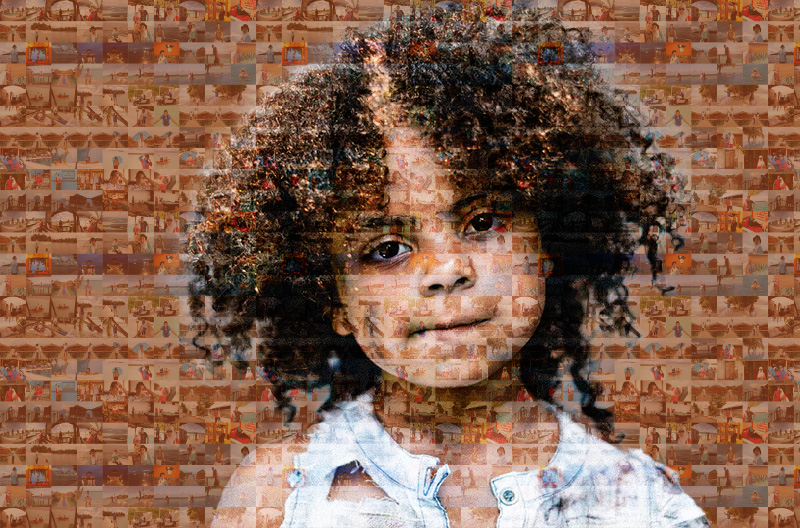
The below photo is an example of a portrait mosaic photo (The original photo by Depositphotos) and it was converted to a mosaic photo using this guide.
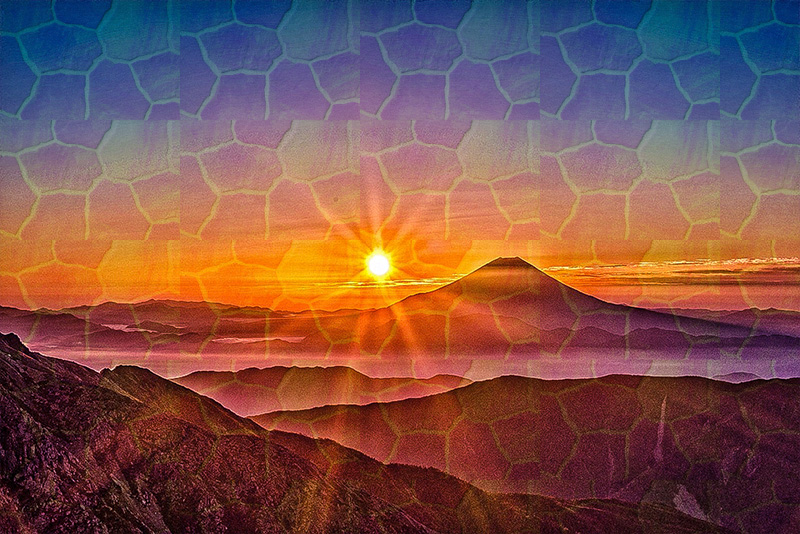
The below photo is an example of a landscape mosaic photo (The original Image by Kanenori from Pixabay)and it was converted to a mosaic photo using this guide.
Step-by-step example
Step 1: Select & adjust the main image for the mosaic
Start by selecting the main image for your mosaic. Choose a picture that will serve as the focal point and guide the overall theme of your artwork. Whether it’s a landscape, portrait, or abstract design, ensure it resonates with the message or emotion you want to convey. For this example, I pick up the below photo:
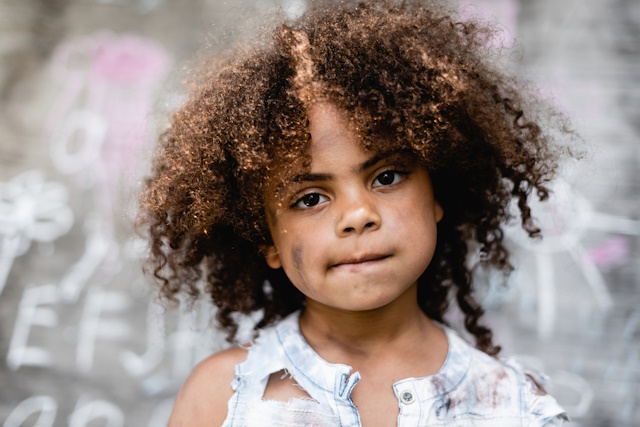
Photo by Depositphotos
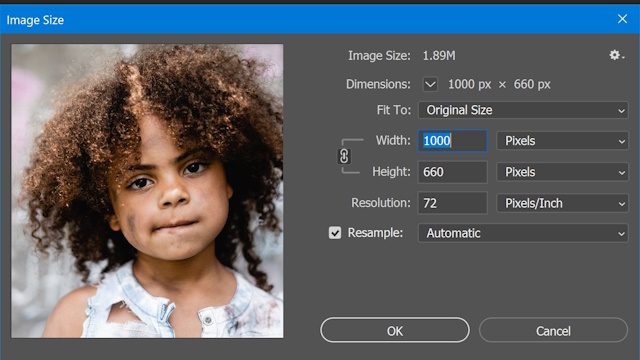
- Use Photoshop (2024) to resize the image to 800×660 pixels (Image > Image Resize)
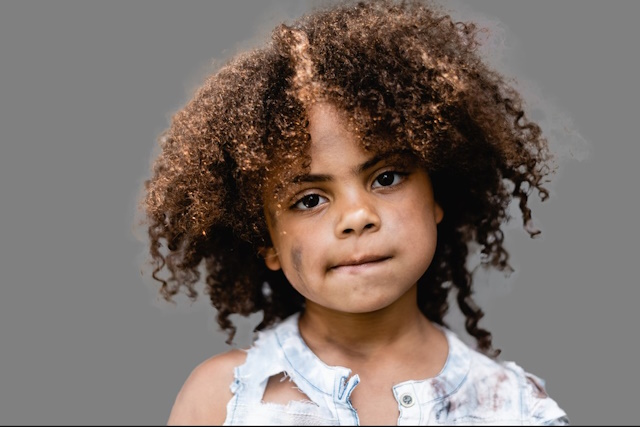
- Because the background is distracting, I remove it using the contextual task bar (if this bar is not apparent check it using the window menu)

- Add a new solid color layer (gay)
- Move the solid color layer underneath the main layer
- Now the main photo is shown below

Step 2: Collecting a pool of images to use in the mosaic
Ensure that you possess an adequate number of photographs to complete your mosaic. Insufficient images will hinder your ability to reduce their size and form the larger picture. Conversely, having an excessive amount of photos may cause you to overlook the overall composition. Aim for approximately 100 pictures for your mosaic, as this will provide the necessary variety of colors and pixels to create a captivating photo mosaic.
You may use any folder of your photos, or you may utilize stock photography websites to find more images. Additionally, think about incorporating duplicate photos as they won’t cause any issues in your photo mosaic design.
Step 3: Resize the mosaic photo
Adjust the size of your images. To create a mosaic, all images should have the same dimensions. So we need to resize them to 80x 66 pixels so we can get a grid of 10 columns by 10 rows. Instead of individually cropping and resizing in Adobe Photoshop, it’s quicker and simpler to batch resize in Adobe Photoshop when working with multiple mosaic images.
1- Create a resize action
- Open up one of the images in Photoshop
- Click the actions panel, (If you can’t see it, go to Window and click Actions).
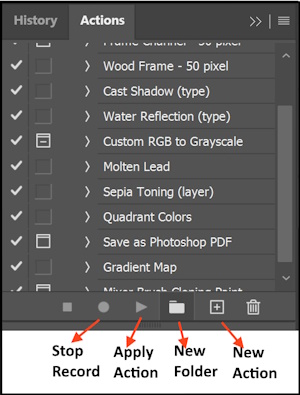
- Create new sets by clicking the folder icon, and naming it “Set1”
- Click the new action and name it “Resize”
- Now begin to record your action, by pressing record.
- Click Image > Image Size to bring up the Image Size window
- Change the width to 80 pixels, and length to 66 pixels press OK
- Click File > Save As, and then choose your destination folder “New folder”. Click “Save”.
- Choose your image options, and then click “OK“.
- In the actions panel, click the square “stop“
Now the resize action is created and saved automatically in your Photoshop.
2- Apply the Resize Action to your mosaic folder
- Open Photoshop, then go to File > Automate > Batch.
- Choose the set that you created for your action ”Set1”
- Choose your action “Resize”
- Set the source to Folder, Press choose, and select the source folder “final”
- Set the destination to Folder, Press choose, select the destination folder “New folder”
- Click OK.
In a few seconds, Photoshop will apply the resize action to all 100 photos in our folder automatically.
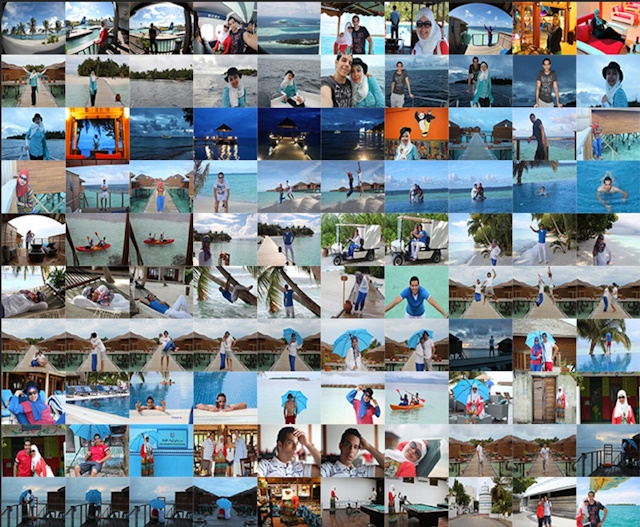
Step 4: Create a Contact sheet
Now, we need to make a simple collage of the resized photo in one document. Photoshop offers a tool to generate a contact sheet.
So what is the contact sheet?
Contact sheets are a feature in Photoshop used for organizing and previewing multiple images in a single document. They provide a visual representation of all selected images arranged in a grid format, with each image displayed as a thumbnail.
Contact sheets are useful for quickly reviewing and comparing images, especially when sorting through large collections or selecting photos for a project. They offer options for customizing the layout, such as adjusting the number of rows and columns, adding labels, and including file metadata.
As for our example, we will use the contact feature to arrange the 100 photos in one sheet, with 10 rows by 10 columns.
Follow the below steps to create a contact sheet.
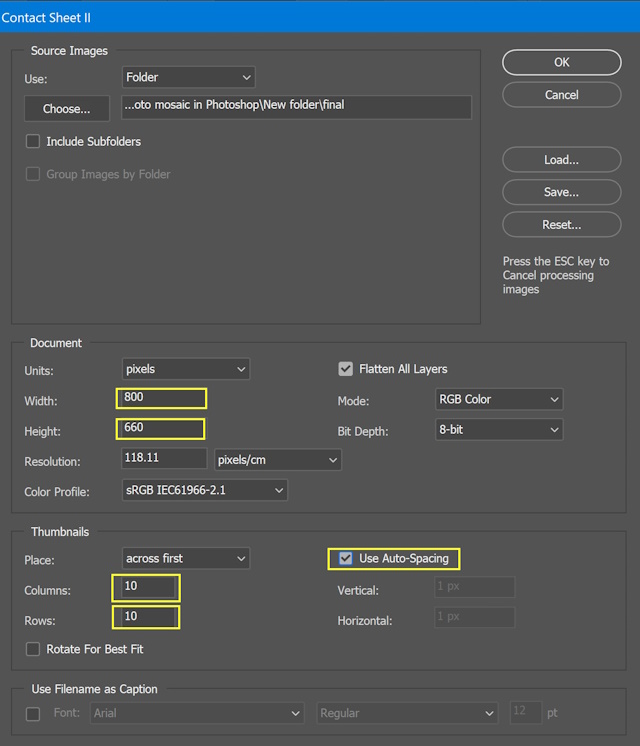
- Open Photoshop, then go to File > Automate > Contact Sheet II
- Choose the source folder ‘New folder’
- Set the dimensions of the documents to 800 x 660 pixels
- Set the columns to 10, and the rows to 10.
- Check the Auto spacing box.
- Press ‘O.K’
Photoshop will automatically arrange the photos of the small images in one document, as shown below
Step 5: Make a Pattern from the contact sheet
Patterns in Photoshop are small, tile-able images used to fill areas with repeating designs or textures. They are typically created from a single image or design that seamlessly repeats horizontally and vertically.
There are some advantages of using patterns over contact sheets, they offer versatility in scale and color, allowing designers to customize them to suit their project’s needs.
Follow the below steps to create a pattern.
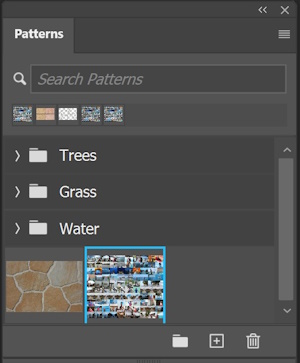
- Open Photoshop, press Edit > Define Pattern
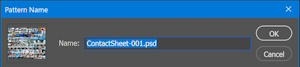
- The pattern is created and saved in the pattern menu
- To check it, press window> Pattern, and you will see it in the pattern menu
Step 6: Making the Mosaic photo
- Open the main image in Photoshop
- Add adjusting layer > Pattern
- Choose the created mosaic pattern

- Change the blending mode to Soft Light
- Adjust the layer Opacity to your liking
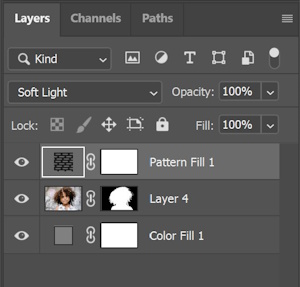
- You can adjust the scale of the mosaic pattern, double-click the pattern and adjust the scale on the pop-up dialog box.
- You can refine the final image by adding a curve-adjusting layer
Two versions of the final image are shown below
More examples
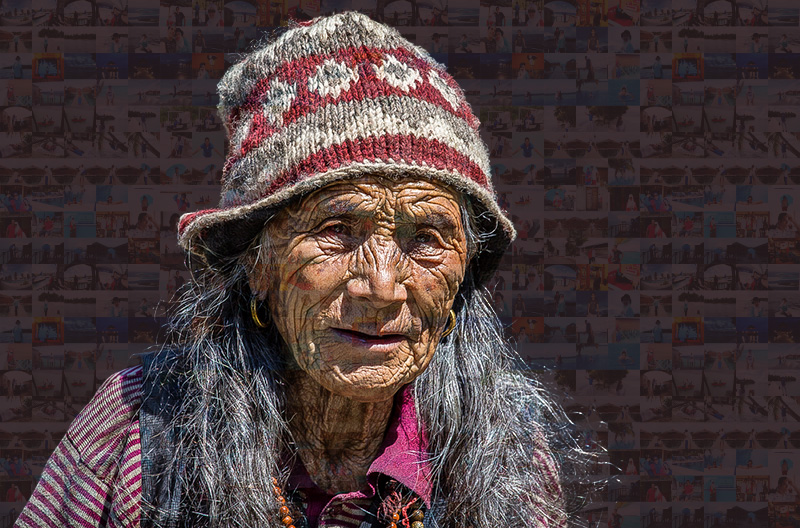
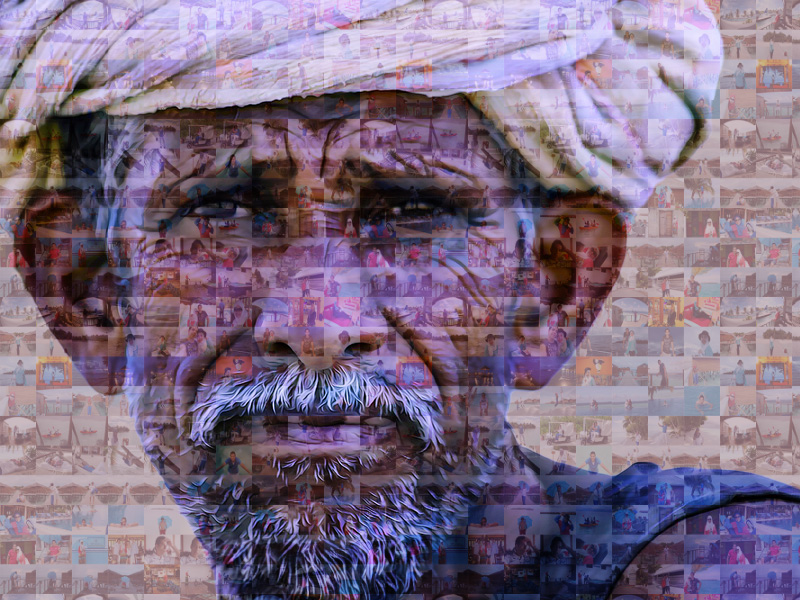
The below photo is an example of a mosaic photo (The original Image by 903115 from Pixabay ) and it was converted to a mosaic photo using this guide.
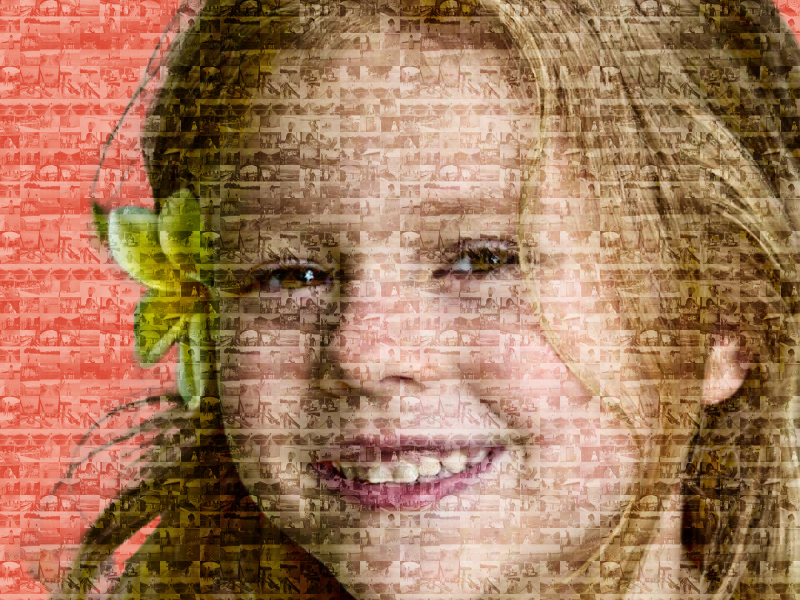
The below photo is an example of a mosaic photo (The original Image by Brigitte Werner from Pixabay ) and it was converted to a mosaic photo using this guide.
Conclusion
In conclusion, creating a photo mosaic in Photoshop is a rewarding journey of artistic expression. With the right tools and techniques, you can turn a collection of images into a captivating masterpiece. Whether it’s a personalized gift, a unique piece of digital art, or a creative project for your business, photo mosaics offer endless possibilities for creativity. So, don’t hesitate to unleash your imagination and explore the world of photo mosaics. With practice and experimentation, you’ll soon be amazed at the stunning results you can achieve. Start creating your photo mosaic today and let your creativity shine!
By following this comprehensive guide, readers will gain the knowledge and skills needed to create captivating photo mosaics in Photoshop, allowing them to express their creativity and produce stunning visual artwork.
Are you looking for Photo editing resources?
If are looking for editing resources like actions, overlays, and textures, I highly recommend paying a visit to my store, it has amazing professional photo editing tools.
In addition, you can check my editing tutorials, and my YouTube channel there are many tips and tutorials there.
Related posts
Batch Edit Photos In Photoshop
Understand the Curves Tool In Photoshop
How To Create Photo Collage In Photoshop
Thanks for reading, I hope you enjoyed the article, if you have any questions just drop them below & I will be happy to answer you.
Image by Осман Бекболатов from Pixabay is used to create the featured image.
If you enjoy the site, don’t forget to subscribe, we will only inform you when a new article is posted.