

Correcting White balance (WB) is the process of removing unrealistic color casts (A colorcast is an overall wash of color caused by the lighting in which a photo was shot) so that objects which appear white in person are rendered white in your photo.
If a color cast makes your photo look unnatural, or you need to adjust the white balance after taking the shot, this tutorial will explain two simple techniques to correct the white balance and remove any color cast using Photoshop.

BACKGROUND
Human eyes are very good at judging what is white under different light sources, but digital cameras often have great difficulty with auto-white balance. Consequently, it can create blue, orange, or even green color casts.
If you were shooting in clear daylight, the colors in your image would be the same as the colors in the scene. However, you are not always photographing in this type of light and it is more likely that you would be taking photos when there are clouds in the sky, in low light when we need a flash, or under fluorescent lights indoors.
Therefore, if you forget to adjust the white balance in your camera before taking a photo, the camera will assume that you were shooting in daylight and the result would be that the photo would have a colorcast in it.
The reason that this happens is that different types of light sources give off different colors. For example, an electric light bulb gives off-yellow color. The flame from a candle gives off a yellowish red color and Fluorescent lights have a slight blue color.
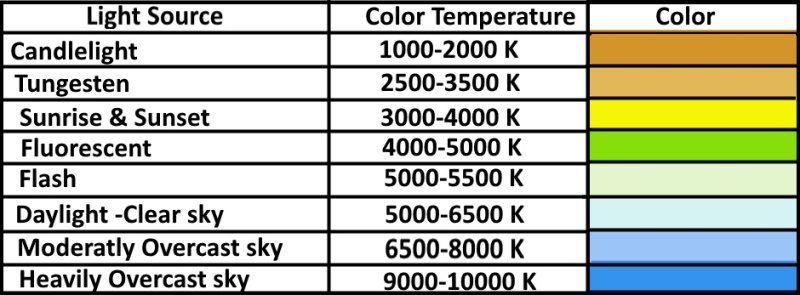
Proper camera white balance has to take into account the “color temperature” of a light source, which refers to the relative warmth or coolness of white light. So, what is color temperature?
Color temperature is used to describe the appearance of light and it is measured on a scale called Kelvin (K), the scale ranges from 1,000 to 10,000 degrees. It is used to describe the color of the light source that you are photographing in.
Typically, Kelvin temperatures for various lighting conditions are shown in the below table
Correcting White Balance in Photoshop
Method 1:
In this technique, we will use a threshold adjustment layer, and the “difference” blending mode to determine a point in the photo that represents exactly 50% gray. Then we will use the “curve” adjusting layer to apply this point as the mid-tone. Therefore, before we start discussing the method, we would like to explain what these terms means are:
-
Threshold adjustment layer
It creates a two-tone, black and white image from color images based on a pixel intensity threshold. Any pixels lighter than the threshold are converted to white; any pixels darker than the threshold are converted to black.
To control the threshold drag the slider to the left to convert more pixels to white, drag the slider to the right to convert more pixels to black.
-
Difference Blending Mode
If you change the blending mode of a layer to the “difference” blending mode, this blending mode Looks at the color information in the active and underneath layers, and subtracts either The blend color from the base color or the base color from the blend color, depending on which has the greater brightness value.
If the blend color is lighter than 50% gray, the image is lightened, if the blend color is darker than 50% gray, the image is darkened.
Example 1

Photo by Nicole Michalou from Pexels
- Open the photo in Photoshop
- Add a new layer
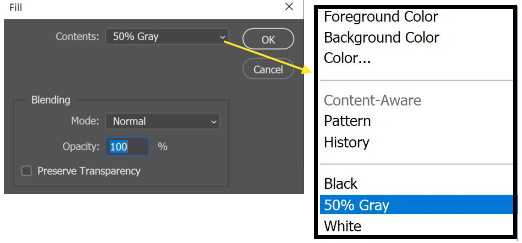
- Fill the layer with 50% gray, click Edit and choose Fill, and choose 50% gray.
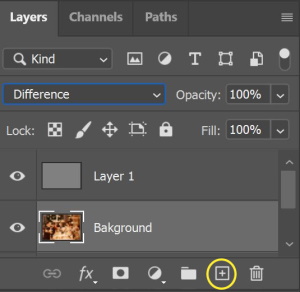
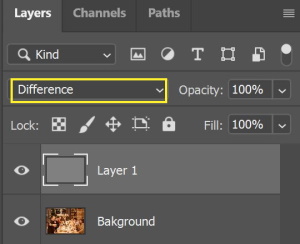
- Change the blending mode to Difference
- Add a new adjustment layer, and choose “Threshold”

- From the property panel, move the slider to the end of the left side (the photo turns into white)
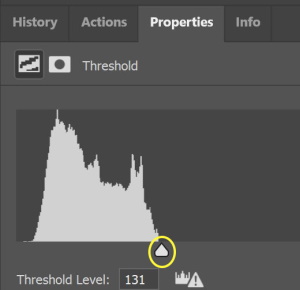
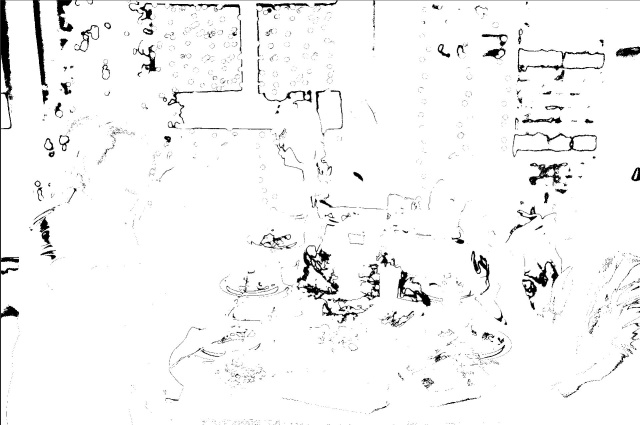
- Slowly start moving the slider to the right until the beginning of dark areas begins to appear, as shown below.
- Use the Color Sampling tool to take a sample of the black color (the exact 50% gray)


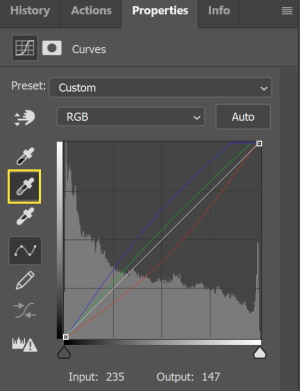
- Now, add a “curve” adjusting layer, hide the Threshold and the gray layers.

- From the property panel of the “curve” adjusting layer, select the sampling brush of the gray odor, and click on the sample point on the photo.

That is it, the before and after photos are shown below

Another example

Photo by Andrea Piacquadio from Pexels
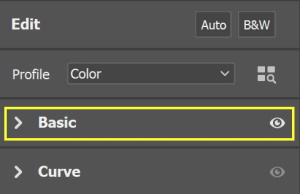
Method 2:
In the second method, we will use the Camera Raw Filter. The filter has an automatic adjustment capability.
Example 2:
- Open the photo in Photoshop
- Duplicate the layer (Ctrl + J)
- Convert the layer to a Smart Filter (Filter > Convert for Smart Filter)
- Open the Camera Raw Filter (Filter > Camera Raw Filter)
- Expand “Basic”
- From the White Balance menu choose “Auto”
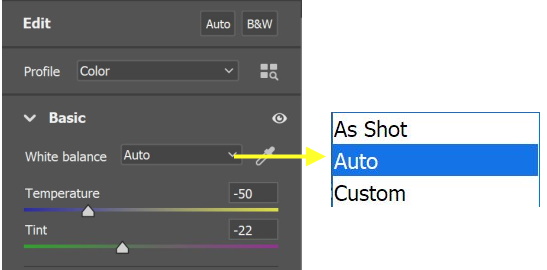
- Press O.K to apply the filter
The before and after photos are shown below
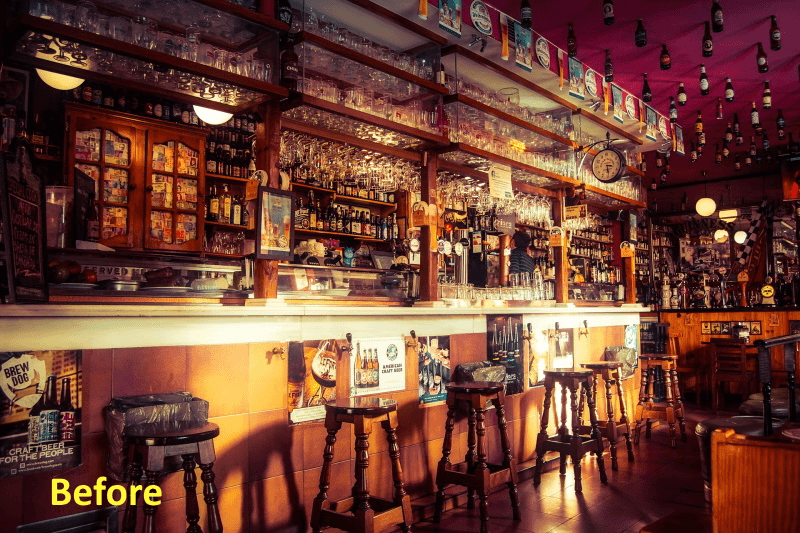
Photo by Pixabay
Another Example
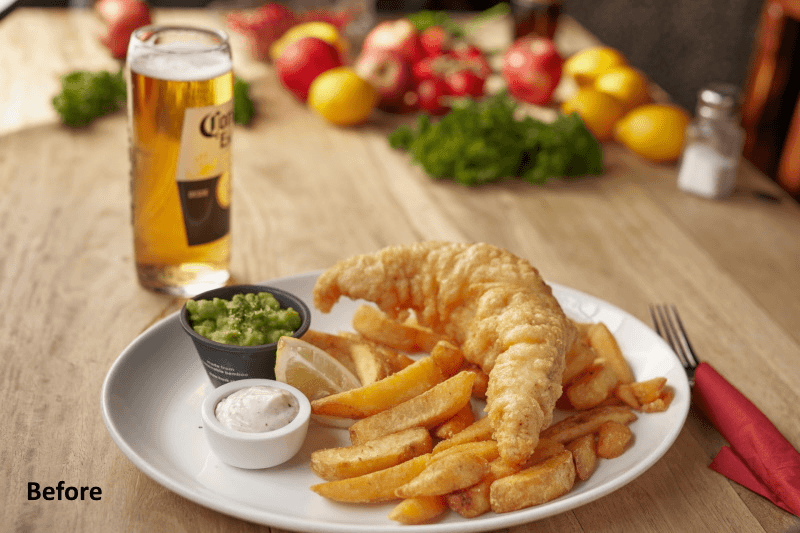
Photo by Olga Lioncat from Pexels
Related posts
What Is White Balance? – A Beginner Guide
How to Use Gray Card to Get Proper Exposure And Color
What Are The Different Types Of Light In Photography?
Thanks for reading, I hope you enjoyed the article, in case you have any questions just drop them below & I will be happy to answer you.
The feature photo by Pixabay
If you enjoy the site, don’t forget to subscribe, we will only inform you when a new article is posted.


Amazing article, I am a huge fan of photography. It is just amazing how much difference can simple white balancing make. On mobile devices I like an app called Snapseed (android) it is really user-friendly, and simple to use, yet have a large variety of adjustments. Of course, this is used for Instagram, but you can do a lot of simple things, and it is free.
I agree with you, Snapseed is good for mobile photography, but for more professional shots you will definitely need Photoshop or a more advanced photo editor. Thanks for your comment, wish you all the best.
I have no idea what this means but it seems like something that will help photographers out there. I know of a few photographers who are looking for ways to better their pictures so I will be sure to share this article with them. I am sure that they will appreciate the help so thank you for this
Thanks