

The concept of light metering is often a point of confusion for newbie photographers. I’m going to try to explain everything about digital metering and show the difference between the two methods used to measure the light, and setting the exposure. But before we start over, there are some concepts that should be explained first. There are two essential forms of light: Incident and Reflective. Understanding the difference between the two is a big start to mastering light.
Incident light
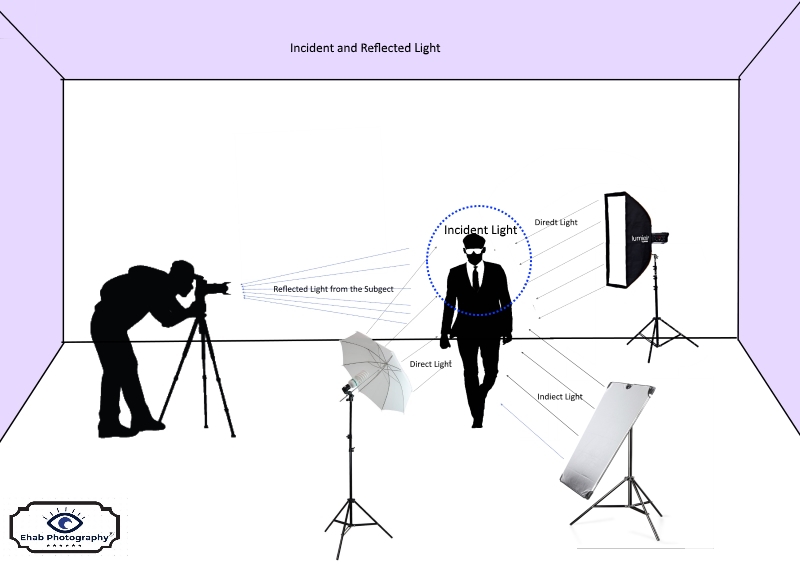
The incident light is the light that falls on a subject, whether it comes from a direct or indirect source. The direct source is light such as the sun or a flash or studio light that is targeted at the subject. The indirect source is the light that is coming from the main light source and is redirected to the subject. Examples of redirected surfaces might be a wall or snow or water from which sunlight bounces back onto the subject. It can also come from a reflector, which also redirects, or bounces, light onto the subject.
Reflected Light
Reflected light is a light source that initiates from the presence of incident light. In other words, it’s the light that bounces, or reflects, off the reflective materials in your scene.
Metering the Light
In order to accurately meter the light in the scene to obtain the correct exposure, there are two metering techniques that are used: reflected light metering (that measures the light that is reflecting from your subject) and incident light metering (that measures the light that is illuminating your subject)
Reflective metering
Reflected metering reads the intensity of light reflecting off of the subject. It reads the light from the entire scene and uses an averaged reading based on an 18-percent gray (also known as middle gray). This gray is a standard value designed to provide a safe and predictable exposure for average subjects.
Since these meters assume the subject has a reflectance of about 18% (the same as neutral gray), it sets the exposure accordingly. That’s good for a typical landscape in daylight, but not if something lighter or darker is predominant. As we all know, subjects simply aren’t all average.
Reflected Metering can be easily fooled by variances in tonality, color, contrast, background brightness, surface textures, and shape. What you see is often not at all what you get. Reflected meters do a good job of reading the amount of light bouncing off of a subject, but the trouble is they don’t take into account any other factors in the scene. They are recording all things as a medium tone.
Reflected measurements of any single-tone area, for instance, will result in a neutral gray rendition of that object. Subjects that appears lighter than gray will reflect excess light, causing them to record darker than they appear. Subjects that are darker than gray will reflect less light and produce an exposure that renders them lighter.
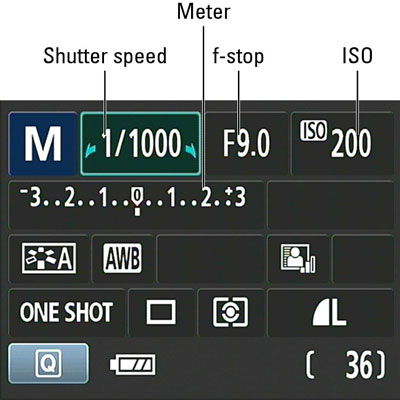
All cameras from the simple point-and-shoots to DSLRs use reflected metering. This means that the metering sensor inside the camera reads whatever light is being reflected from the subject and the scene into the camera. The photo below shows the display of the exposure meter, its shape can differ a bit according to the camera model.
Of course, you can let your camera do everything and hope it produces the goods – and much of the time it will. However, you’ll often be able to improve things if you get involved in the process, and the first step is to choose the metering mode the camera uses to measure the light.
Today’s DSLRs typically have these 3 common metering settings:
- Evaluative or Matrix
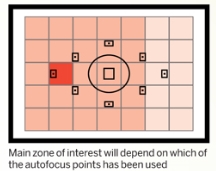
The camera meters a wide area of the image in the viewfinder and sets the exposure according to the average exposure of the scene. It can also be biased to where the focus is. Higher-end DSLRs have a sophisticated way of biasing certain tones like skin and object distance from the camera.
- Center-Weighted
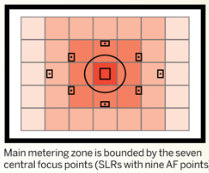
The camera meters a good portion of the image in the frame but puts more bias around the center area.
- Spot
You can specify a metering point and have the camera base its exposure calculation on only that point. This is useful for backlit situations like shooting a subject with the sun behind him or her. You would place the metering point on the subject so the exposure reading would not be affected by the backlight.

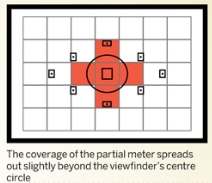
Canon also has a Partial metering mode that meters an area that is less than Center-Weighted but is more than Spot metering.
Using a gray card for metering
There are a few simple techniques that will allow you to get more accurate meter readings from your subject. To take advantage of these techniques, you only need to add a single cheap piece of equipment to your camera bag: a gray card. Although the gray card is commonly used in setting the white balance it can also be used to set your exposure.
A gray card is exactly what it says it is. A card that is gray. More specifically, it is middle gray, or 18% gray. This number is important because 18% gray is what your camera’s meter is trying to calculate when it meters to expose for a scene.
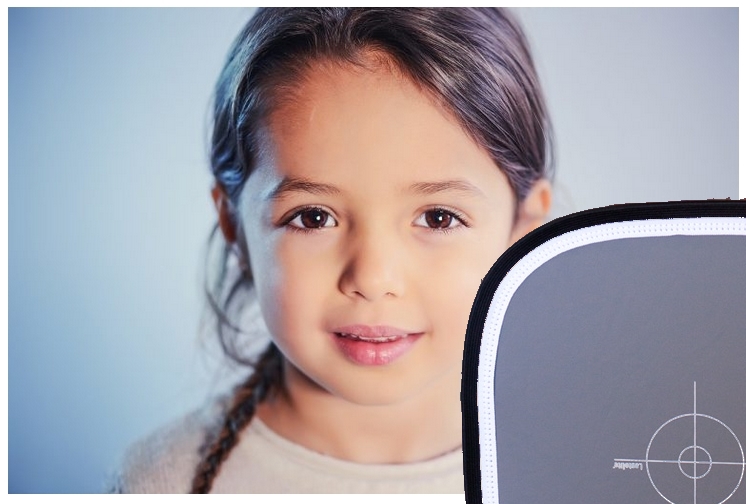
This means if you put a gray card in front of your subject, and take a meter reading off it, you will get a correct exposure regardless of any tonal contrast in the scene.
Sometimes camera meter system can’t get the right exposure and gets it wrong such as when you’re shooting a white subject (snow), or a really dark one. That is because your camera is measuring and setting to make everything medium or 18% gray. a gray card can be used to help you set the exposure in such situations. Follow these steps to get the right exposure:
- Set your camera’s metering mode to Spot Metering.
- Set your focus point to a single
- Aim your camera at the gray card and press the shutter button part way down to take a reading.
- While looking in your viewfinder adjust the shutter speed until you get a reading of zero on the exposure meter.
Incident metering
When you read light before it hits the subject, you will achieve better results every time, because the light reading is independent of the subject characteristics.
Also Because incident metering reads the intensity of light falling on the subject, it provides readings that will create an accurate and consistent rendition of the subject’s tonality, color, and contrasts regardless of reflectance, background color, brightness, or subject textures. Subjects that appear lighter than middle gray to your eye will appear lighter in the finished image. Subjects that are darker than middle gray will appear darker. Colors will be rendered accurately and highlight and shadow areas will fall naturally into place.
Incident readings measure the light falling onto the subject, so it requires the meter to be pointed toward the camera from the subject’s position. This method has proven to be very accurate, more so than reflected readings, because the meter will not be fooled by overly reflective or dark surfaces. This can be difficult with fast-moving or faraway subject matter.
How to Use the Hand-held Meter
- Set your camera to manual mode, and select your preferred ISO and Aperture.
- Turn the knob around the white dome of your light meter to make it protrude.
- Set the ISO and the aperture on the meter to the same values as your camera.
- Hold the meter in front of your subject with the white dome facing the camera.
- Press the measure button.
The meter will instantly read out the correct shutter speed for the shot you want. Make sure that your camera is in manual mode and shutter priority mode and then set the shutter speed to the reading given. That all!
The following are my recommended handheld light meters
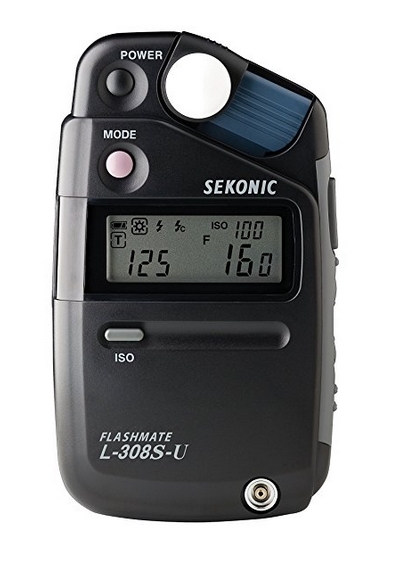
Product Highlights
- Incident Metering for Ambient & Flash
- 40° Reflected Light Metering
- Range: 0 to 19.9 EV at ISO 100
- Flash Range: f/1.4 to f/90.9 at ISO 100
- Cine Setting: Frame Rates from 8-128 fps
- Repeat Accuracy: ±0.1 EV or Less
- Compact Size with LCD Screen
- PC Sync Terminal & Cordless Flash Option
- Runs on One AA Battery
You can buy Sekonic L-308S-U from one of my recommended retailers Here
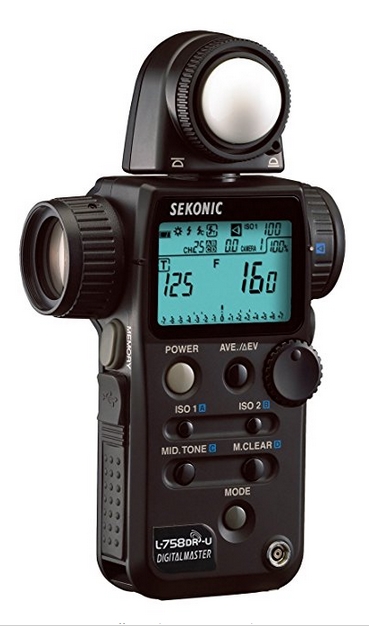
Product Highlights
- Built-In Wireless Radio Triggering
- Incident Metering for Ambient & Flash
- 1° Spot Metering with Viewfinder
- Measuring Range: -2 to 22.9 EV (ISO 100)
- Flash Measuring Range: f/0.5 to f/161.2
- Rotating & Retractable Dome Head
- Program with Custom Camera Profiles
- Latitude Display; Contrast Function
- Memory Mode; Flash Analyzing Function
- Backlit LCD; All-Weather Construction
You can buy Sekonic L-758DR from one of my recommended retailers Here
Thanks for reading the article. I hope you enjoy it and find that it is useful for you. If you have any questions or comments, please drop them in the box below. I’m going to answer it as soon as possible.
Don’t forget to register if you like the site, we will inform you when a new article or post is added.


Amazing! I’m not pretty much too into taking photos but from my previous experiences, i can confidently tell that this kind of arrangement of the lights is on point. The lighting seems obvious while taking a photo but from here i now know there is alot i have to learn about photography. Great work bro, thanks.
Hi, Mugabi
Thanks for the comment. If you need any help about photography, just remember to come back again, there are lots of learning resources here.
What a great website! My father in law is a keen photographer so this website will be a godsend to him.
My father in law has always been telling us that the quality of a photo is highly dependent on the light so being on the top of it is one of the keys to making great photos. When reading your article, I find light metering as a very scrupulous process of photographing. And it just underlines the importance of light when it comes to photographing.
Hi, Arta
Thank you for your comment.