There is an increasing need to find the best way to organize photos because simply you already have a lot of them or are going to have very shortly. You probably own a digital camera, and another phone camera, It costs nearly nothing to take photos. Sooner you will find that you have a massive number of photos, and it is becoming hard to find a specific photo. So it is obvious that you need to arrange and organize your photos, so you can search them easily.
To efficiently organize your photos you need to consider three elements, the first is where you are going to store your photos (the hardware), the second is choosing the organizing software (The software), and finally to decide on what cloud service you are comfortable with for backing up (Cloud backup). We will discuss the three elements in details in the following paragraphs.
The hardware
There are lots of different ways to store photos. These include SD cards, USB thumb drives, DVD or Blu-ray discs, external hard drives, NAS (Network Attached Storage) boxes, and online (cloud) services. It depends on how many photos you have, how often you need to access them, and how much you are willing to pay. You may check my post “What is The Best Way to Store Digital Photos”
When storing digital photos, your goal should be “have at least two copies”. Ideally, one of the copy should be a cloud serves as a backup.
The best option for individuals is an external hard drive, connected to your PC via a USB cable, and the backup cloud service. The size of the hard disc depends on the volume of your photo collection, and how fast it’s growing. Estimate how much space you will need for five years.
For an advanced solution that suits professional photographers, the best approach is to buy a NAS box. A NAS is basically a small computer with its own processor, memory and operating system. NAS boxes are usually supplied without any storage. You can buy a 2-bay, 4-bay or larger NAS and then install suitable hard drives. You can set up your NAS to use RAID 1, so you have two hard drives installed, and one is a mirror image of the other. This will provide a backup if one hard drive fails. You can also back up the NAS to another external hard drive, which you can store somewhere else.

The software
When choosing software for organizing your photos you should look for software that enables you to view and navigate through your all photos, organize them in folders in a logical way (date hierarchy for example), tag them with keywords, add star or number rating, add flags, put location data, and to share whatever you want from them to social media and finally back up your entire set periodically.
There are many photo organizers available in the market; even some of them are free. You may check my post “Best Photo Organizing Software”, but I highly recommend Adobe Lightroom.
Although many people use it as a photo editor and it’s really very good at that, but the primary function of the System in Lightroom is organizing your photos.

Cloud Backup
With the vast increase of internet speeds, it’s becoming easy to get an off-site backup by uploading files to the cloud. For photos, there are Google photos; you get 15GB of room across all your Google services for no charge, with 1TB available for $9.99 a month and several other plans that go beyond that level. Dropbox was making photo uploads and backups look easy a long time before Apple and Google. It does a fine job of uploading pictures from any folder on any device, though you only get 2GB of free space in the cloud — upgrading to 1TB costs you $9.99 a month.
Also, there is Flickr, which has been one of the best solutions for a decade. Flickr provides 1TB of free photo storage; another option is SmugMug, which provides unlimited storage of photos for $40 a year. I recommend the Adobe Creative Cloud for backup; the amazing Lightroom software is available with 1TB cloud storage for $9.9/mo.
Lightroom Library & Map Modules Overview
Lightroom is organizing and photo editor software with very powerful tools. In this post, I’ll discuss only the Library and the map modules because they are our tools for organizing our photos.
Before exploring the organizing options of Lightroom, it is important to understand some terminologies used by the software.
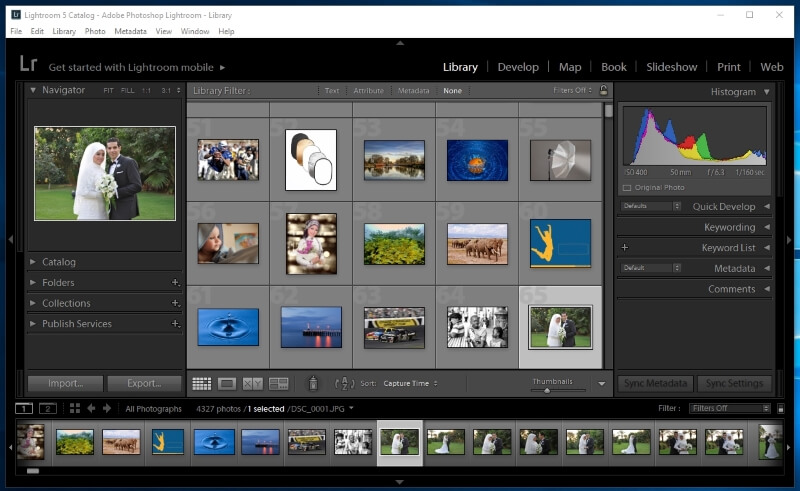
What is a catalog?
A catalog is a database that tracks the location of your photos and information about them. When you edit photos, rate them, add keywords to them, or do other things to photos in Lightroom, all those changes are stored in the catalog. The original photo files themselves are not touched.
Photo collections
Collections are a way to group photos in one place for easy viewing or for performing a variety of tasks. For example, you can assemble photos in a collection into a slideshow, contact sheet, or a web photo gallery. Once created, collections are listed in the Collections panel of every module. They can be selected at any time you need them. You can create as many collections as you need.
Types of collections
- Regular collection: A group of any photos you choose to put in a group.
- Smart collection: Collections based on rules that you define. For example, you can create a smart collection of all photos that have a five-star rating and a red color label. Photos that meet the criteria are automatically added to the smart collection.
- Quick collection: You can temporarily group photos for certain tasks into the Quick Collection. Unlike regular or smart collections, there can be only one Quick Collection at a time in the catalog.
The difference between catalogs and collections
- Collections are groups of photos within a catalog.
- Photos can belong to more than one collection.
- You can stack photos in a collection but you cannot stack photos from different collections, or from collections and folders. A stack created in a collection is visible only when viewing that single collection.
- You can change the sort order of the photos in a regular collection, but you cannot sort by User Order or drag photos to rearrange them in a smart collection.
- Removing a photo from a collection doesn’t remove the photo from the catalog or send it to the Recycle Bin (Windows) or Trash (Mac OS).
- You can create collection sets to organize your collections.
- You can explicitly save Slideshow, Print, and Web module settings as output collections.
Import & Export
When you import images into your Catalog (Adobe’s name for the database that the program uses), Lightroom records the image’s filename, its metadata, and the exact path through your computer that leads to this particular file. Lightroom writes all of this information into your Catalog and it creates a thumbnail/preview for each image. The thumbnails and previews that Lightroom generates a virtual preview for your real files while you are browsing through your Lightroom Catalog.
In Lightroom Classic CC, you don’t save photos in the traditional sense. Instead, you export photos. You can export photos in various file formats suitable for a wide range of uses. For example, you can:
- Export photos as JPEGs to share online or as TIFFs for a print publication.
- Export to a folder on a computer or to an attached or networked drive, such as a Flash drive.
- Burn the photos to a disc after exporting so you can share them on a CD or DVD.
Manage folders
The folders that contain your photos are displayed in the Folder panel of the Library module. The folders in the Folders panel reflect the folder structure on the volume itself and appear in alphanumeric order. Click the disclosure triangle to the right of a volume name to see the folders on that volume. Click the triangle to the left of a folder to see any subfolders it contains. You can rename and/or add subfolders from inside the Lightroom.
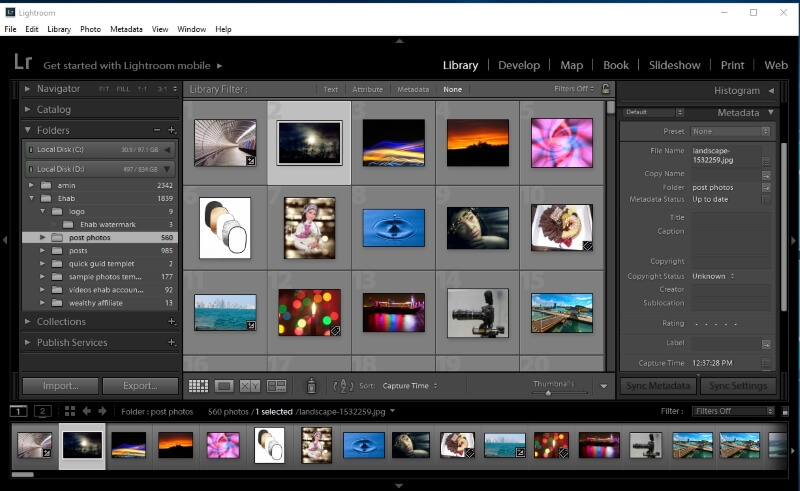
Lightroom Organizing Options (attributes)
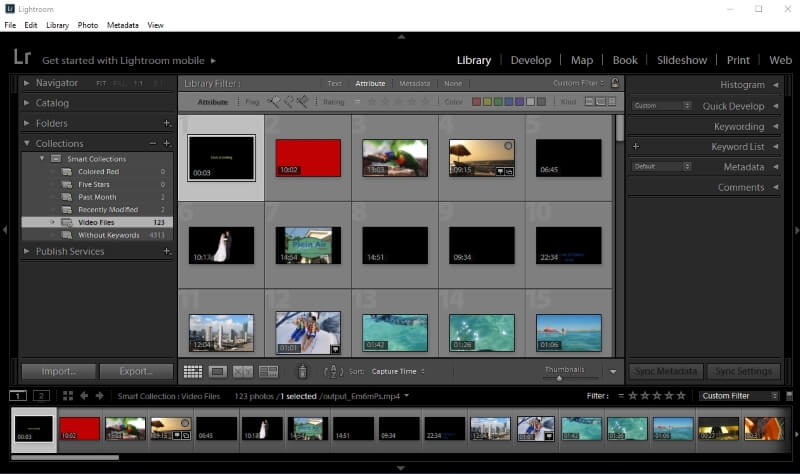
Color Labels
With color labels, you can add simple tags to your images so that they can easily be found again later. By adding color labels to a group of images you set those images aside so that they can be easily selected later. The best part about color labels is that they mean whatever we want them to. you can assign a red label for images that you are going to post to, for example, Instagram. you can assign a user of green labels for photos you want to print, and so on. You can filter those images and run a quick export for the intended destination.
Flags
Flags are another system to add context to our images. Lightroom gives us three options for how to use flags with images: flagged as pick, flagged as rejected, or unflagged. For example, you can use flagged as the pick to tag photos that you are going to send to a customer. And flagged as the reject for the photos that aren’t going to be delivered to your clients. Flags are usually simple to filter and sort which images are worth keeping.
Stars rating
The stars system in Lightroom allows us to rate images with a number value. Once applied, stars can be used to explore your collection based upon the rating. You can customize the use of stars rating to your needs. You may add two stars to the photo that are presented to the client, three stars for the selected photos by the client, and so on. It is a very effective way to sort photos into five groups.
keywords
Images files have the metadata that the camera adds, like the capture time, shutter speed, and other settings that the camera knows. What the camera can’t add, however, is meaningful descriptions of our images. That’s where we come in, to add descriptive keywords in Lightroom.
Keywords are user-added image metadata that describes the contents of a photo. They help you identify, search for, and find photos in the catalog. Once applied to photos, keywords can be read by Adobe applications such as Adobe Bridge, Photoshop, or Photoshop Elements, or other applications that support XMP metadata.
Lightroom provides several ways to apply keywords to photos. You can type or select them in the Keywording panel, or drag photos to specific keywords in the Keyword List panel. You can add, edit, rename, or delete keywords at any time.
Map Modules
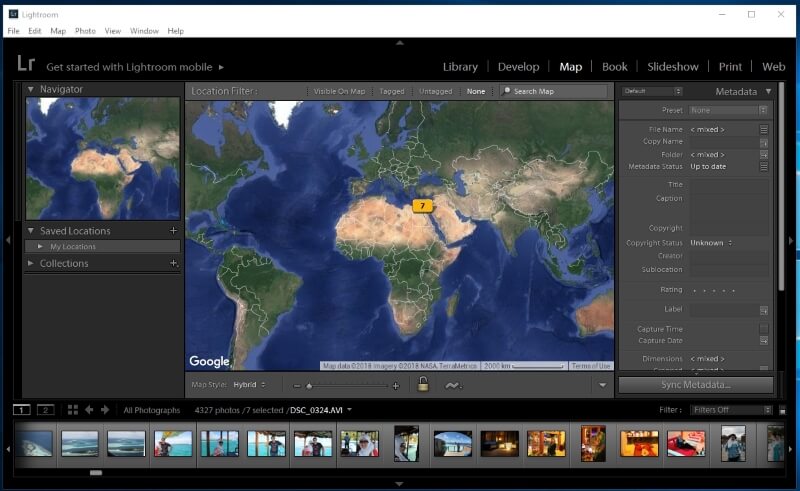
The Map module lets you see where your photos were captured on a Google map. It uses GPS coordinates embedded in your photos’ metadata to plot the photos on the map.
Most mobile phone cameras record GPS coordinates in the metadata. If your camera doesn’t record GPS coordinates you can add it to the Map module, or import a tracklog from a GPS device.
Related Posts
Best Photo Organizing Software
What is The Best Way to Store Digital Photos
Thanks for reading, I hope you enjoyed the article if you have any questions just post them below & I will be happy to answer you.
If you enjoy the site, don’t forget to subscribe, we will only inform you when a new article is posted.





Thanks for the post, I must confess that I really enjoyed reading through and I gained a whole new lot of things. I didn’t know Lightroom was blessed with so much features and tools, I could have just started using it for my editing works. Instead, I perfectly run all my editing on Adobe Photoshop CS6 and only drop by at lightroom for landscape Picture editing once in a while. Thank you, I’ll try and accustom myself to lightroom, it looks easier than I thought. Have a nice day.
Hi Salim
I agree with you, Lightroom is much easier to use than photoshop. It uses sliders to edit the exposure and the contrast, and it is very straight forward and convenient for the normal editing workflow. Thanks for the comment.