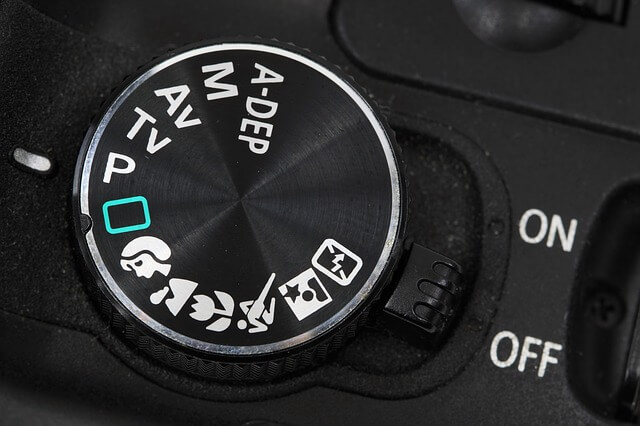


Most digital cameras have a range of fully automatic exposure modes. These are indicated by various icons and have names such as portrait, landscape and night. In this post, I’m going to explain common camera exposure (shooting) modes so that you can pick the right one for any situation and grow out of using auto mode. But before doing so, I’ll highlight some terms that are used in the rest of the post.
What is exposure?
Exposure is the amount of light reaching a camera sensor, as determined by shutter speed, lens aperture, and ISO. Exposure is measured in lux seconds and can be computed from exposure value. Those three elements are listed below, and they form the well-known ‘exposure triangle’, for more information, you may check my posts by clicking the appropriate links below:
- Shutter Speed – the amount of time that the shutter is open
- Aperture – the size of the opening in the lens when a picture is taken
- ISO – the measure of a digital camera sensor’s sensitivity to light
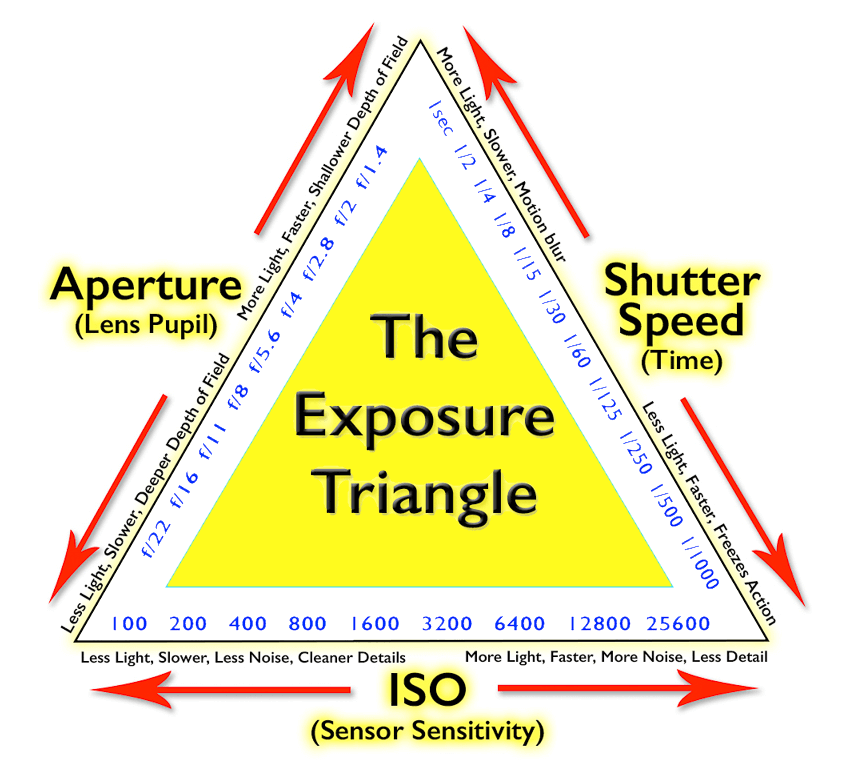
Understanding the exposure triangle:
Combining the ISO, aperture and shutter speed results in an equivalent exposure value for a particular setting. If anyone of these elements is adjusted, the resulting image will not be the same. If you increase the f-stop to decrease the amount of light getting to the sensor, you will also need to adjust the shutter speed and/or the ISO for an equivalent exposure; otherwise, your image might come out blurry or too bright; overexposed or underexposed.
Let us take that simple illustration:

The idea is to maintain the same triangular area if you shorten the length of one side of a triangle; the other side will be lengthening.
Draw a triangle with a base length and it represents ISO, and move point (A) parallel to the baseline (to keep the same area of the triangle- which represent the exposure) to the right to increase the length of the line representing the f-stop. We notice that the line representing the shutter speed is consequently getting shorter. The following illustration shows that there are many triangles with the same area but with different side lengths.
So for example, these combinations have the same exposure value:
ISO 100, f/2.8, and shutter speed 1/1000 sec.
ISO 100, f/4, and shutter speed 1/500 sec
ISO 100,f/5.6, and shutter speed 1/250 sec
For more detailed information about the exposure triangle, I recommend checking this post “The Exposure Triangle Explained in Plain English”
What is the correct exposure?
“Correct exposure may be defined as an exposure that achieves the effect the photographer intended. A more technical approach recognizes that a photographic sensor has a physically limited useful exposure range, sometimes called its dynamic range. If for any part of the photograph, the actual exposure is outside this range, the sensor cannot record it accurately. In a very simple model, for example, out-of-range values would be recorded as “black” (underexposed) or “white” (overexposed) rather than the precisely graduated shades of color and tone required to describe “detail”. Therefore, the purpose of exposure adjustment (and/or lighting adjustment) is to control the amount of light from the subject that is allowed to fall on the sensor, so that ‘significant’ areas of shadow and highlight detail do not exceed the sensor’s useful exposure range”. Via Exposure (photography).
What is the camera metering?
Camera Metering means how the camera determines what the correct exposure should be, depending on the amount of light that goes into the camera and the sensitivity of the sensor. To understand more about how the camera metering system works, and the difference between the handheld metering device and the camera metering, I suggest reading my post on this subject.
Exposure modes (shooting modes)
Digital cameras offer a number of different shooting modes. Each one aims to provide a correct exposure, according to the situation, but each one approaches this goal in a different way. Although different camera manufacturers have their own names for their exposure modes, there are two common ranges of shooting modes, the ‘basic zone’ (previously called PIC) and the ‘creative zone’. EOS professional digital cameras only offer creative zone modes; most consumer models include both types. The photo below illustrates the exposure modes (shooting modes) as named by Canon.
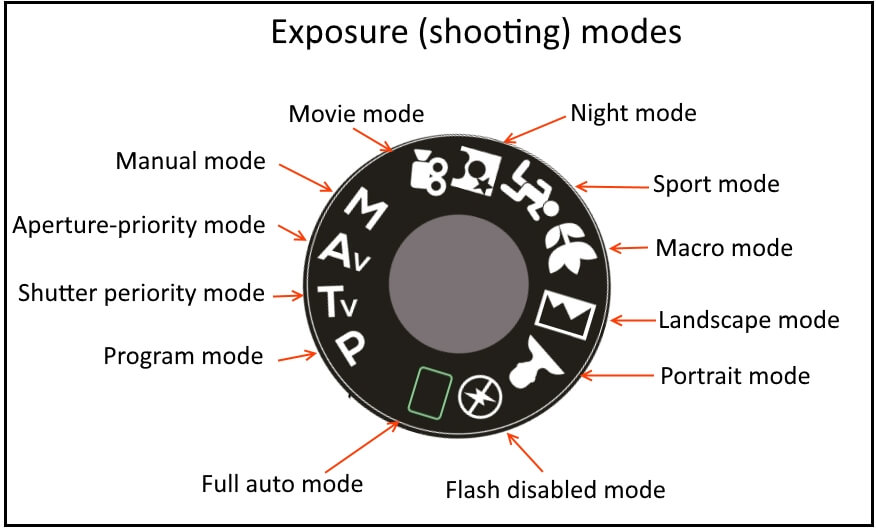
There are two groups of exposure modes: Creative Zone shooting modes, and Basic Zone shooting modes. EOS professional digital cameras only offer creative zone modes; most consumer models include both types. I will discuss each group in the following paragraphs.
Creative zone shooting modes

In Program mode, the camera automatically selects both the shutter speed and the aperture. For any given brightness of light, the camera has been programmed to set a particular combination of speed and aperture.
The camera takes a meter reading from the scene, assigns an exposure value, and then uses internal algorithms to select a suitable shutter speed and aperture.
You can gain more control over your pictures while staying within the comfort zone of program mode. You do this using a program shift, a feature available on almost every EOS camera. First, partially depress the shutter button while in program mode. Then look at the shutter speed and aperture selected by the camera. If you don’t like what you see, change the values by rotating the electronic input dial.
To use the program shift, first set ‘P’ on the camera command dial. Half-press the shutter button to take an exposure reading. You will see the chosen shutter speed and aperture in the viewfinder display. Now rotate the electronic input dial – the one just behind the shutter button. You will see the aperture and shutter speed changing in the viewfinder display. Simply rotate the dial until you get to the aperture or shutter speed you think is most appropriate for your subject.

Shutter-priority mode allows you to select the shutter speed you need, leaving the camera to choose the lens aperture. This allows you to reduce the duration that the shutter is open, to freeze fast-moving action, or conversely, leave the shutter open longer to allow blur and movement to appear in the frame, while the camera system adjusts the aperture according to the chosen shutter speed.

The Aperture Priority mode allows you to set a specific aperture while allowing the camera to calculate the proper exposure and assign an appropriate shutter speed. This mode is suitable when you want more control over the depth of field of your photo. For example, when you are shooting landscapes, you will often want everything from the foreground to the horizon to appear as sharp as possible, this requires a small aperture. Or you might want to reduce the depth-of-field so that the subject stands out sharply against out-of-focus surroundings. This requires a wide aperture. Remember that, with aperture-priority mode, you might not notice that the camera sets a slow shutter speed after you set a small aperture value, so you need to use the camera on a tripod to prevent camera shake from ruining your images.

The camera lets you control both shutter speed and aperture, although the camera’s exposure meter can still be used as a guide. This is likely the most interesting mode of the group. There are situations where having full control is necessary to get the image that you desire. For example, when doing night photography, the camera’s meter cannot always handle extreme darkness, so you may prefer to shoot in manual mode.
Basic zone shooting modes

When photographing landscapes you want everything from the foreground to the far horizon to appear sharp (wide depth-of-field) and is obtained by setting a small lens aperture. This mode generally maximizes your depth of field and it may even make the scene’s colors more vibrant.
Landscape mode might only manage to set f/11. Cloudy weather will bring this down to f/8 or even f/5.6. This is because landscape mode has been programmed to set the shutter speed to 1/60 second or faster. This is good if you are hand-holding the camera because the possible effects of camera shake at slower shutter speeds are far worse than a less than optimum depth-of-field. However, for the best landscape images, you need to put the camera on a tripod and set a small lens aperture using the aperture-priority shooting mode. In some light conditions, this might result in a shutter speed of a second or more, but with the camera on a tripod, camera shake will not be a problem.

This is similar to selecting Aperture Priority and opening your aperture to get shallower depth of field. However, depending on the camera, it may also enhance skin tones and soften skin texture automatically. You might want to use a wide lens aperture to throw the background out-of-focus. The EOS portrait mode is quite good at this, usually giving aperture around f/4 to f/5.6. That’s because this mode likes faster shutter speeds, which means wider apertures.

The close-up mode is very similar to portrait mode, both set wide apertures and fast shutter speeds, and both activate the built-in flash (if available) in low light or with backlit subjects. Most of the time you will need the camera on a tripod to avoid the effects of camera shake. A tripod also keeps the camera still for manual focusing, which is advisable when you get really close to a subject – at these distances the camera does not know which area of the subject you want to be sharp.

Sport suggests action, which means that a fast shutter speed might be useful to ‘freeze’ the movement of the subject. That’s what the sports mode offers: Increase ISO to a higher setting, reduce f/stop for a shallower depth of field, and increase the shutter speed to help stop fast action.

Night Scene mode is for taking photographs at night using the built-in flash. In other modes that use flash, the shutter speed does not drop below a value suitable for hand-holding the camera. This helps to avoid the effects of camera shake in the image.
The background of a subject (which is out of the range of the flash) will appear black in the photograph. Night mode overcomes this problem by setting shutter speed to expose the background correctly. In effect, there are two exposures – a flash exposure for the foreground subject and ambient light exposure for the background.

This is the mode that does everything automatically for you. You get all the computer power behind the Program Auto mode with automatic aperture and shutter speed selection, get automatic pop-up flash, automatic selection of the ISO setting, automatic white balance, and more. If you do not want to think of anything beyond where you are pointing your camera and your composition, this is the mode for you.

This is the same as the Full Automatic Mode, but the flash is disabled so that it will not fire in an environment where you would not want to pop off a flashbulb, such as a museum or other light-sensitive setting. Also, depending on the image, you simply might not want to have the stark lighting effect that a flash may produce.

Movie mode enables your digital camera to capture moving subjects in a video format. Most digital cameras come with a movie mode that records both video and also sound. Video captured on a digital camera is not as good of quality as the video captured on a camcorder or other digital video recording device.
Related Posts:
What is Shutter Speed in Photography
What is Aperture in Photography
Thanks for reading, I hope you enjoyed the article if you have any questions just post them below & I will be happy to answer you.
If you enjoy the site, don’t forget to subscribe, we will only inform you when a new article is posted.


The love for photography is being rekindle each I read your article.It is knowledgeable to know what exposure fully means which hitherto I used a different view, and the conditions at winch you can make an adjustment base on automation is another of interest while choosing a camera for good quality photos. Thanks for improving my photography knowledge.
Many thanks.