


If you are spending a lot of your time using camera’s auto modes, Program, Shutter or Aperture Priority, and willing to take a good step forwards in photography. I think it is the right time to know how to use the exposure compensation feature. It is a major step towards using the manual mode of your digital camera.
The obvious question often being asked is “why do we even need it? Isn’t it easier to relay on the camera metering system or just go into manual mode?” Well, it might be true in some cases, but it’s not always the right choice. And sometimes the semi & fully automatic modes just make our shooting life easier.
Your camera might be clever, but it is not intelligent. This is especially true when it comes to the exposure metering system. All the metering does is measure the brightness of the light that is passing through the lens, it can easily make mistakes in certain exposure or lighting conditions. This post will simply explain the exposure compensation feature and when and why you need to use it.
What is exposure compensation?
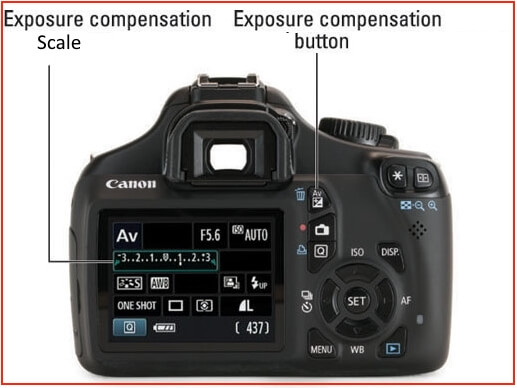
Most digital cameras have a button or menu choice that lets you adjust the camera for a different exposure setting than the regular automatic one. This control is called exposure compensation or exposure value. In order to use it, you may need to change your camera from the regular automatic exposure mode to Program exposure mode. I recommend checking my post “Exposure Modes Explained” to check the different types of camera exposure mode.
The Exposure Compensation button or menu choice is usually marked by a square containing a plus and a minus symbol. Some cameras, though, just display “0.0” on the LCD screen. Check your camera manual for the specifics.
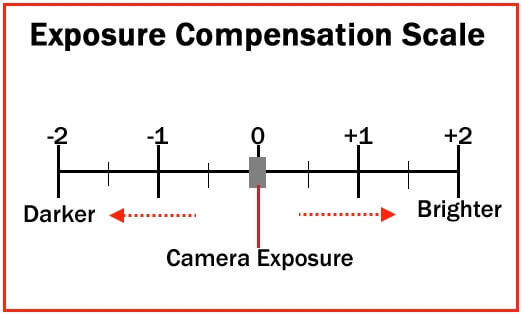
The exposure compensation allows you to incrementally adjust the camera’s exposure around the default reading that meter is giving. Most EOS cameras offer exposure compensation, shown on a scale similar to the one above. This scale appears on the LCD panel and also in the viewfinder. The numbers indicate the amount of compensation in stops – increased exposure (+) to the right, reduced exposure (–) to the left. Under the scale is a moving index mark that shows the amount of compensation applied. When the index is at the center no compensation is applied. Most cameras let you move the exposure adjustment in 1/3 increments (some use 1/2 increments) in either direction. If your camera doesn’t use a ruler display, then “0.3” is 1/3 and “0.5” is 1/2.
Camera metering modes
With digital cameras, all the metering mode does is measure the brightness of the light that is passing through the lens, but in different ways. You have a choice of up to four different metering modes – Evaluative, Spot, Centre-weighted and Partial. Your choice of metering mode will determine how you use exposure compensation. So let us quickly go through the metering modes.
-
Evaluative metering
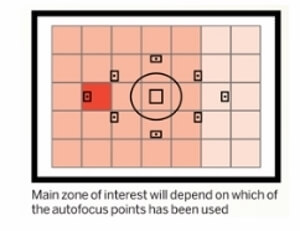
It breaks the scene down into a number of zones (from 3 to 63, depending on the camera). A reading is taken from each zone and the results are analyzed by the camera’s built-in computer. The trouble when using exposure compensation with evaluative metering is that you don’t know if the metering has already compensated for the conditions. If it has, and you dial in even more exposure compensation, then the exposure will be wrong.
-
Center-weighted metering
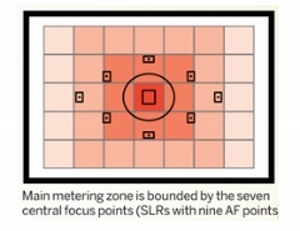
It takes a reading from all of the framed scene, but with more emphasis on the central area. Center-weighted metering is often better than evaluative when you know that some level of exposure compensation is needed.
-
Partial and spot metering
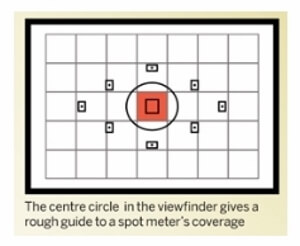

Unlike evaluative metering partial and spot metering take the reading from just a small area of the scene. You are in full control of where the camera takes a reading from, and you know that the camera is not making any further adjustments.
How does exposure compensation work?
Depending on how your digital camera deals with exposure compensation (and the shooting mode used), it may adjust the aperture while maintaining the shutter speed constant; or it may adjust the shutter speed while maintaining the aperture constant.
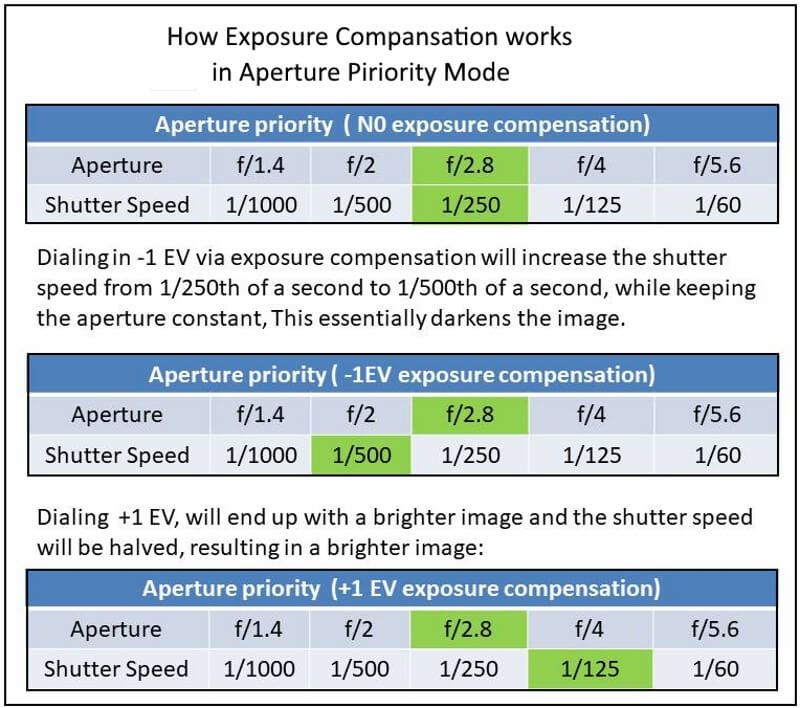
When shooting in Aperture Priority mode, the photographer sets the camera’s Aperture, while the camera automatically sets the Shutter Speed depending on the reading from the camera meter. When adjusting exposure via exposure compensation, the photographer essentially overrides the shutter speed set by the camera. Take a look at the below table, it shows how the camera adjusts exposure using exposure compensation in aperture priority mode:
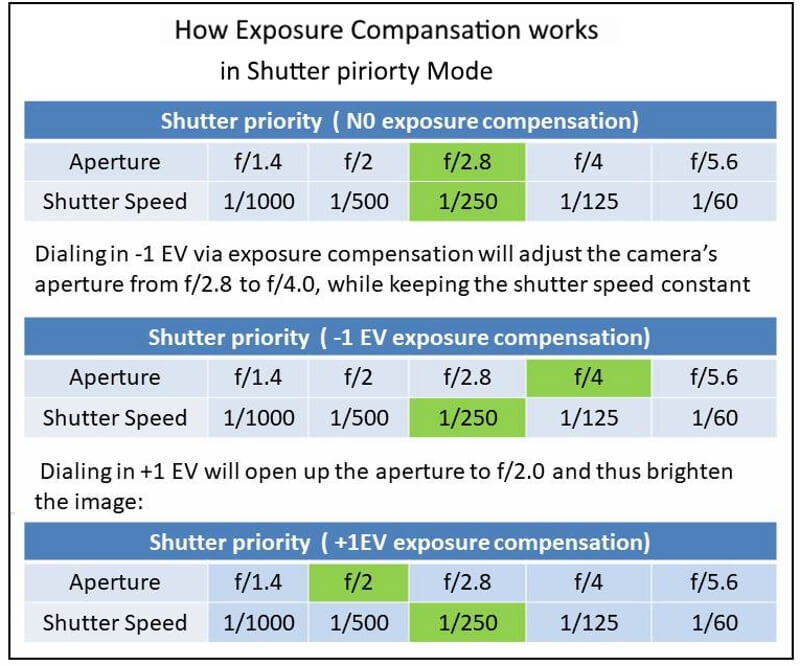
When shooting in Shutter Priority mode, the photographer sets the camera’s shutter speed, while the camera automatically sets the aperture depending on the reading from the camera meter. When adjusting exposure via exposure compensation, the photographer essentially overrides the aperture set by the camera. Take a look at the below table, it shows how the camera adjusts exposure using exposure compensation in shutter priority mode:
What about Manual and Automatic modes? These don’t have exposure compensation. In Manual mode, the camera does not set an exposure value for you in the first place, you set everything yourself. Whenever you change the aperture or the shutter speed, you are changing the exposure value. In Automatic mode, there is no exposure compensation because you have no control over exposure – the camera does everything for you. That is one of the reasons why you should never use this mode.
When to use exposure compensation?
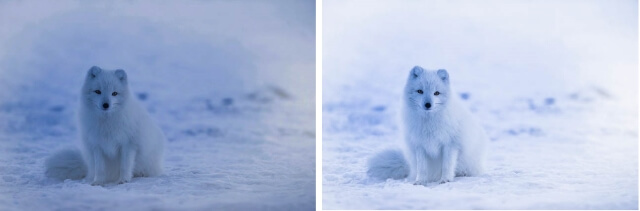
- If you are shooting a white subject, for example, a beautiful bride with a white dress, the camera doesn’t know that your subject is white, so it assumes that the scene is an average grey as it always does. This means that the camera sees the bright light coming through the lens from the white subject and interprets this as meaning that a lot of light is falling onto a grey scene. The camera reduces the shutter speed and/or the aperture accordingly, which means that the scene is underexposed. Another classic example is a photograph taken of a snowy scene. Your camera’s meter will assume that the entire white snowy scene should be grey, and will, therefore, choose exposure settings that underexpose the image.

- In the same way, if the scene has lots of dark tones, the camera assumes that it is a mid-tone scene in low light, and increases the shutter speed and/or the aperture. This leads to overexposure. An example is shown in the below photos. In the picture on the left, taken at normal exposure as per the camera’s meter, it brightened the night scene and it looks a little washed out. To the right is an underexposed (according to the meter) image that more closely resembles the actual conditions of the scene.

- There is another reason, you may want to use exposure compensation is that you simply don’t like the “correct” exposure. You may want to darken the scene intently or add some mood or drama to the photo, or you may want to brighten things up. You may deliberately underexpose image by 1/3 stop to make the colors in the image appear more saturated. Photography is highly subjective and you would sometimes want to add some artistic effect, exposure compensation gives you a tool to work with.
How to use exposure compensation?
There are different ways to set up exposure compensation of digital cameras. For Canon users, the following steps are applied:

- Half-press the shutter button to activate the camera and take a meter reading.
- Check that the Quick Control Dial is switched on.
- Turn the Quick Control Dial to set compensation – right for positive, left for negative.
Important remark:
Once you have set exposure compensation, it will stay set until you reset it back to zero again, even if you turn the camera off and back on again. This can catch you out if you forget so when you’ve finished taking a series of pictures, remember to reset the compensation to zero to avoid ruining pictures you take later.
The following are some exposure tips
- If there is mid-tone in the frame (for example, grass), you can take your exposure reading from that mid-tone area, and you don’t need to use exposure compensation.
- If there is no mid-tone in the frame, you can take a reading from a light or a dark area and then apply for compensation. For example, if you take a reading from a white area that still retains some detail, +1.5 or +2 stops compensation will give similar results to a reading from a mid-tone area with no compensation. Similarly, a partial or spot reading from a dark area that still retains detail, together with –1.5 or –2 stops compensation, will also give results similar to a reading from a mid-tone area.
The below photo is a good example to use partial or spot metering to have a good exposure for this eagle. Either meter from the white features and apply +1.5 stops exposure compensation, or meter from the dark feathers and apply –1.5 stops compensation. Each method will give similar results.
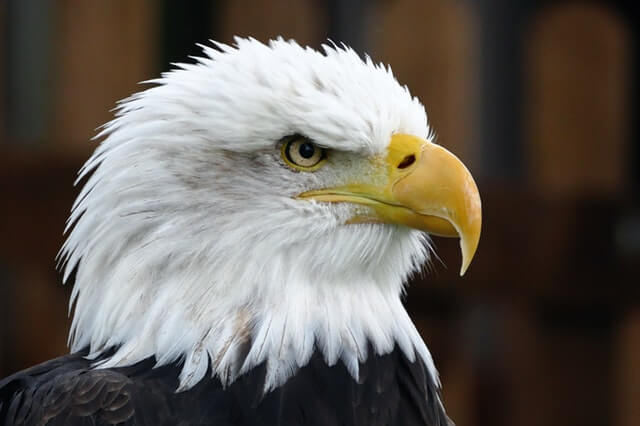
Photo by Anthony from Pexels
- If the area used for the reading is not in the center of the frame, set the exposure compensation first, and then move the camera so that the area is in the center. Now partially depress the shutter button to take a reading, and use the exposure lock button to hold the reading as you recompose the image. Finally, press the shutter button fully to take a picture.
How much compensation?
The amount of exposure compensation you need will vary with every scene you photograph, and many shots will not need any compensation. As a rough guide, try +2 to +3 stops for scenes with lots of snow or sand, and +1 if there is a lot of water behind your subject. Minus exposure compensation is needed less often, and around –1 will handle most dark backgrounds.
‘If it’s light, go right’ is a handy way to remember which direction you need to go on the exposure compensation scale. If the scene is lighter than a mid-tone, you need to move in the direction of ‘plus’ compensation to improve the exposure.
Exposure Bracketing
There is another feature of digital cameras that use exposure compensation but in a different way. This is the Auto Exposure Bracketing (AEB). You set your camera to take multiple pictures in a row (three or five photos) with the first photo at normal exposure, the next one at -1 EV (underexposed), and the third one at +1 EV (overexposed).
When you enable the feature in your camera’s menu, you can set the amount of under and overexposure (EV), and also the number of photos to be taken automatically in rapid succession.
Then the camera or special software will merge the three photos and produce the final HDR image. The below photo is a sample HDR photo.

Finally, if you don’t want to work in Manual mode, but also want to be able to take complete control over the exposure process, you probably will use Aperture Priority or shutter modes. The good thing is you can use the exposure compensation with these modes. You can get the speed of other modes, along with the control of the manual.
Related posts:
Photography Light Meter – Camera metering Vs Handheld Metering
The Best HDR Software – Photomatix Pro 5
Thanks for reading, I hope you enjoyed the article if you have any questions just post them below & I will be happy to answer you.
If you enjoy the site, don’t forget to subscribe, we will only inform you when a new article is posted.


Amin,
I very much enjoyed your article on exposure compensation. I use a Canon EOS Rebel T6 and will benefit from your article greatly. We primarily use the camera for capturing our kids playing sports but have started to explore photography in nature and art as well.
I was in the Photography Club in high school and remember the exhiliration of developing black and white photos from my old Minolta SLR – now the digital platform offers so much potential and rich color, but exposure plays a large role in the outcome. I’ll use your advice to improve our photos in all aspects – even sports as many morning and evening games make the lighting a challenge.
Thanks for a great article and a beautiful website
Glad you like the post and the site, and thanks for your comment