


Taking beautiful indoor photos is a challenging task for photographers because of the limited amount of available light. If for example, you set your camera to auto mode, this camera setting generally leads the camera to lower the shutter speed and increase the ISO levels. Which probably would produce an unwanted blur and noisy photos.
To tackle this situation and to have more control over your camera settings, you need to use the manual mode and choose the right settings to maximize sharpness, minimize noise, and get the effects you want.
In this article, I will discuss how you can use the available light to your favor by applying some tips, also I will explain how to get the proper camera settings for indoor photography.
Tips for Shooting Indoor
Look for the Right Light
The main reason photographers struggle with indoor photography is the limited light. Generally, indoor areas tend to be shadowy and dark, so it is important to plan your shooting time to take the advantage of any natural light sources that come from outside through windows.
Windows are the best source of natural light. They also make fantastic foregrounds and backgrounds. You can use them to enhance your compositions:
- Foregrounds: place your subject behind a window to create beautiful reflections
- Backgrounds: place your subject in front of a window to create a soft, backlit look
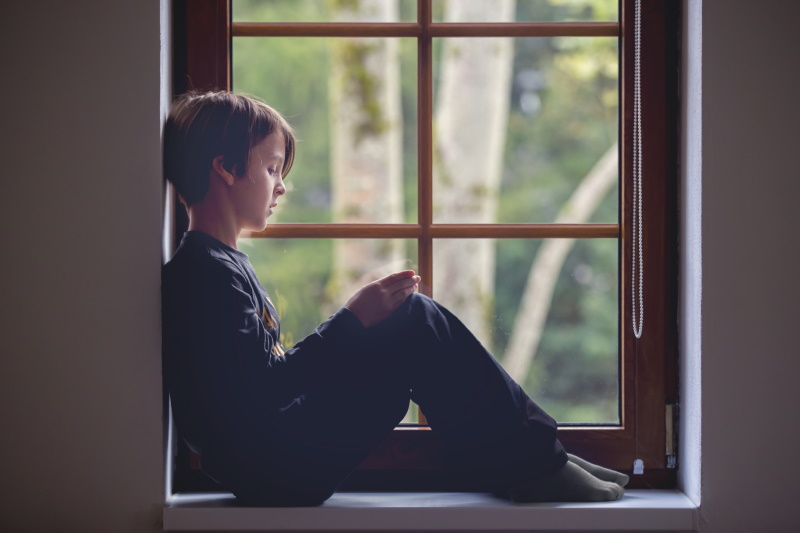
Photo by Depositphotos
You have to take your time to study how the outside lighting falls through the windows in different rooms throughout the day, and try different locations of your subject.
Because natural light is limited at indoor locations, you should get as much light as possible, so take your shoots at these times of day:
- Midday: midday light looks fantastic indoors. Place your subject in front of a curtained window to get the most flattering results.
- Golden hour: You might already be familiar with this magical time of day. It is shortly after sunrise and before sunset. The diffused light is perfect for every photography genre.
Maximize the existing light
You’ll need to maximize existing light. There are many ways to increase the natural light on your subject:
- Use a reflector, reflectors are great for daytime or nighttime photography and they provide powerful lighting compensation wherever you go. A reflector bounces light back toward your subject, and it’s a great way to keep your entire subject nicely lit. For the shots below, a reflector is used to reflect the window light to the other side of the subject, which helped lighten the shadows.

Photo by Depositphotos
- Use a reflective backdrop, a white backdrop will help catch the light and bounce it back onto your subject.
Photo by Depositphotos
Consider using artificial lighting
If you don’t have any natural lighting source where you’re shooting, you can go for artificial lighting such as a flash or Speedlight with a suitable modifier. While working with off-camera flash is not easy, and needs some experience it will boost the light intensity and give you plenty of illumination to work with.
It is worth mentioning that you have to be careful when setting the white balance, artificial lighting will produce some color casting on your photos, also try not to mix natural light with artificial light in one shoot.

Photo by Depositphotos
Understand your camera capability
Understanding the capability of your camera is critical, for example, you should know your camera’s ISO limits; know when it starts to get grainy and noisy. Knowing this limit can be very helpful when boosting your ISO to the highest value while maintaining acceptable quality.
To figure out your camera’s optimal ISO settings for indoor photography: take some test photos at different ISO levels, and inspect them on your computer, making sure to zoom in to 100%. Identify the highest ISO value you would be willing to tolerate. And then, whenever you shoot indoors, use that ISO.
Choose the right lens
Shooting indoor photos have its unique features, generally, the available lighting is low, and you have limited space. To overcome these limitations, it is important to pick up a lens that has a wide angle of view, so wide-angle lenses with a focal length shorter than 35mm are ideal for shooting indoors since they give you a more expansive field of view to overcome the tight space.
In addition, the lens aperture plays a significant role in the amount of light that goes into your camera. So, choosing a lens with a big opening (low f-number) is critical for shooting in low-light environments, whether indoors or at night since you want to catch as much light as possible.
Keep your camera stabilized
Generally, when photographers shoot in low-light situations, they’ll often use longer shutter speeds to achieve the right exposure. Consequently, there will be a big chance of getting a blurred photo because of the camera shake. So, you should think about keeping your camera steady by stabilizing your body against a wall, using a tripod, or turning on any lens or camera image stabilization. That way, you can get a well-exposed, and sharp image

The Best Camera Settings for Indoor Photography
In this section, I offer specific settings recommendations that’ll essentially guarantee sharp shots in a wide array of indoor spaces.
-
Use the camera manual mode
In manual mode, the camera lets you control both shutter speed and aperture, although the camera’s exposure meter can still be used as a guide. There are situations where having full control is necessary to get the image that you desire and the right exposure. For example, when doing indoor and night photography, the camera’s meter cannot always handle low light conditions, so you need to shoot in manual mode.
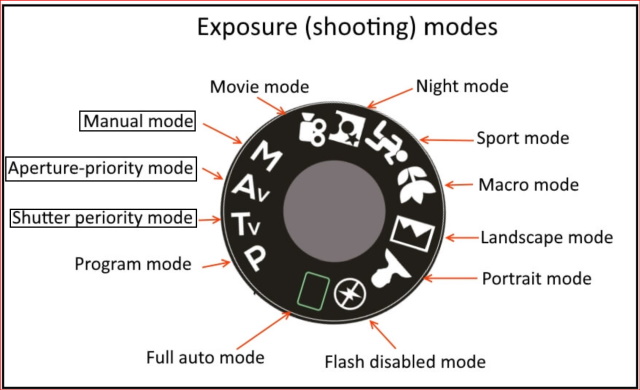
Also, you can shoot on aperture priority mode. The Aperture Priority mode allows you to set a specific aperture while allowing the camera to calculate the proper exposure and assign an appropriate shutter speed. This mode is suitable when you want more control over the depth of field of your photo.
The third option is using Shutter-priority mode, it allows you to select the shutter speed you need, leaving the camera to choose the lens aperture. This allows you to leave the shutter open longer to allow more light into the camera while the camera system adjusts the aperture according to the chosen shutter speed.
To understand the relationship between the shutter speed and the aperture, I recommend reading our article “What is the Exposure Triangle in Photography?”
-
Use a Wide Aperture
Because Indoor light is inherently weaker compared to outdoor light, it’s important to compensate by allowing as much light as you can to reach the camera sensor. This can be done by widening the lens aperture.
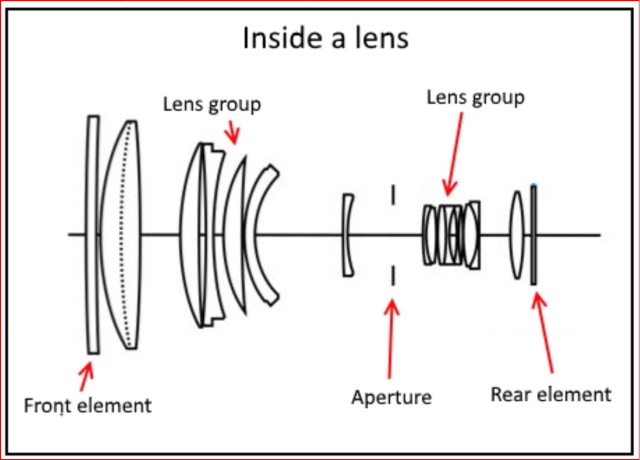
The aperture represents the size of the opening in the lens. Most photographic lenses have variable apertures in order to control the amount of light entering the lens. The aperture is physically located inside the lens, as shown in the below diagram.
This aperture is regulated by a diaphragm made of overlapping blades that can be adjusted to vary the size of the opening through which light passes. The photo below shows a typical diaphragm with 9 blades.
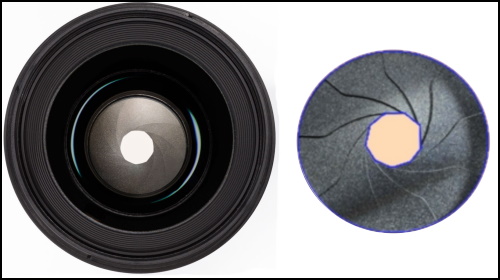
Aperture is measured using something called the f-stop scale. The number denotes how wide the aperture is. The smaller the f-number, the wider the aperture, and the more light that hits the camera sensor
When you’re shooting indoor photography, I recommend starting with the widest aperture your lens offers. That way, your camera’s sensor will take in plenty of light, and you’ll be able to boost your shutter speed without sacrificing the overall brightness.
You have to remember that Aperture has a big impact on the depth of field. A Large aperture (it’s a smaller f-number) will decrease the depth of field while a small aperture (larger f-number) will give you a larger depth of field. A detailed discussion about controlling your depth of field is given in my post <<How to Control DOF of Your Photos – Shallow Depth of Field vs Deep Depth of Field>>.
-
Use a Slower Shutter Speed
Another option to increase the light reaching the camera sensor is to lengthen your shutter speed. A shutter speed of 1/5s exposes the camera sensor to the light for far longer than a shutter speed of 1/100s and will give you a much brighter photo.
Now, one way to deal with the need for more light is to just pick the longest shutter speed your camera allows, and then select the other settings afterward. But such a method comes with a big disadvantage. Shooting with a slower shutter speed increases the possibility of camera shake, which in turn leads to a blurry image.
One way to figure out the safe shutter speed (no camera shake) is to use the reciprocal rule. This rule advises you to use the reciprocal of your lens’s focal length. If your lens is 35mm, you can safely shoot down to 1/35s, and if your lens is 24mm, you can safely shoot down to 1/24s.
So, Instead of selecting the slowest shutter speed your camera allows, you can select a relatively slow shutter speed (the one that doesn’t risk camera shaking). Also, you have to consider whether your subject is still or moving.
-
Choose a Higher ISO
Your camera’s ISO is a way of boosting the brightness of your images while leaving your shutter speed and aperture constant. However, while a higher ISO will get you a brighter shot, it’ll also result in a lot of unpleasant noise.
So it is a matter of compromise between two ISO levels, the level that brightens the scene and the level that keeps noise to an acceptable level. After all, you won’t always need a high ISO, If you have enough window light or you’re working with a flash, you may be able to capture a well-exposed image using a sub-800 ISO.
-
Use Manual Focus
Nowadays most cameras and lenses offer good autofocusing capabilities. However, in some situations, the autofocus capabilities decline, and struggle to nail focus and probably miss it completely. For example, with the low light associated with indoor photography, the autofocus may have a difficult time finding an object to focus on.
For more detailed information check my post “Manual Focus In Digital Camera- Manual Focusing Vs Autofocusing”
In this situation using manual focusing comes in handy. And once you’ve mastered manual focus, you’ll never struggle to get perfectly focused images when shooting indoors.
Conclusion
Choosing the best camera setting for indoor photography depends to a great extent on the available light in your location. Generally speaking, the camera setting values mentioned below could be used as a starting guide:
An aperture of f/2.8 to f/5.6, and an even wider aperture can be adequate. And the ideal shutter speed for indoor photography is typically near 1/60s or 1/80s, though it can be different depending on how steady your hands are, what is the focal length of the lens you are using, and whether your subject is still or moving. Using an ISO setting below 800 could be more than sufficient.
RELATED POSTS
What Is The Exposure Triangle In Photography?
Thanks for reading, I hope you enjoyed the article, in case you have any questions just drop them below & I will be happy to answer you.
The featured Photo by Depositphotos
If you enjoy the site, don’t forget to subscribe, we will only inform you when a new article is posted.


When I take indoor photos they never turn out right and always delete and don’t share them. You provided some amazing tips to help take better indoor pictures, I will be book marking your website for ease of access to follow along like a how-to guide for me. I have also shared with my oldest daughter on Facebook as she was just talking about finding tips for good picture-taking indoors with her kids as we know with kids we like to capture all moments.
Glad you liked the article and thanks for your comment
Many thanks for this valuable and detailed post on Best Camera Settings For Indoor Photography. Amma doesn’t know much about photography. So this is a good post for me. It is very difficult for me to use the main ISO. I learned that too from this post. Keep posting like this. I will definitely share this.
Thanks