

Most of us admire the look of portrait photos with a black background, they look fantastic and creative. You can make this type of photo by applying two or three tips, and they are also applicable to other types of photography (macro, product fashion, and much more. Actually, these tips are based on two important photography facts. Let us discuss them shortly in the following paragraphs.
Dynamic Range
Dynamic range is the measurement from the darkest to the lightest item which can be seen. Your camera has a great deal less dynamic range than the human eye. It is much less capable of seeing into dark and light areas at the same time. It mainly depends on the sensor size of your camera, full-frame, or cropped sensor. Sometimes your camera produces an image with blown-out highlights, and/or blocked-up shadows. But your eye can still see all the details of the scene.

We use camera histogram to evaluate the dynamic range of the scene relative to the dynamic range of the camera and to fine-tune your exposure. You can use it to determine whether your image is too bright or too dark.
You can bring up your camera’s histogram in Live View for a real-time preview to see whether the dynamic range of the scene (represented by the histogram) fits within the dynamic range of the sensor (represented by the width of the graph). Alternatively, you can take a look at the histogram in playback mode when reviewing your images. A well-exposed image is shown below.

The crucial thing here is to pay attention to the edges of the graph. If these are ‘clipped’ (touching either edge) by the histogram, chances are you’ve lost detail in either the shadows or highlights.
Dark areas correspond to the left of the graph, and if this is clipped, those areas in the image will appear pure black as the figure below.

The right side of the histogram is for the image’s highlights. Should this be clipped, highlight areas of the image will be bright white and devoid of detail.

Adjusting any of the exposure parameters (ISO, Shutter speed, or aperture) will shift the histogram to the left or right.
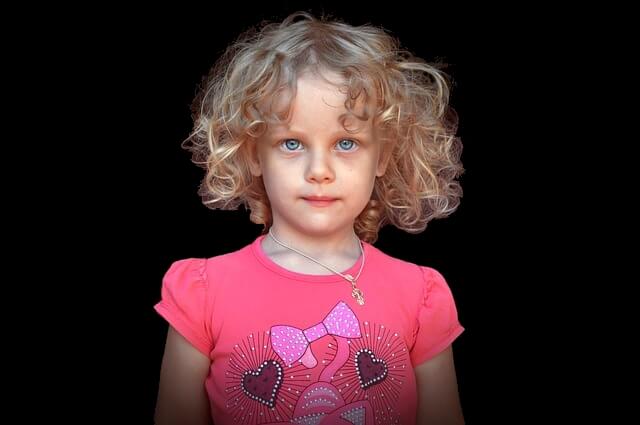
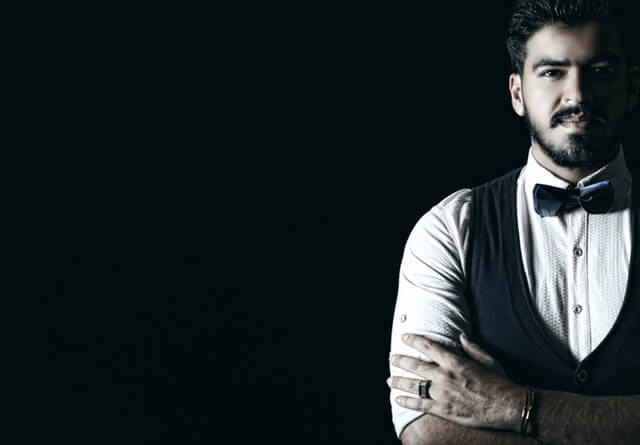
If you can add localized light onto your subject, and properly exposed for the highlights. The histogram will be shifted to the left, and that will help to send the rest of the image (the background) into darkness. It is important that the brightly lit subject is properly exposed. Then there is a good chance that the background will be outside of the part of the dynamic range for which you are exposing. It will, at the very least, be darker, and heading towards black.
The falling off of the light
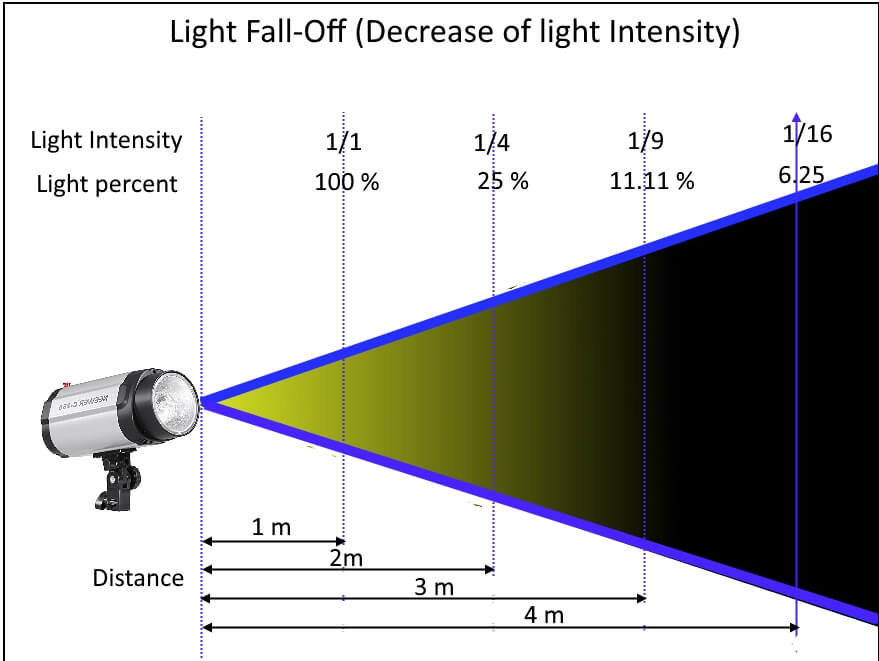
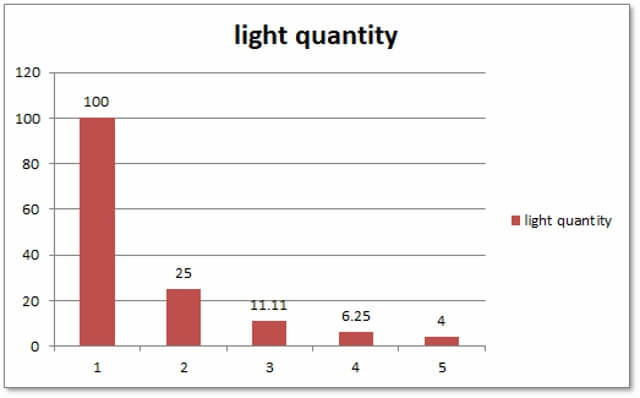
Light falls off according to the inverse square law. What’s this mean? An object that is twice the distance from a flash head will receive a quarter (1/4) of the illumination – or two stops less light. An object that is three times the distance receives one-ninth (1/9) of the illumination – or three stops less light. An object that is four times the distance receives one-sixteenth (1/16) the illumination – or four stops less light, etc. The below figures illustrate the idea.
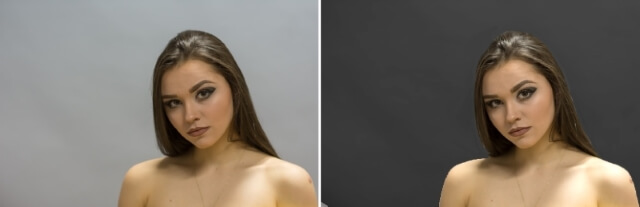
When trying to achieve a black background, you are interested in the amount of light hitting it. If you place the background away from the light source, the light will spread quickly and because of this spread, a smaller amount of light will hit the background. As less light hits the background, it gets darker. In the below-left photo, it was shot with the background placed about 2 meters away from the subject. Where in the right photo, the background was placed at 4 meters away from the subject.

In these photographs, the subject hasn’t moved and the exposure does not change. The background moves farther away, and the amount of light reaching it reduces rapidly. Even when the background is white, rather than the desired black, it gets much darker the greater the distance it is positioned from the light source.
If you combine this reasonably straightforward rule, the way light falls away, with the other rule of the dynamic range of camera sensors and you will be a long way towards achieving black backgrounds for your portraits.
Portrait set up #1
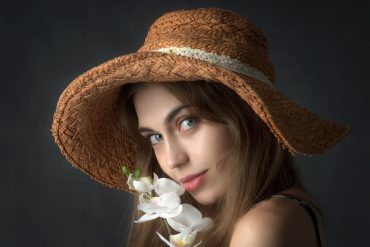
This technique is actually quite simple to do. Basically what we’re looking to do is to tell the camera to capture no light other than what we introduce in the form of a Speedlight flash for example. We don’t want the camera to pick up any of the ambient/natural light at all, and by doing that we have an instant black backdrop. You just overpower the surrounding ambient light with the light from your flash. If you turn up your flash power enough, you can make the background completely black. This setup can be used either in studio setup or outdoor.
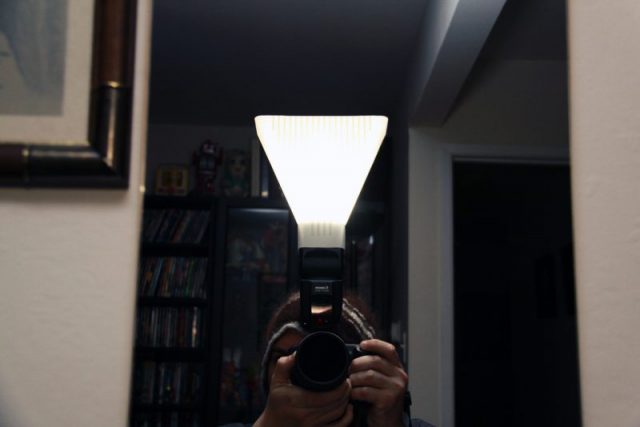
This technique can be done with any camera that has a Manual Mode and has the ability to trigger the off-camera flash. The setup is shown below.
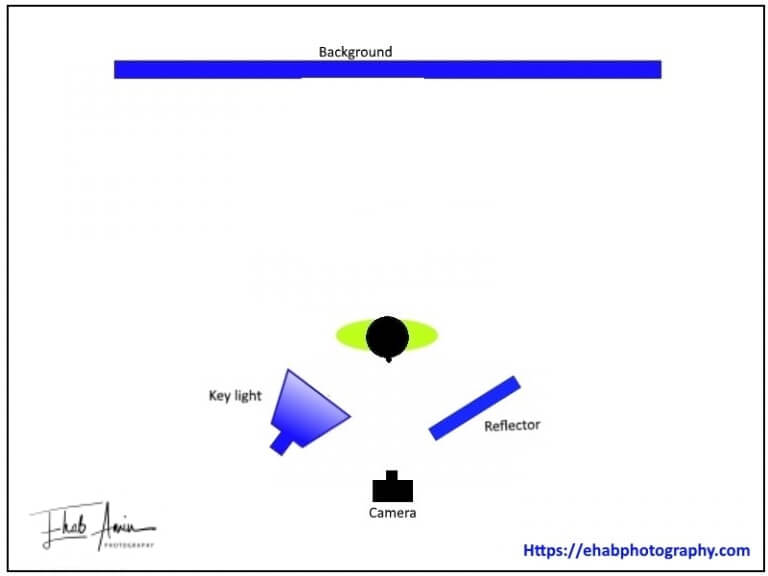
- Position the subject away as possible from the background.
- Set the camera and strobes to manual mode.
- Choose the lowest possible ISO setting. we’re looking to make a black backdrop, so we’re not concerned with how sensitive to light the camera is, we’ll be keeping our ISO as low as possible(100)
- Set your camera to its maximum/optimum sync speed shutter speed (the sync speed for your camera and flash unit). Common maximum sync speeds are in the 1/200th of a second to 1/250th of a second.
- The objective here is to see absolutely nothing on your camera’s display i.e. you should see a completely black screen. For the aperture, start with f/5.6 and keep closing the aperture opening (f/8, f/11) until you get a black frame like the photo below. In this way, you canceled the effect of any ambient light on your exposure. If you’re seeing a bit of the environment then clearly some natural/ambient light is creeping into the scene. So, all we have to do is close down your ‘f’ number a little ie if you’re getting natural/ambient light into the photo at say f/5.6 then try going to f/8.0 and see what that gives you.
- Take a test shot of your scene, and adjust your aperture until the test shot results in a completely black frame

- Keep these camera settings and begin setting up your flash.
- Shoot an off-camera flash into an umbrella that’s been closed down to narrow and control the light hitting your subject. Or you may use a softbox or a beauty dish. The main idea is to narrow and concentrate the light on only your subject.
- Once we’ve set both the shutter speed and aperture to give us our black background we really need to leave them well alone. To control the exposure of the subject use the manual control of the flash power.
- Set the strobe to full power and take a test shot. Adjust the light power until you get the desired results. You may need to use a more powerful flash or multiple strobes to get proper exposer to your subject. Also, you may use a reflector or another light source as a fill flash to control the shadows on your subject.
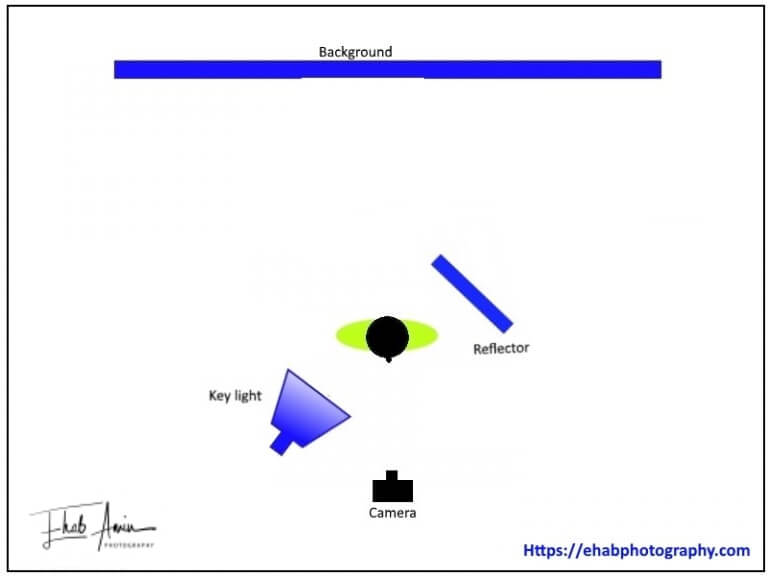
Portrait set up #2
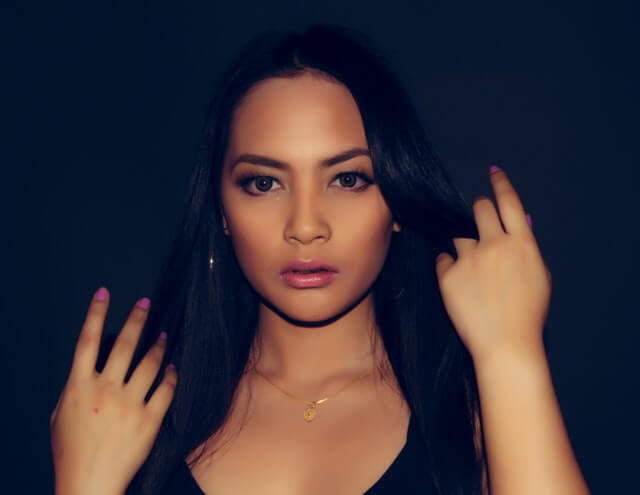
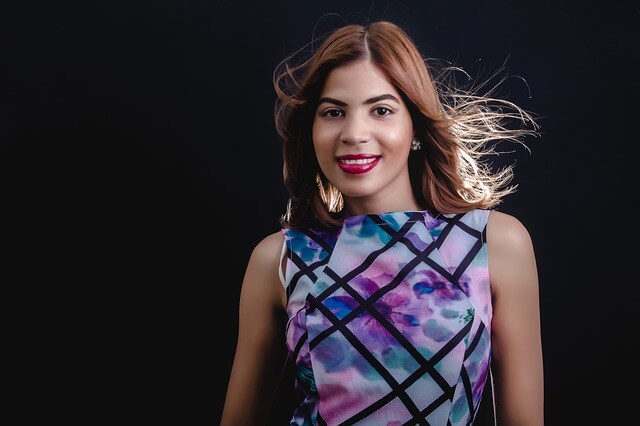
The setup is very similar to the previous one, except that you used a reflector behind the subject (barely outside the frame), to reflect back the light from the flash. This simple lighting setup (often called clamshell lighting since the flash and reflector envelop the model from above and below) turned out a great result.
One of the main advantages of working in an actual studio is that the photographer can control the lighting 100% and doesn’t have to worry about annoying incandescent lights messing up the shot, or reflected light from shiny surfaces in the room. Studio photographers can fix these problems by painting all walls and the ceiling white or black (the white is like having a built-in fill light and other photographers paint black to prevent any reflection).

Related Posts
Photography Lighting Techniques – All About Light Reflectors
Photography Lighting Techniques – Softbox Vs Umbrella
Photography Lighting Techniques – Portrait Lighting Setup
What is Beauty Dish – My Favorite Portrait Lighting
Off Camera Flash for Beginners
Thanks for reading, I hope you enjoyed the article if you have any questions just post below & I will be happy to answer you.
If you enjoy the site, don’t forget to subscribe, we will only inform you when a new article is posted.


Very thorough tutorial, thank you. I really like the clamshell lighting effect. Hadn’t thought about how back lighting could create the black background effect.
Does it make any sense to shoot in the dark outdoors? I’ve had some success with this where the background is far enough away (say, a field) that the flash doesn’t illuminate anything beyond the subject. It’s kind of like what you describe in Portrait #1 but might simplify the process in that there really isn’t a background to speak of that you have to deal with.
When I wrote this post, I was trying to explain how to get a black background when shooting a portrait in a photography studio. But for outdoor shots, as you suggest, you can get nearly the same result if your background is far enough away with no light and use a flash to illuminate the subject.
Thanks for your comment, wish you all success.
You offer a lot of great technical information that frankly will require me some time to digest. I don’t do much photography. Usually what I do is simple automatic snapshots with my cell phone that I give hardly a thought to. What I do have a somewhat bigger interest in is underwater photography. I scanned your impressive list of posts and did not notice anything related to that. I could easily have missed it. If you could do a review of cameras suited to underwater stills and videos, that would be of great interest, along with some tips. Thanks a lot.
Thanks for your comment. You do miss two posts about underwater photography. The first named “A beginner’s guide to underwater photography” which talks about some tips and tutorial of underwater photography.
The second post list the essential equipment used in this type of photography. You may check “Camera and accessories for the underwater photography.
Wow now that’s a nice photography trick that I didn’t know how to achieve. I especially like the setup 2 and how the light emits from behind the person. It give a more three dimensional feel to the photo as the light illuminates the shape of what you are shooting. But I didn’t know you could trick shooting a black background. I thought that in these kind of photos they are always using a black background but it seems this is not always the case. Nice one, thanks.
Thank you for the nice comment
Amin,
OK, looks like you are going to be my go-to for photography tips. I just commented on another post but this one is very timely. We were looking at the About Me page on our corporate website and had considered black background portraits. We attempted to use the new portrait setting on the iPhone but couldn’t make it work properly.
Your examples and advice were easy to follow and with minimal lighting equipment/techniques required. We will put this to use next week and look forward to the results!
Thanks for the comment, wish you all success.