

When editing your photos after going back home, you may discover that some unwanted objects are ruining your photos. Also, there is another common situation, that some stranger just walks in front of you when you click the camera shutter, especially in crowded tourist areas. We cannot prevent unwanted visitors from coming into the scene, but we don’t want to completely spoil the photo by leaving the stranger in. Fortunately, Photoshop provides us with five different tools that can be used to remove unwanted objects or people from our pictures in a flawless way.
In this article, I will go through the five Photoshop magic tools, that can be used for removing people and unwanted objects from your photos, and provide some applied examples. It is worth mentioning that I will use, in this tutorial, Adobe Photoshop 2020
Photoshop tools to remove people and objects from your photos
The following are different tools; they all can be used to remove people or objects from your photos. They can be used all together to obtain better results.
The first three tools can be found in the toolbar as shown in the below photo.
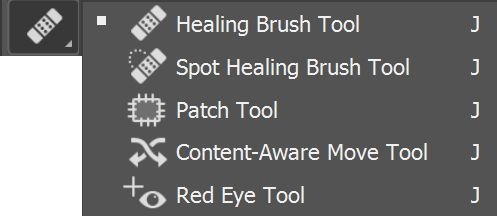
Tool #1 Spot healing brush
The spot healing brush can be used to clone areas from an image and blend the pixels from the sampled area seamlessly with the target area. The basic principle is that the texture from the sample area is blended with the color and luminosity surrounding wherever you paint. The spot healing brush requires no source point.
The spot healing brush Options bar is shown below.

The spot healing tool has three basic modes of operation.
- Content-aware mode
The spot healing brush also features a Content-Aware mode that intelligently works out what is the best way to fill the areas you selected.
- Create texture mode
The spot healing tool will read in the data surrounding the area you are attempting to repair. As you do this, it will generate a textured pattern from the sampled data.
- Proximity match mode
The Proximity Match mode analyzes the data, around the area where you are painting, to identify the best area to sample the pixel information from. It then uses the pixel data that has been sampled in this way to replace the pixels beneath where you are painting. When you are dealing with larger areas in a picture, you will usually obtain better results if the brush size used is smaller than the defective area.
How to use the Spot healing brush
You simply click on the object you want to get rid of and the spot healing brush works out the rest for you. It is extremely effective at removing most blemishes, marks, and even big objects according to brush size.
Example:
The below photo shows the result of using the spot healing brush in removing the boy from the original photo.

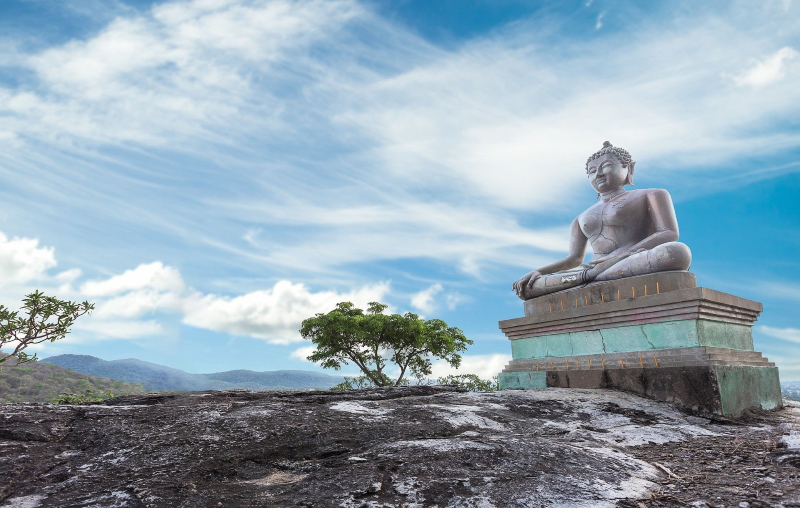
Image by Sasin Tipchai from Pixabay
Tool #2 Healing brush
The healing brush enables you to clone areas from an image and blend the pixels from the sampled area seamlessly with the target area. The basic principle is that the texture from the sample area is blended with the color and luminosity surrounding wherever you paint.
The healing brush Options bar is shown below

The healing brush is used in the same way as the clone stamp tool. However, it is important to stress that the healing brush is more than just a super clone stamp and it has its unique characteristics.
The healing brush performs by sampling the texture from the source point and blends the sampled texture with the color and luminosity of the pixels that surround the destination point. The healing brush reads the pixels within a feathered radius that is up to 10% outside the perimeter of the healing brush cursor area. By reading the pixels that are outside the cursor area at the destination point, the healing brush can calculate a smooth transition of color and luminosity within the area that is being painted. It is for these reasons that there is no need to use a soft-edged brush and you will always obtain more controlled results by using the healing brush with a 100% hard edge.
How to use the healing brush
To begin with, you establish a sample point by Option/Alt-clicking on the portion of the image you wish to sample from. Release the Option/Alt key and move the cursor over to the point where you want to clone to and click or drag with the mouse to carry out the healing brush retouching.
Example:
The below photo shows the result of using the healing brush in removing the woman from the original photo.
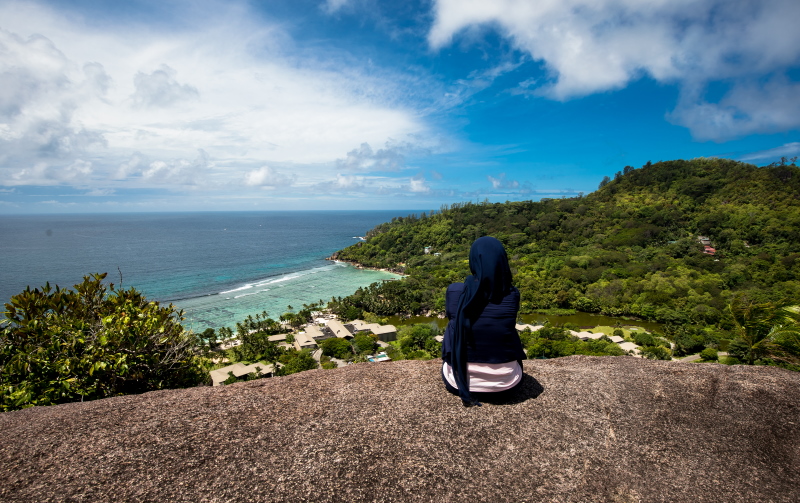

Photo by Ehab Amin
Tool #3 Patch Tool
The Patch Tool is part of the healing brush set of tools. These are the go-to tools for retouching and repairing your images. The Patch Tool is primarily used to repair larger areas of an image or get rid of any distractions or blemishes.
The patch tool was introduced into Photoshop at the same time as the Healing Brush. It is similar to the Healing Brush Tool, in that it matches the texture, lighting, and shading of the sampled pixels to the source area. However, the Patch Tool uses selection-defined areas instead of a brush.
The Patch Tool Options bar is shown below.

How to use the patch tool
- Select the Patch tool and draw an area around your selection. It works similarly to the Lasso selection.
- Move the cursor over the selected area and drag it to the left, right, or in any direction.
- Choose whether you choose Source or Destination mode in the Options Bar. You will see a preview of the image as you drag it.
- When you release the mouse or stylus, Photoshop does the magic of blending the pixels from the source or the destination area, to merge the pixels with the original selection seamlessly.
- Deselect by hitting Cmd+D on a Mac. Ctrl+D on a PC.
Example:
The below photo shows the result of using the patch tool in removing the woman from the original photo.


Photo by Ehab Amin
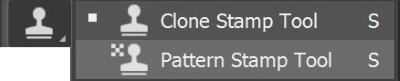
Tool #4 Clone stamp tool
Photoshop’s clone stamp tool allows you to duplicate part of an image. The process involves setting a sampling point in the image, which will be used as a reference to create a new cloned area.
The clone stamp tool can be found in the toolbar as shown in the below photo
The Clone Stamp tool Options bar is shown below.

Aligned: If this option is selected, the new cloned image will be drawn continuously even if you release the mouse button while drawing. If it is deselected, the clone will begin drawing from the sampling point each time you release the mouse and resume painting.
Use All Layers: If this option is selected, the information will be used from all visible layers. Otherwise, only the active layer will be used.
How to use the clone stamp tool
- Hold down the Alt key — the cursor will change to a target. Click the point you wish to use as a sampling point. This will be used as the reference point for cloning
- Click and draw where you want the cloned image to appear. As you draw, a cross will appear on the original image while a corresponding circle appears where you are drawing.
Example:
The below photo shows the result of using the clone tool in removing the man from the original photo.
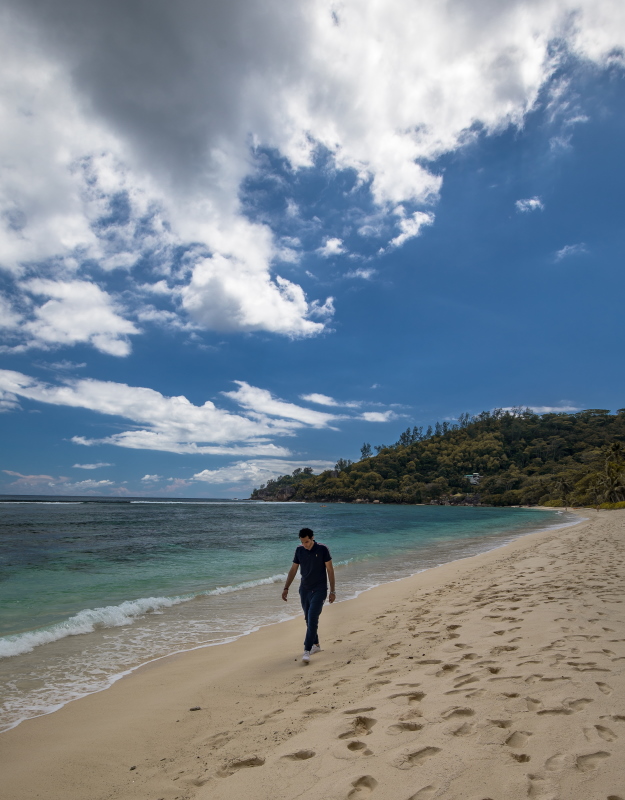

Photo by Ehab Amin
Tool #5 Content-aware fill
Photoshop’s Content-Aware Fill command was designed to make removing unwanted objects or distracting elements from your photos as easily as possible. Simply by drawing a selection around an area, Photoshop can instantly replace it with new image detail from surrounding areas.
Adobe first added Content-Aware Fill back in Photoshop CS5 as a new option in the Fill dialog box. However, in Photoshop CC 2019, Content-Aware Fill was given its separate workspace. And in Photoshop CC 2020, Content-Aware Fill has been improved even further.
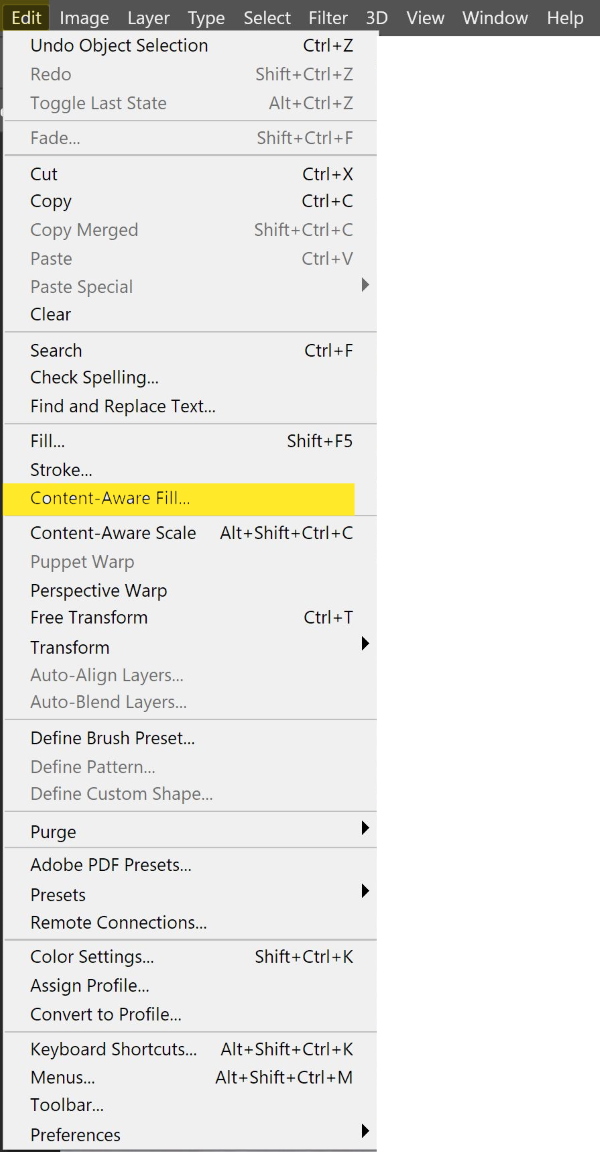
The Content-aware fill can be found in the edit main bar as shown in the below photo
How to use the content-aware fill
- Open an image in Photoshop. Use any selection tool to select a part of the image you want to fill.
- Choose Edit > Content-Aware Fill. As shown in the below snapshot:
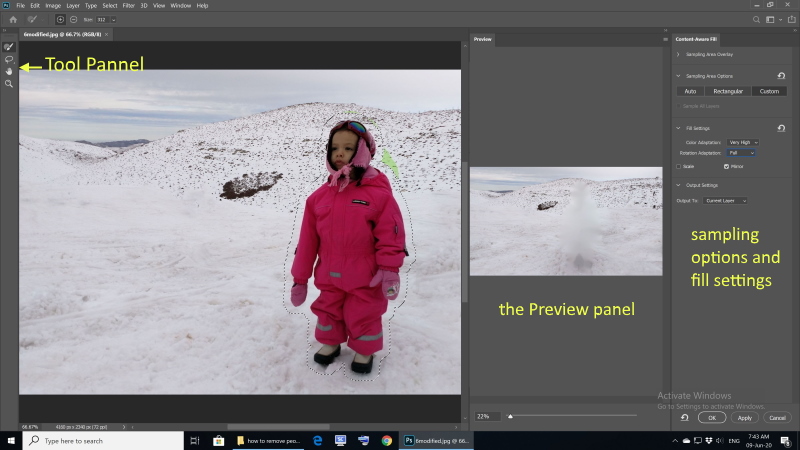
Within the Content-Aware Fill workspace, the document window displays the default sampling area as an overlay mask over the image. You can use the tools provided in the Tools panel (at the left of the screen) to modify the sampling area and your initial selection of the fill area. In the Content-Aware Fill panel (at the right of the screen), you can specify sampling options, fill settings, and output settings to get the desired fill result in the image. As you make changes, the Preview panel displays a live full-resolution preview of the output.
- Use one of the available two tools to fine-tune sampling and fill areas:
- Sampling Brush Tool: Use the Sampling Brush Tool to add to or remove from the sampling area used to fill the selection. Paint over the image in the document window.
- Lasso Tool and Polygonal Lasso Tool: Use any one of these selection tools to change or modify your original selection (fill area) in the document window.
- Adjust Content-Aware Fill settings
Examples:
The below photo shows the result of using the Content-aware fill in removing the child from the original photo.

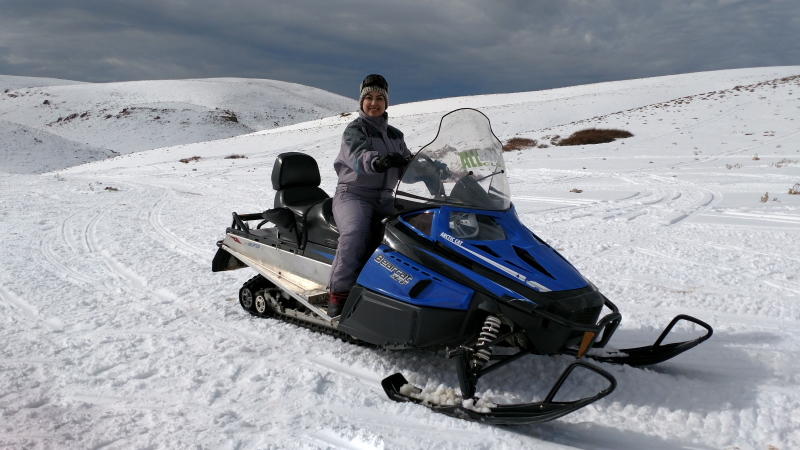
Photo by Ehab Amin
The below photo shows the result of using the Content-aware fill in removing the tractor and other objects from the original photo.
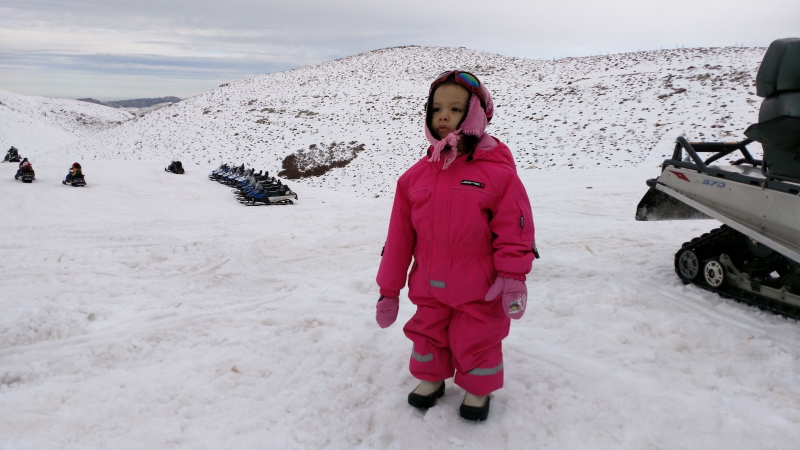
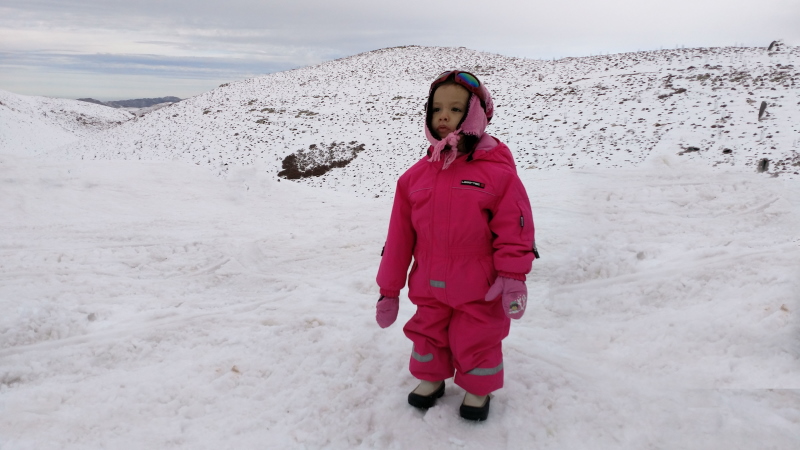
Photo by Ehab Amin
The below photo shows the result of using the Content-aware fill in removing the woman and other objects from the original photo.


Photo by Ehab Amin
Thanks for reading, I hope you enjoyed the article if you have any questions just post them below & I will be happy to answer you.
If you enjoy the site, don’t forget to subscribe, we will only inform you when a new article is posted.


Hello Amin – I have really enjoyed reading this post. It is amazing what can be done in the world of photography these days. I have a precious photo that is blurred but I understand photoshop is expensive. Is there a reasonable alternative? Also, does photoshop have an app for android?
Hi Nathaniel
Thanks for the comment, you may check my post “The Free Photo Editing Software- The Best 7 Software Packages“. Photoshop has a couple of apps for Android, Photoshop express, and Photoshop Mix you may try them, I wish you all the best.
Wow, I love your before and after shots! Now I feel the urgent need to get Photoshop. I rely heavily on my photos for my website. And to be able to remove unwanted objects or people is great! Are the tools fairly easy to use? I have had Photoshop before, actually I believe it was a trial…but not sure. Second question is, there are a lot of Photoshop products if I remember correctly. I just need Photoshop for photos?
Hi Leahrae
Thanks for your comment, the current monthly fees for Photoshop and Lightroom CC is $10. You may need Lightroom for global basic adjustment. Bur for Photoshop it is more printed to creative editing. But I must admit they need a lot of training and practicing to get professional results.
Perhaps you captured strangers in your shot, or a person didn’t make it entirely into the frame. You can remove them easily in Adobe Photoshop
With our practice file, or a photo of your own, use a selection tool to trace around the subject you want to remove. We used the Lasso tool to select the man on the right.
Use Content-Aware Fill (Edit > Content-Aware Fill) to automatically fill the selection of the person with other parts of the image. The green overlay shows the areas of the picture that Photoshop samples from. The area on the right shows the preview of the results. If unwanted parts of the image are included in the sampling area, you can choose Subtract from overlay area (the “–” icon at the top) and use the brush to paint over the green areas to remove portions of the sampling area.
With this setting, Photoshop generates a nondestructive edit by putting the new content on its own layer. This way, the original image is still on a separate layer if you need it.
You have got it all right, thank you for your post, I mean your comment! thanks.