

Most modern DSLRs are quite competent in shooting video, and you can use them to create industrial and commercial productions that are ideally suited for use at corporate functions, in sales presentations, as training aids, and as promotional spots on YouTube…so there is a great opportunity to expand your service offering by including video.
There are some advantages to filming with DSLR cameras:
- The variety of interchangeable lenses allows you to get creative with your shots
- It’s easy to shoot with a shallow depth-of-field to create a ‘cinematic’ look, a traditional HD camcorder may have a good zoom, but its widest f-stop or aperture (typically f/5.6) cannot compete with a fixed focal length lens- typically f/1.8 or better.
- Their low light capabilities make it easy to film in a range of conditions
- They’re light and portable so you can take them anywhere and get creative with your camera angles
Also, there are some limitations when using DSLR for shooting videos:
- Limited record time, you can get up to about 30 minutes at the highest 1080 resolution, depending on the DSLR manufacturer. This is a self-imposed DSLR limitation, while traditional HD camcorders don’t have this limitation, with record times of about 2 hours, depending on the HD record quality.
- Zooming and autofocusing is a standard feature when shooting with a camcorder, usually with variable control on speed. On the other hand, when shooting with a DSLR, only manual zoom control is generally available. Many of you might be able to zoom manually, but it does take considerable practice before that zoom is smooth with no stop and start bumps.
- Lack of good audio recording control, the built-in microphone on your DSLR will likely not be adequate for shooting good video; also manual audio control is a must-have feature for traditional videographers. However on many DSLRs that feature is either not available, or it got clumsy controls. Better DSLRs offer a stepped audio setting that achieves better results.
Shooting videos with DSLR camera are well suited in the following situations:
- When you will be filming subjects where clear separation from the background is desired.
- Where you’re shooting static scenes or scenes where the focal plane of the subject is not changing significantly.
- Where wide, rapid panning movements with a camera are not required.
The Essential Gear
If you want to get serious about shooting motion, having the right gear will really help you out. Here’s a list of stuff that will make your movie-making experience more enjoyable and more productive.
CAMERA & LENSES
You should have a camera body with a video shooting mode. Also, you need two or three different lenses for different scene situation. Conventional camcorders often have built-in telephoto lenses, but they usually lack decent wide-angle capabilities. I recommend a prime lens say of 50mm focal length and a wide aperture. Primes tend to be extremely good at their job of letting in a lot of light and are sharp, but of course, they cannot zoom. A zoom is great to have as well. You can use a fisheye (or super wide-angle), to cover a huge area.
For example, the 24-105mm Zoom lens is perfect for daytime and well-lit scenes, and a 50mm lens with a greater aperture – allowing much more light in when you shoot in low-light environments and take advantage of its narrow depth of field.
A STURDY TRIPOD WITH A PAN HEAD
Camera shake is bad for still photos, but it can be downright nasty when shooting motion, so a sturdy tripod is essential. For the legs, you want something that’s going to be extremely stable and as light as possible. Carbon fiber is nice, but not entirely necessary. Stability and portability are your top priorities. The head is where things get a little more specific. If you don’t plan on moving the camera while it’s on the tripod for pan shots, any kind will do fine, but eventually, you’re going to outgrow the static shot. Fluid heads are a great option because the movement is damped to make it smoother. Plus, they rotate on flat planes, making them more practical than many ball heads. The below photo shows my recommended tripod.
Manfrotto MT055XPRO3 3-Section Aluminium Tripod with MVH502AH Professional Fluid Video Head and a 35″ Padded Case
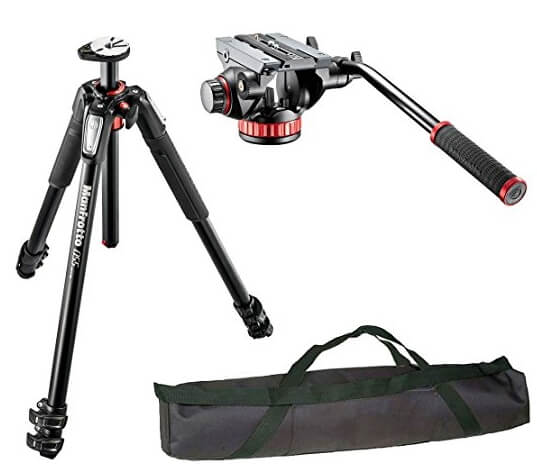
Product highlights:
- QPL’s (Quick Power Levers) design also offers more powerful locking of each section. Intuitive and ergonomic leg angle selectors allow each leg to be independently and solidly set to any of the preset angles, again allowing considerable positioning freedom
- The top casting of the 055XPRO3 has an Easy Link connector for supporting a photo or video accessory (such as an LED light, flash, reflector, or another piece of equipment) on an extending arm or bracket, and making the tripod into a practical mobile studio
- A bubble level is built into the top of the center column for precise framing. The bubble level rotates freely around the center column, so it can be positioned wherever it’s easiest for you to see it while adjusting the tripod, and without it either being obscured by the mounted head and camera or getting in the way of head or camera controls
- Redesigned Q90 center column with quick one finger operation
- 502HD Pro Video Head – The Manfrotto 502HD Pro Video Head with Flat Base provides full smoothness control while shooting thanks to the variable fluid mechanisms. Ideal for the latest camcorder and HDSLR cameras supplied with external accessories (4kg max capacity). The head can be combined with all photo tripods, thanks to the 3/8″ female thread
Some situations call for moving your camera rather than shooting with a still camera. If you are shooting for example real estate photography and you want to explore the whole property by walking through the different locations from the entrance to the dining room and the kitchen. To completely avoid camera shack while walking and taking photos the only solution is using a proper handheld stabilizer or gimbal.
Neewer Carbon Fiber 24″/60cm Handheld Stabilizer
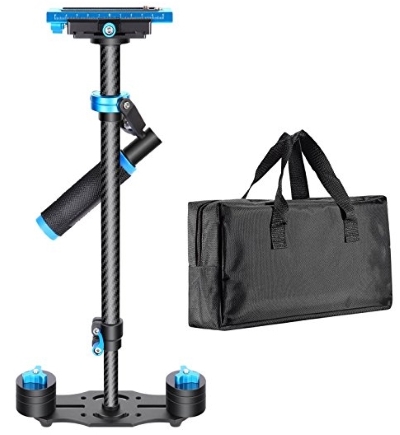
The Neewer 60cm Handheld Stabilizer is a lightweight stabilizing system created for DSLR cameras weighing up to 6.6lbs. It gives photographers the ability to create smooth videos while the camera is in motion. It features a camera platform with both x and y adjustments, and multiple mount holes for various camera positions. The weight plate contains four weight discs to balance your camera on the stabilizer. These can be added or removed based on your camera and accessories weights.
Product highlights
- Neewer Carbon Fiber 24″/60cm Handheld Stabilizer with Quick Release Plate 1/4″ and 3/8″ Screw for DSLR and Video Cameras up to 6.6lbs/3kg, Allows high and low angle shooting, high precision bearings, and low friction joints
- Stretch adjustment improves weight ratio and reduces the clump weights greatly
- The Quick Shoe Plate can accept any camera With a 1/4″ to 3/8″ screw adapter
- It can be extended from 15.2″ to 24″ to adapt to the weight of the camera
- Max Load: Approx. 6.6 pounds/3 kilograms
AN EXTERNAL MICROPHONE
The built-in microphones are a nice feature for DSLR cameras and show that the manufacturers are thinking about video users more and more. However, the quality is more often than not unusable for professional use.
If your camera has a microphone in jack, a great solution is a top microphone that will attach to the camera via the shotgun microphone. These can either be stereo or shotgun (directional) and are great at recording sound directly in front of the camera as well as ambient background noise.
Rode VMGO Video Mic GO Lightweight On-Camera Microphone
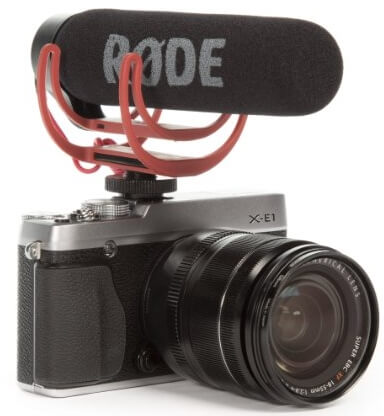 Product highlight:
- High-quality directional microphone
- No battery required
- Rode’s lightest mic at only 73g
- Rugged reinforced ABS construction
- Windshield included
- Integrated cold-shoe mount with 3/8” thread
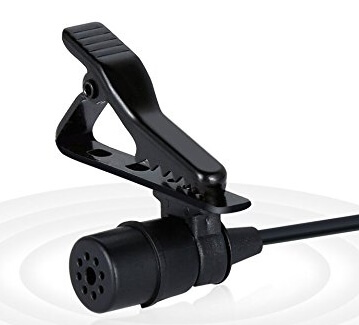
A wired or wireless clip-on Lavalier microphone is another great accessory to have. These lav microphones attach to a person’s collar or lapel and are the best for recording speech and dialogue.
MAONO Lavalier Microphone
If your camera doesn’t have a microphone input jack then a solution is to use an external audio recorder and sync the sound up in post-production.
HIGH-CAPACITY, HIGH-SPEED MEMORY CARDS
New cameras record video onto high-capacity SD memory cards. When recording 4K or full HD 1080p video these can fill up quite quickly, so it’s good to have a few in your collection. The speed of the card is the main factor to look out for – 4K demands the fastest of cards available. I would always recommend the highest speed card that your budget can permit! You will likely have to balance between your need for capacity and speed. I recommend buying only brand name cards with reviews like the one below.
SanDisk Extreme 128GB SDXC UHS-I Card
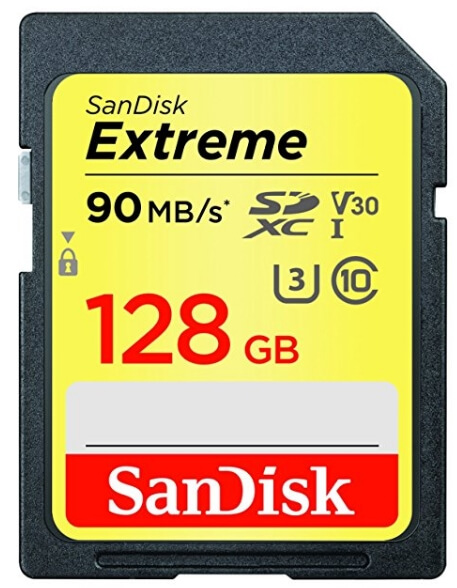
Product highlight:
-
- Ideal for DSLR and interchangeable-lens cameras and high performance camcorders
- Up to 60MB/s write speeds for faster shot-to-shot performance and up to 90 MB/s read speeds for faster transfer
- High-performance SD card with both video speed Class (V30) and UHS Speed Class 3 (U3) ratings for capturing 4K UHD and full HD video
- Shockproof, temperature-proof, waterproof, and x-ray proof
- Lifetime Warranty
SCREEN LOUPE
You’re going to be doing most of your composing and focusing using the LCD screen on the back of your camera, and that can cause some issues. Glare can be a big problem if you’re shooting in the sunlight, and a loop will take care of that for you. You’ll also likely be focusing manually using only the screen as your reference, so having more magnification on your screen will give you a better look at your subject as you focus.
Hoodman H32MB HoodLoupe Outdoor Loupe for 3.2″ LCD Screens
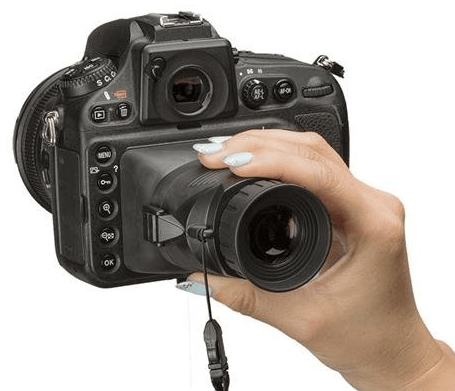
Product highlight
- Fits up to 3.2″ LCD
- Accepts multiple mounting bases
- Glass Optics
- +/- 3 Diopter
- Space-saving design
Focusing tools
Lonker 2pcs SLR camera Focusing ring Zoom ring
 Product highlight
- Easy installation to the camera lens
- High-quality Aluminum alloy grip, durable.
- Non-slip design and smooth design is no harm to your camera.
- Suitable for any lens with a diameter from approx. 52mm to 86mm(2.0-3.4in)
- Specially used for following focus. Suitable for most shooting situations.

Camera Settings
Before starting to discuss your camera setting, you should be aware of some terms that are related to video shooting
- NTSC or PAL Format
These terms refer to the number of frames per second (fps) used by a TV depending on where you are in the world.
NTSC is the standard for the USA, Canada, and Japan, amongst others, and delivers a frame rate of 30 fps.
PAL is the standard for the UK, Europe, Australia, and China, amongst others, and delivers a frame rate of 25 fps.
- Frame Rate
The frame rate is the number of images or frames, your camera will capture per second. 25 fps or 30 fps will give your footage natural-looking motion. This is probably the best setting to start experimenting with and it’s what we use for the majority of our shoots. 50 fps or 60 fps will capture double the number of frames. You can use this setting if you want to create slow-motion footage by playing it back at 50% speed. So 1 second of video recorded at 50 fps = 2 seconds of smooth slow-motion video when played back at 25 fps.
- Resolution (video quality)
Entry-level DSLRs can often only record at the lower resolution of 720p HD (a resolution of 1280×720 pixels). But most of the new prosumer and top-end DSLRs can record in full HD (equal to a resolution of 1080×1920 pixels). With modern mirrorless cameras, a resolution of 4K (3840×2160) can be reached.
Use Manual Mode
The reason for shooting in Manual Mode is that you’ll want to manually set the aperture and shutter speed, by taking control of these variables you will stop the camera from automatically adjusting one of the settings during a mid-shoot, which could produce some unwanted effects.
Manual focusing
By using autofocus your camera may adjust the focus in your scene partway through a clip in ways you don’t want. I recommend always shooting using manual focus; this will allow you to use some creative shooting, such as focus pulls (bringing an out-of-focus subject into focus) or rack focusing (switching between something in the foreground or background that is in focus).
Aperture setting
Aperture works just like a pupil. When the camera’s diaphragm is open, more light will get in. When it’s more contracted (closed), less light gets let in. So use a small aperture, like f/1.8, to let more light into the camera in lower-lighting situations. If you’re shooting outside, you might want to close the aperture to a larger number, like f/10, to limit the amount of light hitting the camera. Aperture also controls the depth of field. To get a blurry and out-of-focus background, keep the aperture as wide (like f/1.8) as possible. To make sure everything is in focus (deep DOF), stop down to a closed aperture (like f/22) to flatten out the image.
Shutter speed setting
When deciding your shutter speed for video, use this general rule: double your frame rate. If you’re shooting at 24fps, your shutter speed should be 1/48 (rounded up on the DSLR to 1/50). If you’re shooting at 60fps, your shutter speed should be 1/120.
ISO setting
Use a higher ISO value if you’re shooting indoors without much ambient light. Keep your ISO number low when you’re shooting in broad daylight outside or under bright studio lights.
Just remember that noise is a factor when shooting video just as it is with shooting still photography and whenever possible you should always shoot at the lowest ISO possible.
White Balance and Color Temperature
The auto-white balance (AWB) mode is very sensitive and can change while recording due to someone walking into frame or clouds passing overhead. I recommend using a manual white balance or using one of the camera’s presets. For more information about white balance, check my post >>What Is White Balance? – A Beginner Guide<<
Common Issue when shooting videos:
Moiré
Moiré is an unintended pattern that may show up in your photos and videos when you are shooting highly patterned, usually man-made subjects. Moiré is most likely to happen when you are shooting highly patterned things like brick walls, metal gates, fences, patterned clothing, and automobile front grills. It also tends to show up more when shooting these types of subjects with a wide-angle lens. The problem with moiré can’t be corrected in post-production so the best thing to do is reshoot the scene and try and reduce or eliminate it while you’re still on-site. The following are some correction you can make to reduce or hopefully illuminate the Moiré:
- Change the camera to subject distance or adjust the focal length
If moiré is visible in your image, the best thing you can do is change the distance to your subject. You can either physically move closer or away from your subject, or you can zoom in/out with your lens. Remember, moiré only happens when the pattern you are photographing exceeds sensor resolution, so all you have to do is move to a safer distance.
- Change the angle of the camera
You can simply change the angle of the camera a little; it will eliminate even very strong moiré patterns.
- Adjust the focus to a different area
While this is not always practical, adjusting the focus a little away from the patterns will remove moiré.
The Jello Effect
A DSLR camera has two types of imaging sensors: CCD and CMOS. CCD sensors use what’s called a global shutter, whereas CMOS sensors use a rolling shutter. The difference between the two is pretty straightforward: global shutters expose the entire image simultaneously, and rolling shutters, well, don’t. A rolling shutter tells parts of the sensor to become light-sensitive at different points in time, so you don’t get the full image instantly. This all happens fairly fast so it’s not always noticeable to the eye, but when the image changes drastically (quick panning) the “jello effect” shows up as a result of the rolling shutter and causes the frame to wobble.
You can cancel this jello effect by avoiding quick motion and use a lens with image stabilization.
Related Posts
What is a Gimbal Stabilizer? – Explanation and Recommendations
What Is The Best Video Editing Software For Beginners?
Thanks for reading, I hope you enjoyed the article if you have any questions just post them below & I will be happy to answer you.
If you enjoy the site, don’t forget to subscribe, we will only inform you when a new article is posted.


Hi Amin,
Most interesting writeup on DSLR filming. I hope you maybe enlighten us with a basic editing tutorial.
Thank you again on all photography tutorials.
Cheers!
~Jaffer
Many thanks for your nice comment, I’m planning to do some film editing tutorial soon!
Hope you all the best
i still wonder when I will be able to learn all these finish about photography. The memory card speed, is something I really need to understand properly. Is the speed of a memory card measured? Is there a memory card in which the speed is low and affects virtually the function of the camera?
Hi Kenech
High-resolution and high bit rate video requires a lot of data to be written to the card very quickly. The speed of data transfer between the camera and the memory card is measured in Megabits per seconds. The speed ratings for different cards are defined as ‘Speed Class’ and refer to the absolute minimum sustained write speeds. Cards can be rated as Class 2 (minimum write speed of 2MB/s), Class 4 (4MB/s), Class 6 (6MB/s) or Class 10 (10MB/s).
Hi, I have read on you post something about the traditional HD camcorder has a good zoom, but its widest f-stop oraperture (typically f/5.6) cannot compete with a fixed focal length lens- typically f/1.8 or better. I am sorry I am not sure I understood what you actually meant. Could you elaborate a little for me? thank you
Hi Barbara
Thanks for the comment, when using a traditional camcorder with its zoom lens, you can not use a very wide aperture opening (wider than f/5.6). But when using a DSLR camera, you have a variety of lenses to choose from. So you can use a prime lens that has a much wider aperture (f/1.8 or more).
Thanks for a most informative article. I often experience that effect I learned was called Moiré and was wondering if there was a way for it to be corrected, but see now in your post that you say it’s better to reshoot the scene as it isn’t correctable.
I recently sold my old Sony video camera, as it was old, and I found I was using my cell phone more and more to shoot both video and photos. I also sold my fancy Canon camera as I found it cumbersome to carry around. I see the shots I do now on my phone are good but they aren’t as good as they used to be, and I wonder if it is worth getting a separate video camera and photo camera, or is it best to buy a two in one type machine?
The decision of choosing DSLR or video camera depends on how you are using your camera. If you are frequently shooting videos, a video camera should be your choice. Otherwise, a DSLR camera will be the best choice. Thanks for the comment.