

Flash photography opens up a whole new world of possibilities to take some truly amazing photos that just wouldn’t be possible with natural light. It is important to understand that your flash unit is just another light source at your disposal. Fortunately, you can control the light it produces and shapes it to your needs. Before we begin I suggest reading my post about the different types of light.
When to use flash
Many photographers often love the feel of soft natural light, but, knowing how to utilize artificial light can be of tremendous value especially in low-light environments. In this paragraph, I would like to go over situations when the flash should be used and how it can work to our advantage.
Shooting Indoors:
High-end DSLRs may be flexible enough to capture images in poorly lit environments, but it is a game of compromises. If you are shooting indoors, for example inside a church, ballrooms, Wedding ceremony, or Corporate Reception place. Light levels are low; you will have to use a relatively slow shutter speed which may lead to blurry images due to motion blur or camera shake. You may increase ISO level too high, which obviously increases noise, messes up colors and greatly reduces dynamic range. In short, you are leaving very few options for post-processing. In order to avoid that and potentially reduce your post-processing time and other headaches, why not use flash instead? You can start out with a simple configuration, with a flash mounted on your camera, or you could get more creative and use flash in an off-camera setup to make images appear more dramatic and well-balanced. Wedding ballrooms, churches and reception areas are prone to have less than ideal light. The idea here is to be able to create a primary source of light that is brighter and more pleasant than the dim ambient light.

A more complex setup involves moving the light source away from your camera, commonly referred to as “off-camera flash”. You could set up a couple of lights that will illuminate the area from multiple sides/angles. Setting up one flash behind your subject as a rim light and a single flash bouncing off or shooting through an umbrella could create great images in indoor environments. With modern camera systems, you can control both directly from your camera with infrared or radio transmitters. If you are an event photographer, you are expected to capture details.

Finally, the use of a flash system is a must in professional studio photography. At this setup, it is common to use lighting sources that include flashes, umbrellas, and reflectors.
Shooting outdoors:
If you are taking photos of a subject that is backlit, it can create a nice separation and bring more depth to images. But you should also be aware that if the subject is heavily backlit (say with the sun behind), the opposite side of the subject where you stand might get underexposed. Fill flash can add more light to the foreground to balance the exposure. Fill-in flash is one of the easiest flash techniques to master, and one that will instantly give your shots a pro edge. It might seem odd, but fill-flash is actually a technique best used in broad daylight, in fact, the brighter it is the more likely that you’ll need to use it.
Another cool thing about flash is that it allows you to freeze the motion in a photo with a short burst of light. This works especially well if you’re shooting in low light. You can’t set the shutter speed too high or it would be too dark so, instead, you may use a flash.
When you shouldn’t use a flash
When you are shooting people or scene that is far away from you (twenty meters or more) and trying to use your on-camera flash to take the photo because there is a low light situation. This is obviously pointless and the flash will probably only reach about 5-10 meters before maxing out. You’re much better off putting your camera into manual or a priority mode and doing it properly. I wrote a post about handling the low light situation, you may check it.
Another situation is when you are taking candid photos; you supposed to be invisible to the subject you are shooting.
How to choose a flash unit
When you are going to choose a flash, there some basic factors you should consider: Knowing In what type of photography you are planning to use a flash. Understanding the jargon and terms used in flash specifications, so you can objectively compare different flash units. Finally, find the best price that suits your budget.
A good guide to choosing your flash is found in my post >How to Choose a Camera Flash<
Understanding flash modes and functions
Although the flash modes and functions can vary a lot among the different types and models, there are some basic modes that are common to any flash type. I have chosen the Canon Speedlite 600 EXII-RT as a tool for this explanation.
Canon Speedlite 600 EXII-RT
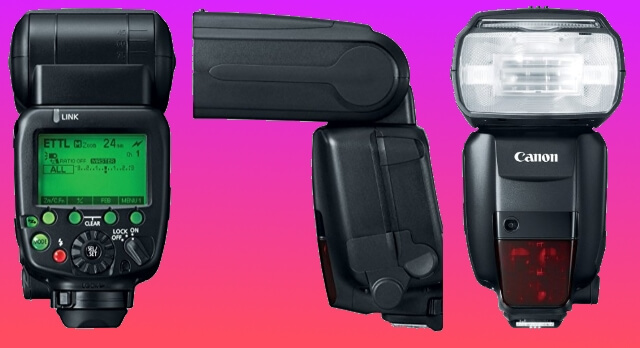
If you are a Canon user and are planning to go to the next level in flash photography and go to the top flashed in the market, buying the Speedlite 600 EXII-RT may be your best bet. It can be used as an on-camera flash that is attached to the hot shoe of your camera, and as a master/slave unit during optical/wireless flash photography.
Canon uses a Larger and better LCD which enables a user-friendly interface that made the use of flash much easier. Canon has dropped out making users tap on different buttons multiple times to get functions, providing users with an interface that changes according to the mode in use, followed by a change on the way buttons behave.
It also allows you to control your new flash or flashes directly from your camera, (there are some limitations to cameras introduced before 2011)
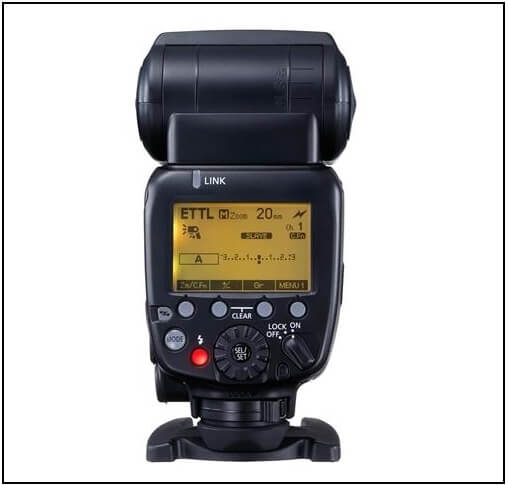
Control panel
The control panel in the back of the flash is shown in the below photo
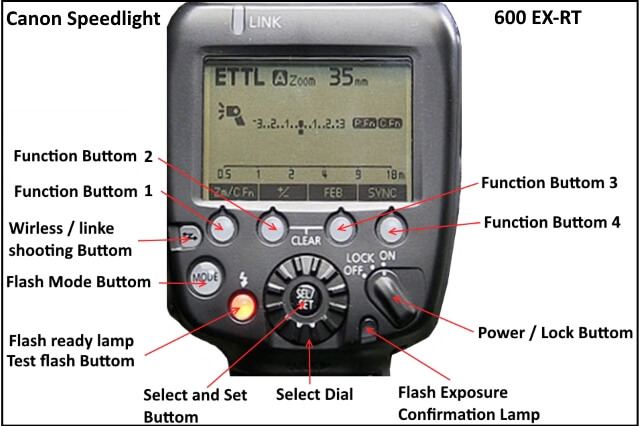
There are five different modes; you can access them by using the large button on the left. They are:
ETTL Auto flash mode (fully automatic mode)
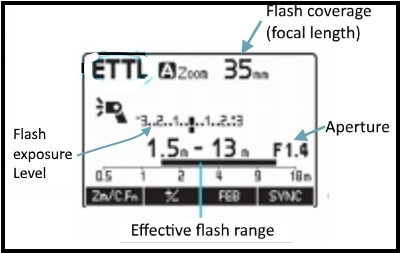
When you set your camera to program <P> (auto mode), you can shoot in flash fully automated mode (ETTL). In auto mode, the flash automatically defines the light needed, based on a meter reading done through the lens. Once you choose the ETTL mode, the functions available to each button show up on the LCD. And they are Zoom/Functions, Exposure Compensation, FEB (Flash Exposure Bracketing), and Sync witch defines if you get 1st or 2nd curtain sync or if you go to the Hi-Speed mode. Besides choosing the zoom of the flash head (automatically and manually from 20 to 200mm), you can access both the Custom and Personal functions through the first button. On the center of the LCD you get a scale for Exposure Compensation and at the bottom the distance the flash will reach, as shown below.
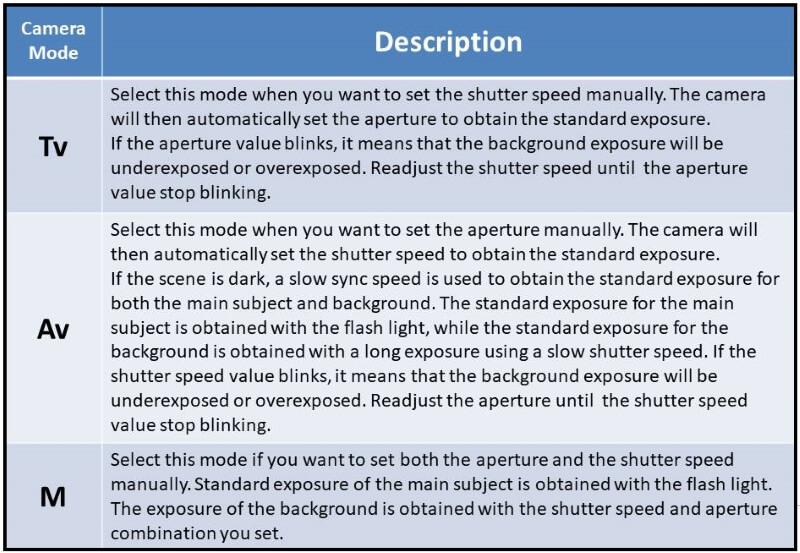
ETTL Autoflash by shooting mode
Set the camera mode to TV (shutter priority AE), AV (Aperture-priority AE), or M (manual exposure) and you can use the ETTL autoflash suitable for each mode. The below photo summarizes the settings.
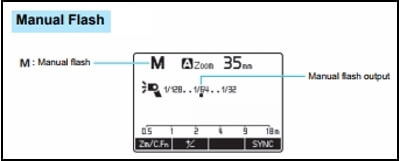
Manual
In this mode, you can set the flash output from 1/1 full output to 1/128 power in 1/3 step increments. You need to use a light meter to determine the required flash power.
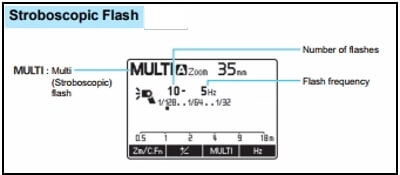
Multi (Stroboscopic)
When using stroboscopic mode with a slow shutter speed, you can shot multiple successive movements within a single picture. In this mode, you have to set the flash output, numbers of flashes, and flash frequency (the number of flashes per second=Hz)
Auto/manual External Flash Metering
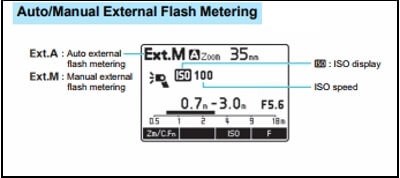
An auto external flash can be used with the digital EOS cameras released in and after 2007. But the manual external flash metering can be used with all EOS cameras.
-
A: auto external flash metering
The Speedlite’s build in external metering sensor measures the flashlight reflected from the subject in real-time and automatically stops the flash firing when the standards exposure is reached.
-
M: manual external flash metering
You can manually set the Speedlite with the ISO speed and the aperture set on the camera, and the flash output will adjust automatically to these values.
Optical / Radio transmission wireless shooting modes
-
Radio transmission
Using the flash in this mode allows you to perform wirelessly controlled shooting with multiple flashes in the same way as normal ETTL autoflash photography. The system is designed so that the settings of the master unit attached to the camera are automatically applied to the wirelessly controlled flashes. The transmission range is approx. 30 meters.
-
Optical transmission
Wireless shooting using radio transmission has advantages over wireless shooting using optical transmission, such as being less affected by obstacles, and not having to point the slave unit’s wireless sensor towards the master unit.
Additional features
Flash exposure compensation
You can adjust the flash output by changing the flash exposure level. It can be set up to 3 stops in 1/3 stop increment.
FEB
You can take three shots while changing the flash output. This is called flash FEB (flash exposure bracketing)
FE Lock
The FE (flash exposure) locks the correct exposure setting for any part of the subject.
High-speed Sync
With high-speed Sync, you can shoot with a flash even at a shutter speed that exceeds the maximum flash sync shutter speed.
Second-curtain Sync
Shooting with slow shutter speed and second-curtain sync, captures the trail of the light sources of a moving subject, such as car lights.
Zoom – setting the flash coverage
Flash coverage (the range covered by the flashlight) can be set automatically or manually. With automatic mode, the flash coverage is adjusted according to the focal length (shooting angle of view) of the lens in use and the image sensor size.
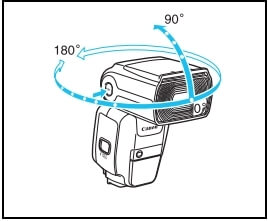
Bounce
By pointing the flash head towards the ceiling or wall, the flashlight will bounce off the surface before illuminating the subject.
You can get Canon Speedlite EXII-RT 600 from Amazon
Related posts
Flash Photography Tips – Tricks & Techniques For Better Photos
What Are The Different Types Of Light In Photography?
What Is The Use Of A Flash Diffuser? – Simple Tutorial
Photography Studio – Setting Up Home Photography Studio
Photography Light Meter – Camera metering Vs Handheld Metering
Thanks for reading, I hope you enjoyed the article if you have any questions just post them below & I will be happy to answer you.
If you enjoy the site, don’t forget to subscribe, we will only inform you when a new article is posted.


Hi Amin Hashem,
Thank you for writing a helpful information about using flash in Photography. I believe this is a great perfect knowledge for every photographer. I am honesty accept that I would not even know so much details information if I did not read your article. I am now clearly understood the concept of using flash and the time which is perfect for using it. I am going to share it with my photographer friends.
Thanks for the comment and I appreciate sharing the article.
Hi Amin,
you have really made me a researcher.. Lol.. i researched more on this particular article of yours and it’s like I’m enjoying every bit of it. and i will like to add a little ideas from my research about the topic.
It is important to understand that the effective distance of any flash depends on the aperture and ISO. For example, at f/8 and ISO 100, the built-in flash will be effective only if the subject is within about five feet from the camera. Indirectly the range can be increased by decreasing F-stop and/or using a higher ISO setting. But both the methods come at a cost.While a good external flash unit has about 15 times the power of a built-in unit, with approximately four times the effective distance (there’s some math involved here). Power also becomes critical for bounced flash and fill flash in sunny outdoor conditions.
Thanks for the added information, well done and wish you all the best
WOW! Your article about using Flash is one of the best I ever read. If you are using a professional camera, you have to buy a flash or more. Not that easy to use than on a simple compact camera. There are many functions that you have to learn, but with some practice, you will be able to use it. Your review shows how can you choose from the modes.
Nature photographers must have professional flash/es. Speedlite is a good choice.
Thanks for the comment