


Nowadays most of the lenses that are manufactured are capable of being used in either autofocus or manual focus mode. Although Autofocus is a tremendous innovation for camera technology, the camera and lens producers are still providing the manual mode in their products.
Autofocusing mode allows you to be efficient in shooting and more accurate in many cases. For example, when your subject is in motion, such as a football player or a running horse, using autofocus is a must and you can’t afford to go without it.
In autofocus mode, the camera determines the sharpest focus, using sensors that are devoted to measuring the focus of the scene, and the photographer doesn’t have to do anything.
One of the most confusing aspects can be figuring out when you should use manual focus, versus when it’s better to use an autofocus mode. To learn more about the debate of autofocus versus manual focus, read the tips below.
Situations When the Manual focus is better than Auto
Autofocus in Canon DSLRs works well when there is enough contrast (the difference between light tones) on or between subject matter that the camera is able to detect. It is fair to say that autofocus doesn’t perform as well on some cameras, and in some situations, so simply rotate the focus mode selector to manual and use the focus ring to sharpen the subject in view. These situations and limitations can be summarized in the following points:
-
Very high contrast or very low contrast
If for example, you are shooting an outdoor portrait with your subject standing in the shade, and you frame your scene such that it includes an adjoining large area of light. It is likely your autofocus will struggle.

As with areas of high contrast, you may find that scenes with no contrast present the same focusing issues i.e. the main subject of your image exhibits the same tones and colors as its background. A common example of this is shooting a light color or white subject in the snow.

-
Distracting elements
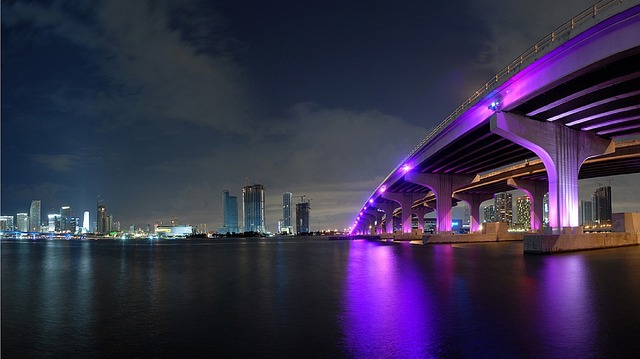
Compositions that contain objects that are bigger or bolder than the intended subject may also throw off your autofocus. For instance, a person dwarfed in front of an intimidating cityscape may be lost using autofocus

-
Low-light situations
When shooting at low light situations such as dimly lit concerts or nighttime landscapes. In low light situations, the autofocus may have a difficult time finding an object to focus on. The red assist beam that many cameras have is designed to help with this issue. In these instances, flicking the switch on the lens to manual focus puts you in full control of the lens’s focal plane.
-
Obstacles are in the way
If your subject is partially blocked behind an obstacle that you are unable to move out of the way or intend to keep, For example, if you are shooting a caged or penned animal, a person looking from a window or stood behind a gate etc., this can easily foul the autofocus.

Also, If you are framing the shot with foliage (tree leaves) and it’s windy, using manual focus may be necessary. If there are a lot of foreground elements, like shooting through several branches, the manual focus becomes a must. Cameras equipped with focus peaking, or the ability to zoom in as you select the focus point, are a big help in these scenarios.

-
Scenes with geometric or repeated patterns
Modern architecture often exhibits geometric patterns that can confuse the camera’s autofocus.
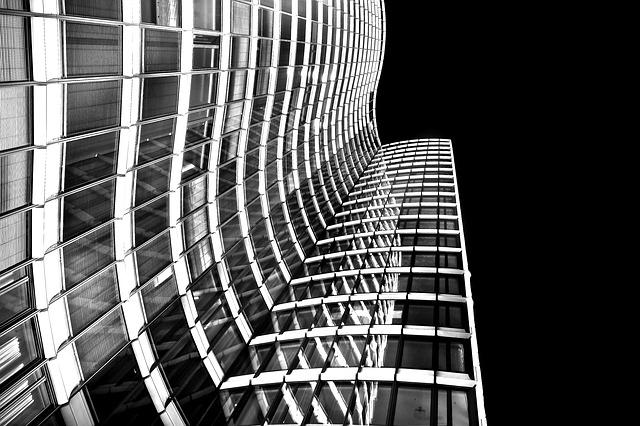
When shooting a scene that compromises hundreds of elements, each presenting a multitude of details, manual focus may be necessary for complete control. This is especially necessary when the subjects exhibit small or no variation in size, shape, color or brightness. As an example, a field of flowers.

-
Using compact and phone cameras
Some cameras, particularly compact cameras and phones, simply do not have a quick autofocus function because of an issue called the autofocus lag. Autofocus lag refers to the amount of time between you pressing the shutter button halfway to when the camera finds an autofocus lock. This issue will be apparent when you are shooting moving objects because some cameras cannot keep up and refocus on the subject as it moves across the scene.
-
Shooting Through Glass
Places, where you have to shoot through glass, like on a plane, at a museum where there is exhibit protected by glass containers, or the zoo are challenging shots for the autofocus function. That is because the fingermarks, scratches, and reflections on the glass can confuse the autofocus function into thinking that these are what you want it to focus on and not what’s on the other side of the glass. Switching to manual focus can help ensure your subject is sharp.


Understanding how manual focus works
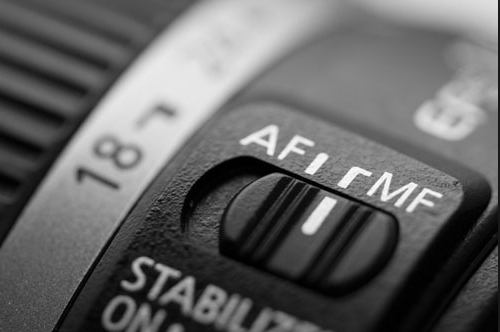
Most lenses within Canon’s EF lens range feature full-time manual focusing which allow you to adjust the focus manually, even when the lens is set to autofocus. Once you have switched to manual focus, simply adjust the focus ring until the details sharpen. Most DSLRs switch to manual focus by using a switch on the lens, often marked with A and M or A/M. Switching to manual focus is usually just as simple as flipping that switch.
However, on some lenses, you may find the focus ring turns during focusing through the lens drive. If this is the case with your lens, don’t adjust the rotating part of the lens without first switching to manual focus. Doing so can cause damage to the focus motor.
Manual focus works based on distance. If you look at the barrel of your lens, you’ll see distance markers that go up to infinity.
![]()
Adjusting the focus is done simply by turning the ring around the front part of the lens. Turning the ring clockwise will focus on objects that are closer to the camera and vice versa. Since manual focus works based on distance, you could also move the camera instead of turning the lens, this is a popular manual focus method among macro photographers.
Very occasionally, you will come across an EF lens that has a depth-of-field scale.
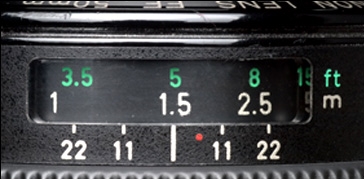
A depth-of-field scale sits on either side of the focus index mark. The distance range encompassed by the two numbers representing the aperture set on the lens is the depth-of-field − the near and far limits of apparent sharpness in a photograph. So, in the above example (EF50mm f/1.8 lens), with the lens set to f/11, the depth-of-field extends from about 1.3m to about 1.8m.
Focus lock
Manual focusing has also others uses. Focus lock is a feature of the one-shot AF shooting mode. Partial pressure on the shutter button locks the focus, letting you focus on one part of the subject before recomposing the image in the viewfinder. But exposure is also locked at the same time.
If you want to lock the focus without the exposure, use autofocus to set the lens, and then flick the AF/MF switch to MF. The focus will not change as you recompose the image and press the shutter button again.
Manual Focusing Tips
Use Live View instead of the viewfinder
It’s easy to see if a shot is sharp or not by using the LCD screen instead of the viewfinder. Start by turning Live View on, it’s in the menu for most Canon cameras and with a live view shortcut button. You may check my post “What is Live View in DSLR Cameras”
Live View comes in handy—click the button with the magnifying glass to zoom in on your subject (on most cameras, you can click more than once to get in even closer). Use the arrow keys to move your view if the subject isn’t in the center. When you are zoomed in on your subject, it’s easier to see if the subject is sharp as you turn the focus ring.
Pre-focusing can be of great help for shooting action
This method only works with subjects that have predictable movement patterns. It means focusing on a flower before the bug lands on it, or focusing on a nesting area in wildlife photography. Pre-focusing on a spot where you expect the subject will be. If you pre-focus in advance, it will allow you to capture shots with manual focus quickly.
Focus-Assist light can make manual focus easier
Most digital SLR cameras have a focus assist light that illuminates when you press the shutter button halfway down to focus. It’s easy to turn the focus assist light On/Off. Simply go into the custom settings in your camera’s menu and select the setting for the focus assist light and turn it off. If you want to use it later, go back to the menu option and turn it back on.
On a Canon camera, the focal point that is in focus will light up when the proper focus is achieved. A focus confirmation light will also turn on.
Conclusion
Modern cameras have made big improvements in autofocus technology, making it a great tool that works best most of the time. However, there are still a few scenarios where manual focus trumps even the new autofocus technology. Manual focus makes it possible to shoot in dark and low contrast scenes, as well as giving the photographer more control in landscape and macro photography, as well as shots with foreground elements.
Related Posts
What Is Autofocus And How It Work
How to Control DOF of Your Photos – Shallow Depth of Field vs Deep Depth of Field
How to Focus and Recompose- Tips to Achieve Sharp Focus
Macro Photography Tips And Tricks – Guidelines & Examples
What is Live View in DSLR Cameras
Thanks for reading, I hope you enjoyed the article if you have any questions just post below & I will be happy to answer you.
If you enjoy the site, don’t forget to subscribe, we will only inform you when a new article is posted.


Dear Amin,
I must say I found your post highly uplifting and educational. Thanks for the article I enjoyed it.
To be very honest with you, I’m in a kind of information overload with the in-depth research you have come up with here. However, I have to congratulate you on this “Great Post”.
To be honest very recently I started to follow my passion, So I am studying and learning about photography I got great insights from your post and as a beginner I believe I need to read your post for several times to grasp all the valuable information. I am bookmarking it for future reference.
You have given me plenty to think about here. This post is so thorough it opened my eyes to all sorts of information I wasn’t aware of!
Also I am going to share your post with one of friend who is a photographer by profession from whom I am learning photography and I strongly believe he is going to find great value via your post.
Much Success!
Paul
Thank you for your comprehensive comment, glad you like the post and you are welcome to my site.