


There are lots of different ways you and your camera can focus on a subject. One of the interesting techniques of using autofocus is the so-called focus and recompose. Many beginning photographers are taught to use the center autofocus point because it is believed that it is the most sensitive and accurate focusing point. So you frame your photo by making your subject in the center of the frame and focus by pointing at that center focus point on your subject. And then recomposing so that your subject is placed according to the rule of thirds or whatever composition you like.
Before I talk about this technique, let me first explain what the word “recompose” stands for in photography. When you take a picture, you carefully frame your shot and place your subject somewhere in the frame before you take a picture. In other words, you compose the shot. Recomposing simply means framing your shot first (to acquire focus), then moving your camera to re-position your subject somewhere else in the frame.
Another example that is very popular, you are taking a portrait of someone you would usually place your focal point on the nearest eye because it is important that the eyes are sharp. Now your subject is in the middle of your photograph because you are using the center focusing point. But you don’t want your subject there. You want him slightly off to the side of your image. So what do you do?
How to use focus and recompose technique
To use the ‘focus-and-recompose’ technique, you first focus on your subject by pressing the shutter button half-way down and centering your focusing point of the subject in the center of the frame and wait for the camera beep (to make sure that the camera acquires the focus). And then keep your finger lightly pressed down on that shutter button (to lock the focus) and then move your cameras slightly to place the subject to the side of the frame. As long as you haven’t lifted your finger from the shutter button the focus will have stayed on their position even though their focal point is now pointing at something else. Finally, you fully press down the shutter button to take the photo.
There is an interesting technique that may facilitate the using of focus and recompose, it called back bottom focusing. You may check my post “Back Button Focus for Canon- What is it and how to use it.
It sounds like a good technique, but, there is the main issue involved, that is the focus shifting.
The depth of field issue
In the below figure, I frame my subject in the middle of the frame to acquire the focus.

Then I recompose by rotating the camera a small angle to frame the subject out of the center to apply the third composition rule or the golden composition rule. As shown in the below figure.
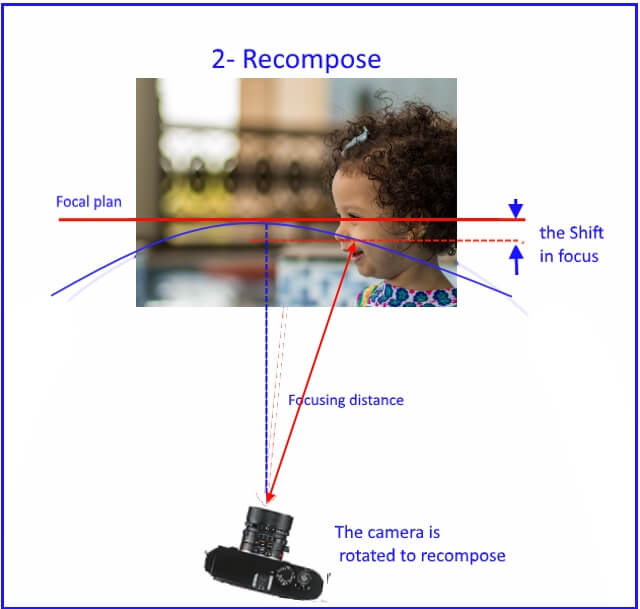
As a result of that camera rotation and recomposing, the acquired focus plane is now behind by a small distance that I’ll call the focus shift. In many situations, this shift is small and has no effect on the final image. But if you are shooting very close to your subject, or using a wide aperture, or a relatively long focal length lens, the focus distance becoming bigger compared to the depth of field and cause the final photo to be out of focus. Let us first refresh our knowledge about what is the depth of field means and what are the factors that affect its magnitude.
Depth of Field
The depth of field is defined as the area in front of and behind your main subject that is in acceptable focus. For more reading about the depth of field, you may check my post “How to Control DOF of Your Photos – Shallow Depth of Field vs Deep Depth of Field”.
The DOF is a function of the following factors:
- Aperture (f-stop).
- The focal length of the lens.
- The size of the camera sensor
- Distance from the camera to the subject.
There are many apps available on smartphones nowadays, like DOF calculator, and, DOF and Hyperfocal Calculator for Android system. You can easily calculate your DOF if you select the focal length, the aperture, sensor size, and the subject distance. The following are screenshots of the two apps.
Case study
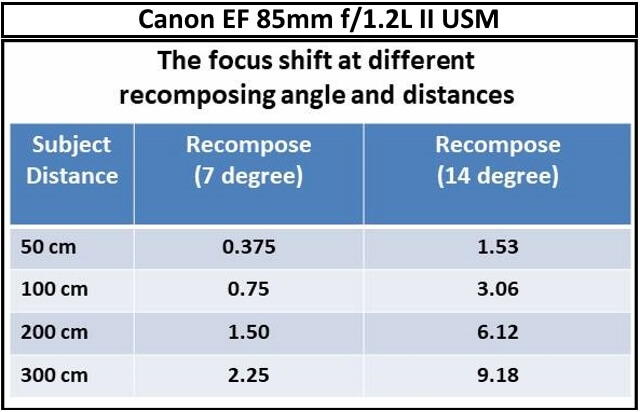
The following is a case study to get a feeling of how much the depth of field and the focus shift in different shooting situations., I use Canon EF 85mm f/1.2L II USM lens. The below table is the calculated depth of field at different apertures and different subject distances for the 85mm focal length.

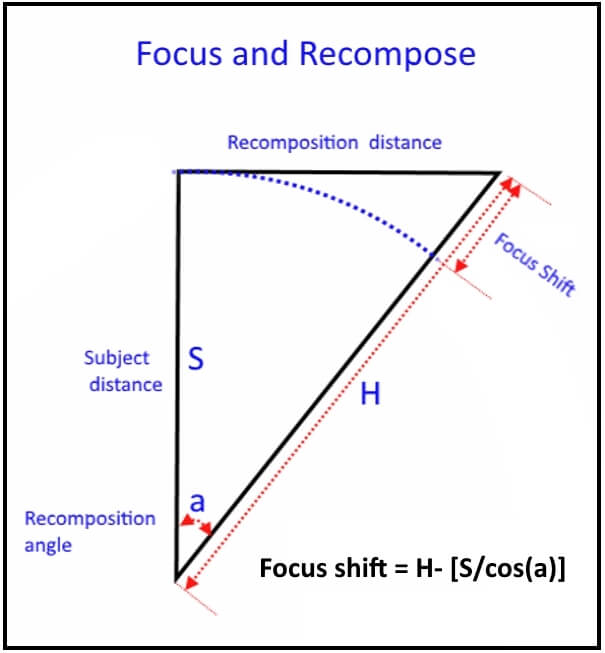
To calculate the focus shift, and knowing that the angle of view of this lens is about 28 degree, the below diagram and table illustrate the used formula and the results for two recomposing situations (at 1/6 the frame =7 degree, and ½ the frame=14 degree)
Discussion of the results
If you are using a wide aperture (f/1.2), shooting very close to your subject (50 cm), and recompose 1/6 of the frame (about 7 degrees) the focus shift will be 0.375 cm (table 2). This value is greater than the depth of field (table 1) at the same shooting condition. It will result in an out of focus phot.
But if you just step back and make the subject distance 100 cm, the focus shift will be smaller than the depth of field and your photo will be in focus.
If you keep the subject distance short (50 cm), but you use and just step the aperture to f/2.8 the 0.375 focus shift will be smaller than the new depth of field (2.15 from table 1) and the photo will be also in focus.
Conclusion
The focus-recompose technique is much less accurate when your aperture is wide and your depth of field is shallow. The focus-recompose technique only works well in single servo or one-shot autofocus mode because you need to just focus once then lock focus on your subject whilst you move your camera to recompose the scene. Also, you can’t use this technique with fast moving subjects.
So generally I would not recommend using this technique in portrait photography especially headshots. Otherwise many photographers are using this technique successfully in many other shooting situations.
The best alternative to focus and recompose technique
Since the modern camera offers more than one focus point, some of them have lots of focusing points; you don’t have to use the focus point that is in the middle of your frame. The below photo shows a grid of focusing points. This is a normal option in all modern digital cameras.
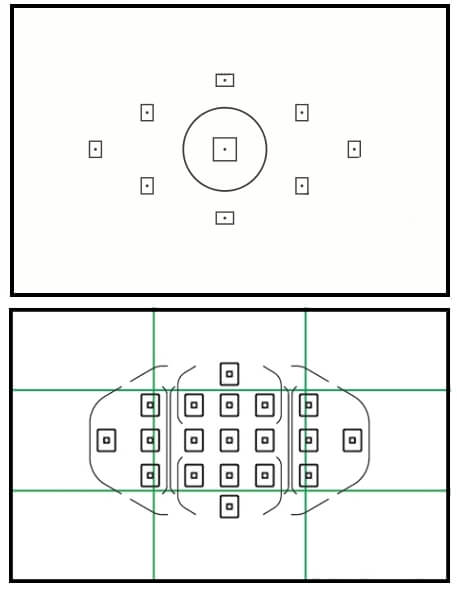
You can compose your scene just the way you want it to look. You place your subject in the scene where you want them to be and then, then just simply select the focus point nearest to them. To do this you need to make sure you are on the correct setting.
For Canon cameras, you will have the option of either automatic AF point selection which will allow your camera to choose your focal point for you or manual AF point selection which allows you to select it instead. Manual is what you need for this.
Once you are in this mode you will be able to move your focus point around your scene using either the dial or the arrow buttons to the right of your screen. If your focal point stops moving just simply press your AF point selection button again and it will start to move to your command again. You will see it moving both through your viewfinder and on your screen. The following paragraph describes the different autofocus modes of Canon cameras.
Autofocus modes Types
There are two Autofocus modes you have to do some setting among both of them. For more reading about this subject, you can read my post “What Is Autofocus and How It Work”. The first is AF mode (the choice is made according to the movement or stillness of your subject, and the second is AF area mode (the choice is made according to the position of the sensor you want to use in focusing).
AF Modes
- One-Shot Focusing Mode (One-Shot AF – Canon)
It represents a single-focus capability. In this mode, when you depress the shutter release halfway, the camera focuses on the subject just once – there’s no continuous adjustment. This mode saves battery power and is ideal for subjects that aren’t moving.
- Continuous Focusing Mode (AI Servo AF – Canon)
This mode is used for Continuous Focus and it is most useful for keeping moving objects sharp within the viewfinder as you track the object. In the Continuous focusing mode, the camera detects the subject’s movements and refocuses accordingly to keep the object sharp as a tack.
AF Area Modes
- Manual AF single Point Mode
You work with one AF point only, and that point can be moved manually anywhere within the points of AF array.
- AF Point Expansion Mode
A cluster of 5 total AF points (four points surrounding one primary AF point), which can be manually moved anywhere within the points array.
- Zone AF (Canon)
It looks almost the same as AF Point Expansion, but behaves differently. It’s a grouping of AF points, which can be moved to any of nine pre-defined locations.
- Automatic AF Point Selection Mode (Canon)
The automatic AF point mode is identified by the thin black borders or brackets that surround the entire AF area. All AF points are active; the camera automatically selects the active AF point to use.

After setting up your camera, you can select your focus point manually. Naturally, there will be some difficulties you will encounter when you use this technique. There may not be a focus point available to you in exactly the place you want it to be. However, there will be one nearby. To overcome this difficulty, you can alter your composition a little so that your focus point is where you want it to be and then you can crop your image a little afterward to get the exact composition you want. The next difficulty is learning and practicing to select and move your focus point easily and quickly.
Related posts
What Is Autofocus And How It Work
Back Button Focus for Canon- What is it and how to use it
What Is Aperture In Photography
Full Frame vs Crop Sensor – Which To Choose
10 Rules for Photo Composition
Golden Ratio and Photography Composition
Thanks for reading, I hope you enjoyed the article if you have any questions just post them below & I will be happy to answer you.
If you enjoy the site, don’t forget to subscribe, we will only inform you when a new article is posted.


I completely agree with the important article about those misconceptions, your calculations are correct.
Focus and recompose with the center autofocus-point will almost always result in unsharp images with an open aperture (i.e. <=2), given you have only millimeters depth of field. Even if you and your model don't move during recomposing! Moving the lens by 7-15° will shift the focal plane way too much.
Using the nearest focus point to the eye of the model will result in a better result although still not optimal. With live view on modern DSLR or DSLM you can select the perfect focal point for optimal sharpness although this may be impractical. Even better is an automatic eye detection mode.
Hi Mino
Thanks for your interesting comment, Of course having the advanced automatic eye detection mode is the perfect solution.
This is an interesting post! Recomposing is quite an interesting technique because I am new to photo editing. In the past, there was a little more pressure on me (put there by myself) because whatever I shot is what I was stuck with. This technique is quite cool because you can lock the focus onto your subject and then shift the subject to the side.
This is something I have never encountered before and is going to be great to try out in real life. It always amazes me how technical photography is because it is an art form so there must be a technique to it. I think it is great to practise the recompose technique because it will allow you to make great compositions on the fly.
Thanks for sharing this great information!
Hi Amin Hashem,
I have read your article and I believe this is a great post about “How to use focus and recompose technique”. I would not even think about it if I did not read your article. I have a cybershot mini digital camera and I always have to press shutter button twice for taking picture without thinking deeply. Now I found your article is helpful for me and I can learn by practicing your guideline. I am going to bookmark it in my favorite section. Thanks for writing such helpful tips.
I think it is very important to understand what will happens when you press the shutter button in your digital camera. To master focus and recompose technique you need to know who to lock the focus until you recompose and take the shot. You may also check my post ” Back Button Focus For Canon- What Is It And How To Use It“, it is the easiest way to lock the focus. Thanks for your comment.