


In the realm of photo manipulation, the timeless allure of black-and-white imagery continues to captivate. Discover the artistry behind transforming vibrant color photos as we delve into the process of turning color photos into black & white. Unveil the techniques that breathe new life into your images, exploring the subtle nuances that make monochromatic conversions a compelling endeavor. Join us in this exploration as we decode the transformational journey from color to the evocative realm of black and white photography.
In this article, we are going to explain some methods using different Photoshop tools to turn color photos into black & white. First, let us explain some definitions and terminologies used in this topic.
Grayscale Photo (black and white)
Grayscale is a more technical and more accurate term for the type of photos, we call black and white. A grayscale photo is an image that is composed exclusively of shades of gray, varying from black to white. In essence, “grayscale” and “black and white” mean exactly the same thing. However, grayscale is a far more accurate term.
Monochrome Photo
A monochrome photo is an image composed exclusively of shades of one color varying from the brightest to the darkest hues. All grayscale or black and white images are monochrome, as they are made of varying shades of only one color (black). However, not all monochrome images are grayscale as monochromatic images can be made of any color.
Why do we turn a color photo into a black & white photo in post-processing?
The advantage of turning a color photo into a black & white photo in post-processing instead of shooting the photo directly in the camera is that it preserves all the possible data that the camera sensor collects from the scene, which gives you more freedom during the editing process. You can produce color and black-and-white versions of the same photo, plus you can create an unlimited number of black and white and monochrome variations.
What to look for to create black and white images?
You can transform an ordinary scene or object into something dramatic just by converting it to black and white. Of course, not all photos are suitable to be converted to B&W, the following elements can help you pick the right photo to be converted to B&W
-
Photos with good contrast
Black and white images look best with a lot of contrast. Often when I convert a color image to black and white, I add contrast and clarity, boost the curve, and push the white/black sliders. To have the appearance of an image full of depth and richness, you need to have good solid blacks in your image, and pure white.
-
When color is distracting
Sometimes it’s best to convert to black and white when the color in the image is distracting in some way. When there is something in the background that is brightly colored and drawing attention away from the main subject, or maybe the subject itself has a color that is not appealing.
-
When you can’t fix the white balance
Perhaps there is a mixture of light sources such as daylight, fluorescent, and tungsten. That will make a mess of the white balance, and sometimes it’s impossible to correct. You can turn the photo into B & W to create a mood.
How to Turn Color Photos into Black & White
Many photographers who are just starting out typically make the mistake of simply desaturating or choosing the grayscale mode when they turn images to black and white. However, these are among the worst ways to edit and should be avoided. By desaturating or converting to grayscale, you are essentially just removing the colors while disregarding the tonality of the image. This ultimately creates monochrome images with a boring, washed-out appearance.
The following are some tools in Photoshop that are used to turn your photo into black and white.
-
Method 1: The Black and White adjustment layer
To easily convert a color image to black and white with the Black & White adjustment layer in Photoshop, follow the steps of the example below:
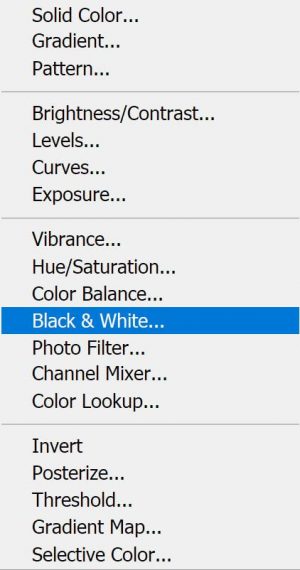
Example 1
I will use the following photo

Photo by Nishant Aneja from Pexels
Step 1
Open the photo in Photoshop
To access the Black & White adjustment layer, do one of the following:
- From the layer panel, add a new adjustment layer, click the Black & White
- Choose Layer > New Adjustment Layer > Black & White.
Photoshop applies a default grayscale conversion to your image.
Step 2
Fine-tune your results in the Properties panel
- Preset: Select a predefined grayscale mix or a previously saved Custom mix.
- Auto: Sets a grayscale mix based on the color values of your image.
- Color sliders: Adjust the gray tones of a specific color in your image. Drag a slider left to darken or right to lighten the gray tones corresponding to the original color of the image.
You may start editing by applying one of the available presets as a quick start to convert your image to black and white. Click a preset in the list to apply it. If you find one you like you can use it as is, or continue to adjust by the sliders to fine-tune the result.
In the Properties dialog, there are color sliders for red, yellow, green, cyan, blue, and magenta. You can use these to control how the colors in the photo are converted. Drag a color slider to the left to darken areas in the image, which has that tone, and drag to the right to lighten them.
You can also use the on-image adjustment tool (as an alternative to using color sliders). Click on the image and drag left (darken) or right (lighten) to modify the color slider for the corresponding color(s) at that location. You should be aware, that this would adjust every occurrence of that color in the image, not just the area of color underneath your cursor.
Finally, you can control the intensity of the adjustment intensity by reducing its opacity.
The result is shown below
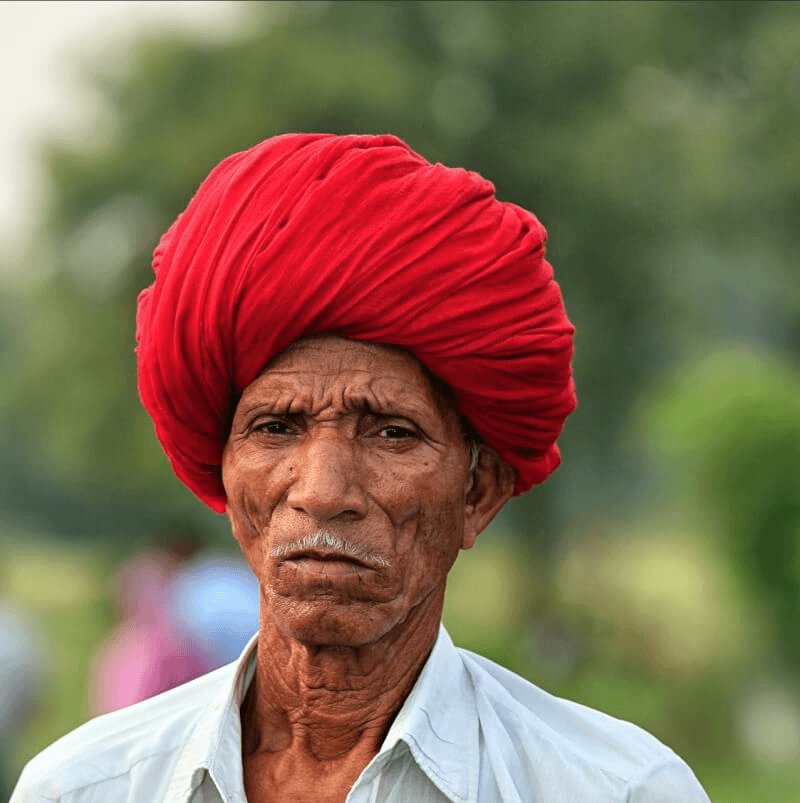
Example 2
Photo by Nasimul Islam from Pexels
-
Method 2: The Calculation command
Photoshop’s calculation commands perform mathematical operations on the corresponding pixels of two channels (the pixels with identical locations in the image) and then combine the results in a single channel. In other words, The Calculations command lets you blend two individual channels from one or more source images. You can then apply the results to a new image or to a new channel or selection in the active image.
To use the calculation command in turning photos to black and white, we blend two different color channels of the same image.
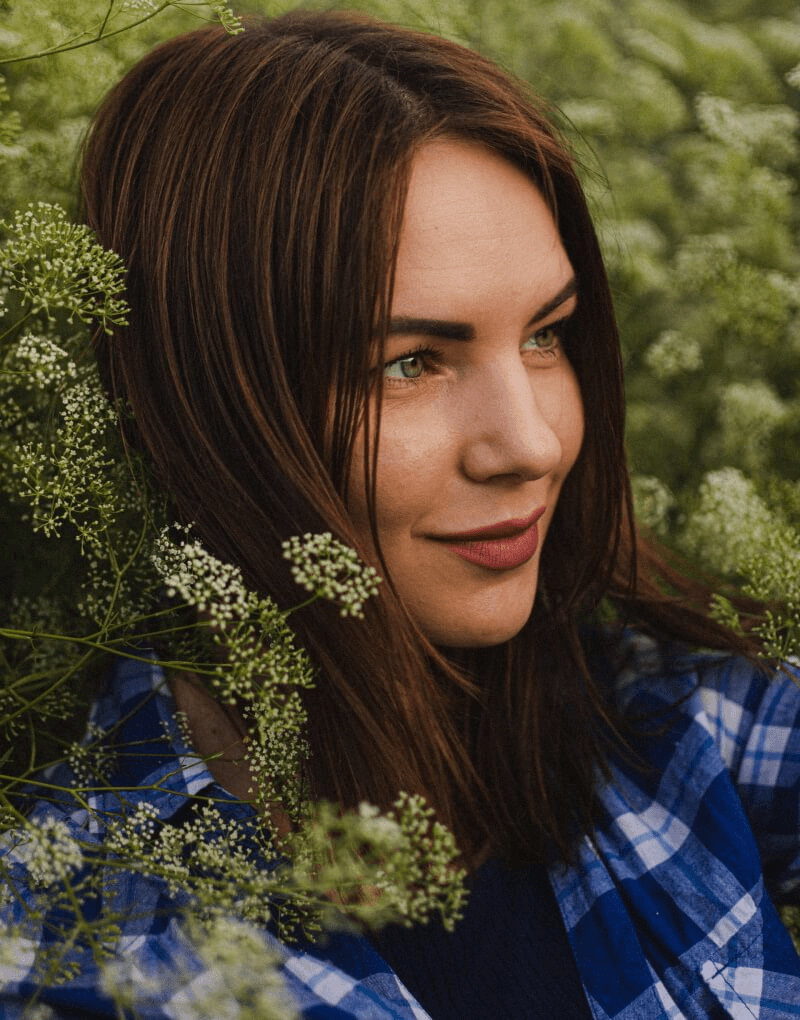
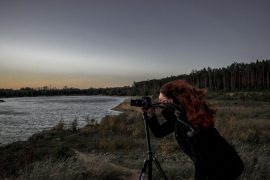
Example 3
I will use the following photo
Photo by Anastasiya Belaya from Pexels
Step 1
Open the image in Photoshop
Choose Image > Calculations
The Calculation command appears:
Choose the first source image (the name of our image), layer (the background layer, we have only one layer), and channel. For Channel, choose Gray if you want to duplicate the effect of converting the image to grayscale, otherwise try red or green, or blue channels.
Repeat the same choices for the second source image (the same image and the same layer), and for the channel, you can try different channels.
For Blending, choose a blending mode that gives you the required mode.
Enter an Opacity value to specify the effect’s strength.
For Result, specify whether to place the blending results in a new document or in a new channel or selection in the active image.
Step 2
I choose the output to be saved as a new document, then I select it all (Ctrl + A), copy it (Ctrl + C), then past it (Ctrl + V) as a new layer in the image document.
Then, I add a level adjustment layer to finalize the edit. The result is shown below.
Example 4
Photo by Dmitriy Ganin from Pexels
- Method 3: The Camera Raw filter
The Camera Raw Filter allows you to convert a photo into black and white with one click, and it gives you more control. You can apply the Camera Raw Filter to any pixel layer, but it is best to work non-destructively (by using a smart filter) so, you can always come back and fine-tune your adjustments or even remove them entirely if you like.
In the Camera raw filter, we will use three modules: basic, B&W Mixer, and Detail
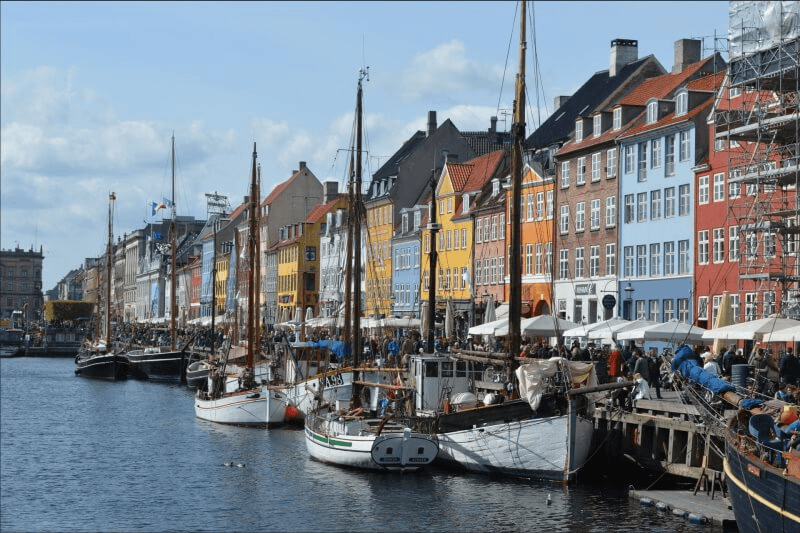
Example 5
I will use the following photo
Photo by pexels
Step 1
Open the photo in Photoshop
Duplicate the layer (Ctrl + J)
Covert the layer to Smart Filter (Filter > convert to Smart Filter)
Load the Camera Raw Filter by liking (Filter > Camera Raw Filter), or use the shortcut (Shift + Ctrl +A)
The filter will open the below window
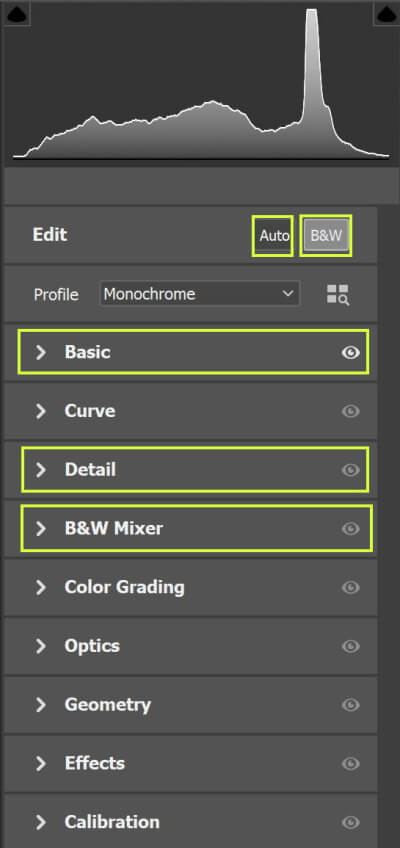
Step 2
Click on the B&W tab to convert the photo into B&W
Click on the Auto tab to use the power of AI to analyze the photos and pick up the suitable setting.
Click on the Black & White Mixer tab to access eight sliders that resemble the Black and White Adjustment Layer. These sliders control the brightness of the grayscale version of the corresponding colors.
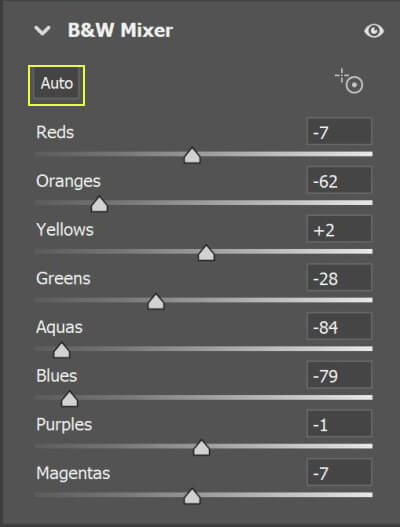
You may also choose to use the Auto tab. The result is shown below with the setting
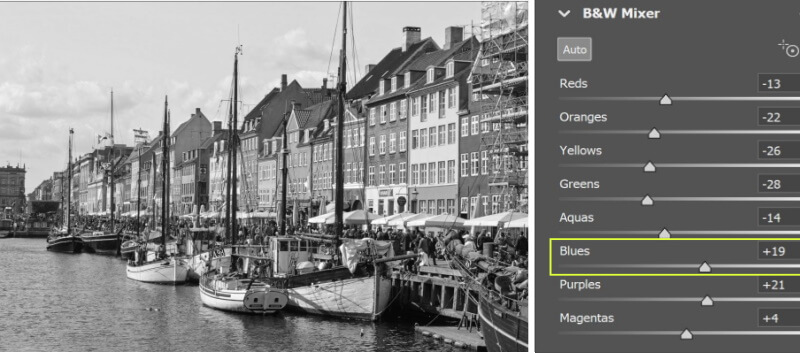
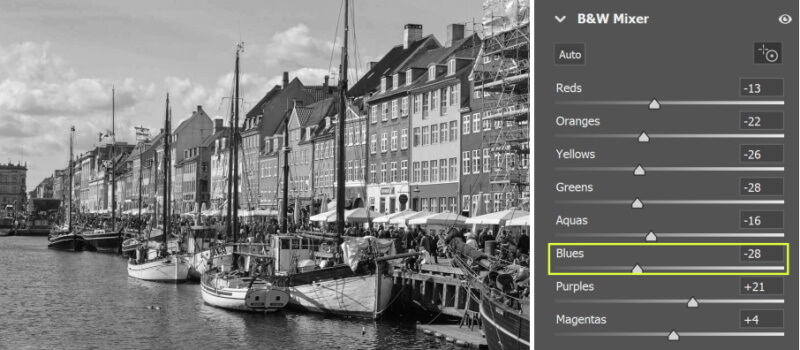
You can adjust the brightness of the sky by sliding the Blues slider left or right. For example, to make the sky darker you can drag the Blues slider to the left, as shown below.
Step 3
Now, it is time to enhance the B&W photo. You can use the Basic tab to increase the contrast, add some clarity, increase the shadows, etc.
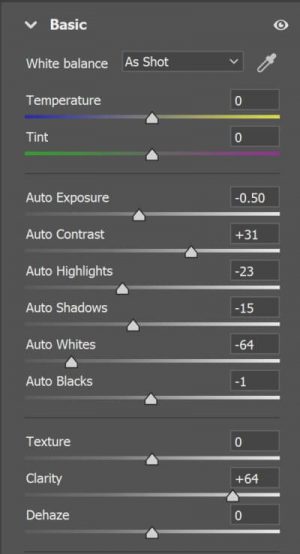
In addition, it is a good idea to use the Detail tab to add sharpness, and you may add vignetting by using the Effect tab.
The before and after photos are shown below
Example 6
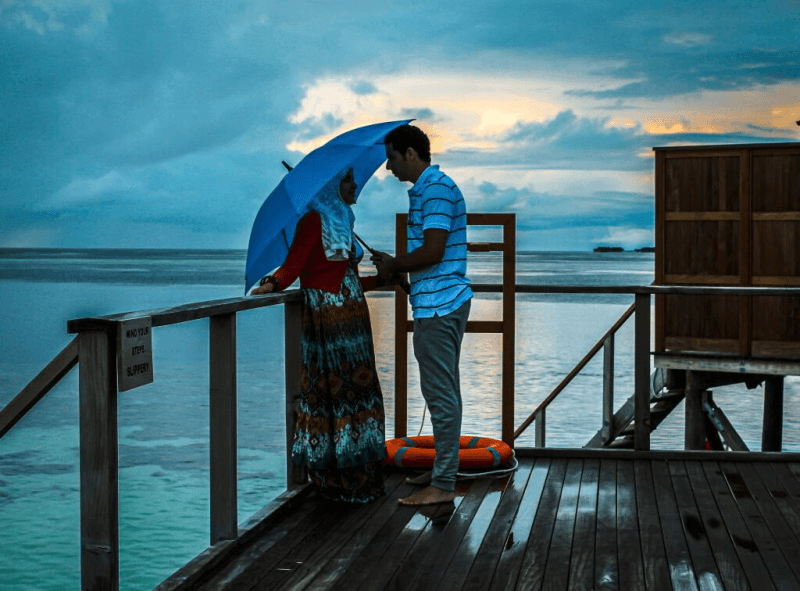
Photo by Ehab Amin
Related posts
Black And White Photography – Learn And Excel The Magic Art
Thanks for reading, I hope you enjoyed the article, in case you have any questions just drop them below & I will be happy to answer you.
If you enjoy the site, don’t forget to subscribe, we will only inform you when a new article is posted.


I usually use the filter that comes with your phone to change my pictures from colour to black and white. Question, is it okay if I still use my phone or will it make a difference if I change and start using your method to edit my pictures? I want quality pictures so I will go for the best way
The Photoshop method will certainly gives you better results, thanks for dropping by.
Thank you so much for this guide. I have had issues turning my photos into black and white and like you said most of us photographers just desaturate, thank you for the information.
I like the step by step guide , the image examples, the visuals were all on point. My question is , Is it the same process by turning coloured photos into black and white?
Hi Ann
Thanks for your comment, yes the same process was adopted in the additional examples