The function of the camera shutter is to open and then close after a specific length of time so that light coming through the camera lens may reach the image sensor. The length of time that this shutter is open is called the shutter speed and also sometimes referred to as ‘exposure time’. Shutter speed is one of the three sides of our exposure triangle, along with aperture and ISO, which allows us to control the brightness of our image. In this post, I’ll explain how the different types of digital camera shutters work, and then I’ll present a table to help you choose the right shutter speed for different photography situations.
What is a Camera Shutter?
A camera shutter is a curtain in front of the camera sensor that stays closed until the camera fires. When the camera fire, the shutter opens and fully exposes the camera sensor to the light that passes through the lens aperture. After the sensor is done collecting the light, the shutter closes immediately, stopping the light from hitting the sensor. The button that fires the camera is also called the shutter button because it triggers the shutter to open and close.
There are many ways you can block light from reaching your sensor. The most popular shutter types are:
- Focal-plane shutters – found on DSLRs
- Rotating disc – found on 35mm movie film cameras
- Electronic shutters – found on video cameras, DSLR/mirrorless, and mobile phone cameras
How the Focal-plane shutter works
The shutter of a DSLR camera consists of 3 basic parts the mirror, the bottom curtain, and the top curtain. When you look through a DSLR view finder you are essentially looking through a series of mirrors that get their light directly from the lens, as shown in the figure below:
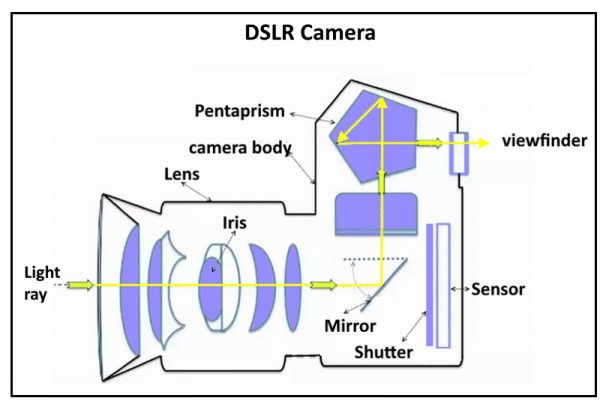
When you click the shutter button the mirror flips upwards to allow light to pass to the sensor. This is why the viewfinder goes black for a short amount of time when taking photos. Then the first curtain moves from top to bottom exposing the sensor beneath. After that another curtain will fall down, covering up the entire sensor, and then finally the mirror flips down to its original position.
The below video illustrate the working sequence of the focal plane shutter.
This process can vary in time depending on the length of your shutter speed. Sometimes a shutter speed can be so fast that your camera sensor won’t be entirely exposed at any one time. The entire process from mirror up to mirror down is known as one actuation. A typical DSLR can withstand over 100,000 actuation in its lifetime.
How the Rotating disc shutter works
When it comes to video, you only have to worry about rotating discs and electronic shutters.
The rotating disc shutter is a circular disk that has a clear-cut angle and is continuously rotating in front of the sensor. Obviously, you need some method to control the time duration of the exposure, here comes the importance of the angle value. The figure below shows a rotating disc shutter with a 90-degree angle.
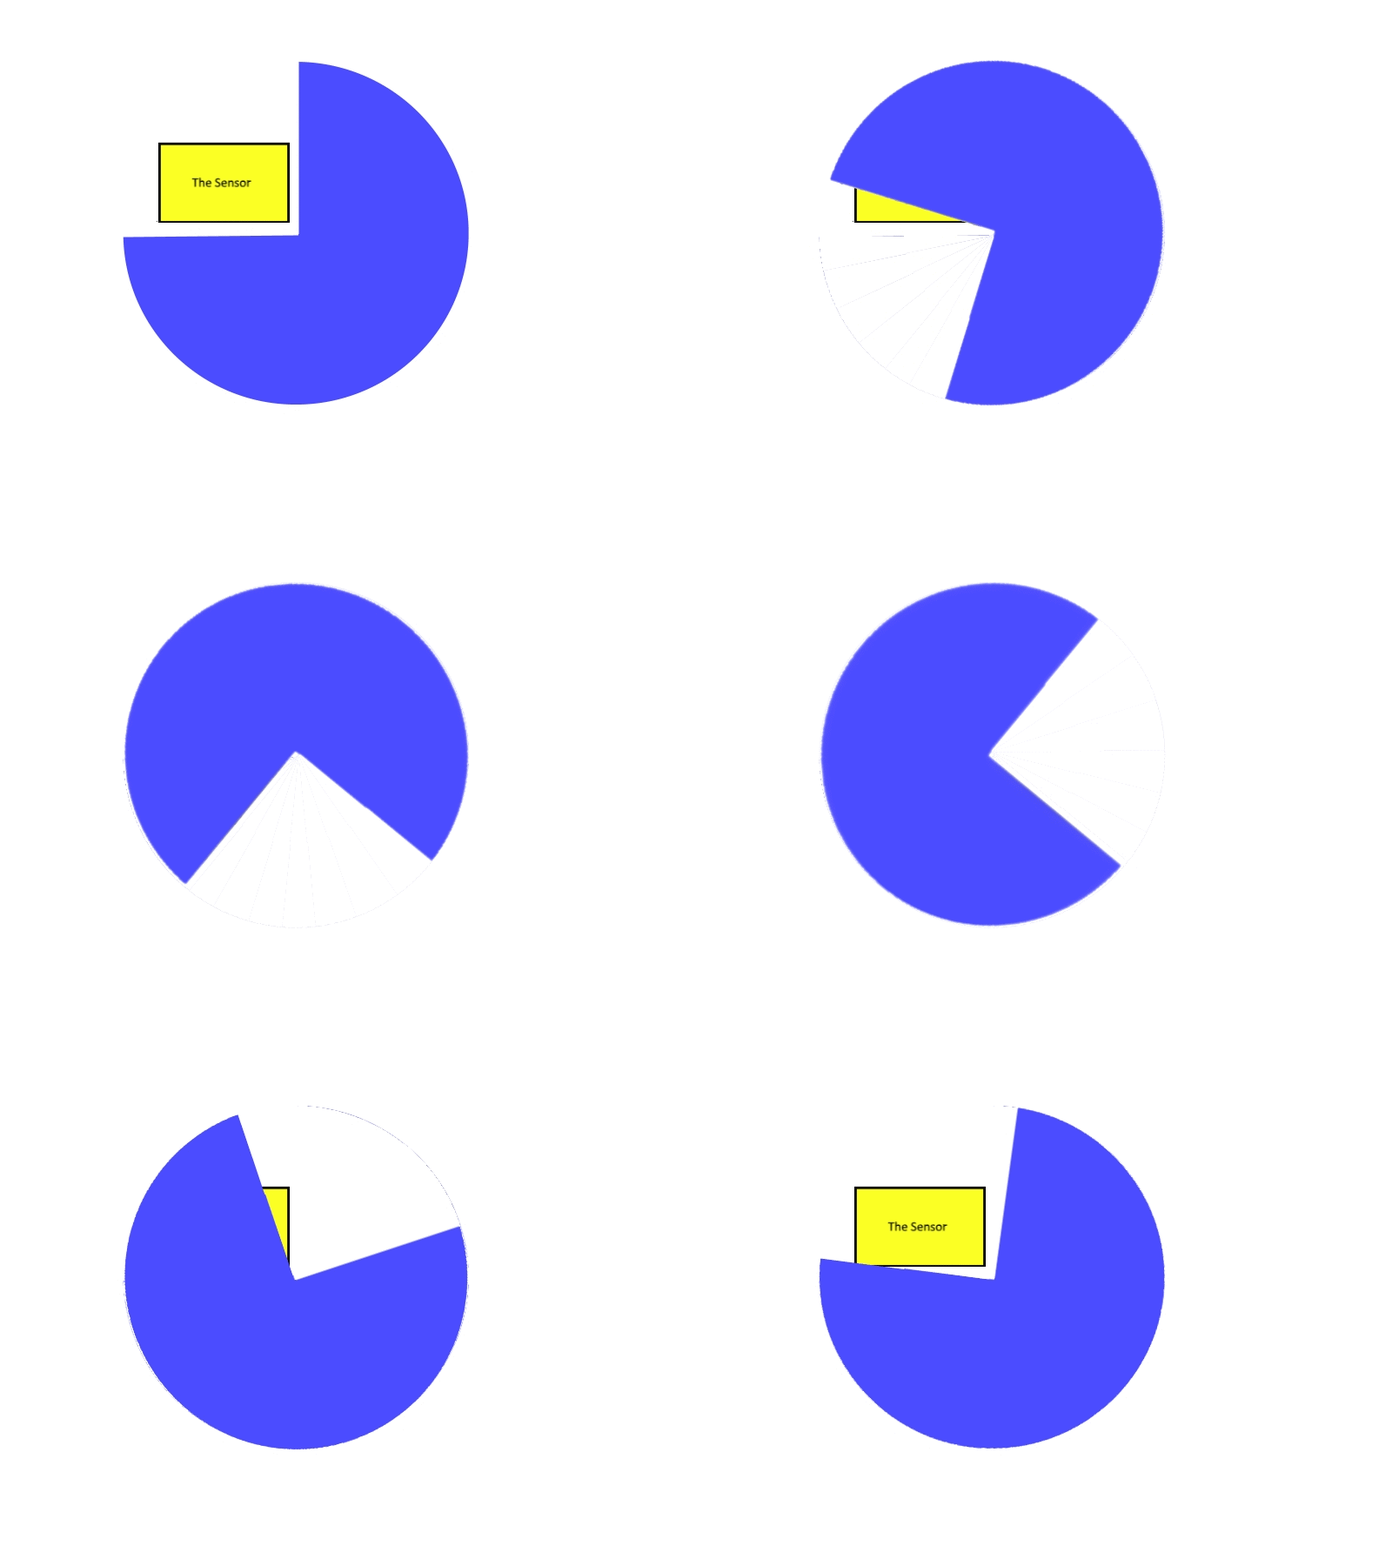
Instead of shutter speeds in seconds, rotating disc shutters use shutter angles, they can adjust the shape of the shutter. The larger the shutter angle, the more the light passes through. The relationship is designed to be similar to shutter speeds – halving or doubling the angle will halve or double the light. (source: Author: plowboylifestyle)
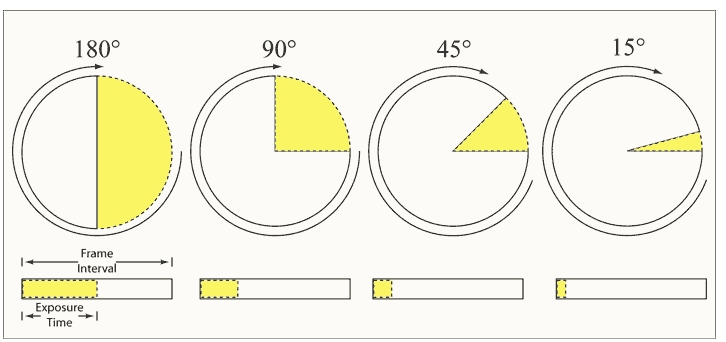
Most film movie cameras have shutter angles from 0 to 180 degrees. The most common shutter angle used is 180 degree, which gives us the ‘film look’. This corresponds to exactly half the duration that each frame will take in one second.
Electronic shutters (global electronic shutter)
As the sensor of the digital camera is an electronic device it can normally be powered on and off. Some modern digital cameras like the DSLR/Mirrorless and Mobil phone cameras operate an electronic shutter in a way where the cameras simply power-on the digital sensor for a selected amount of time.
The pros of using the electronic shutter are: you can shoot quietly, without the noisy clang of a mechanical shutter; you can get even higher frame rates during continuous shooting, and since there are no moving parts, electronic shutters aren’t vibrating the camera every time they’re activated. But the apparent cons are having a lot of noise and it can produce some pretty annoying ‘jello’ effects, especially when shooting video or very high speed moving subjects. This is because CMOS sensors read pixel information from the top left of the sensor to the bottom right. The figure below illustrates how the CMOS sensor read pixel (rolling).
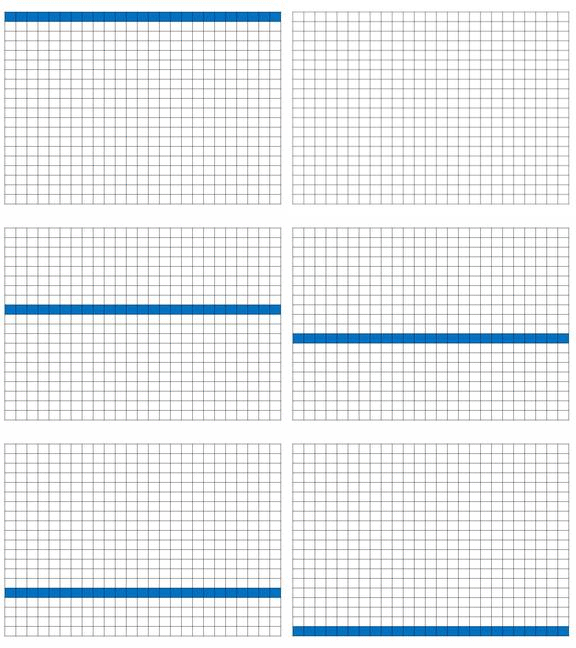
This is a problem because if your subject is incredibly fast and moves position during capture you will get warped images.
What is Shutter Speed? And how it is measured?
Shutter speed describes how quickly or slowly the shutter opens and closes again. Shutter speeds are measured in seconds, or fractions of a second. For example, a shutter speed of 1/100 means 1/100th of a second or 0.01 seconds. This is also known as the “exposure time” because it’s the amount of time the sensor is exposed to light.
Modern DSLRs give you the option to choose whether your exposure is adjusted in 1/2 stop, or 1/3 stop increments. The chart below provides you with the common shutter speed options in today’s digital cameras.
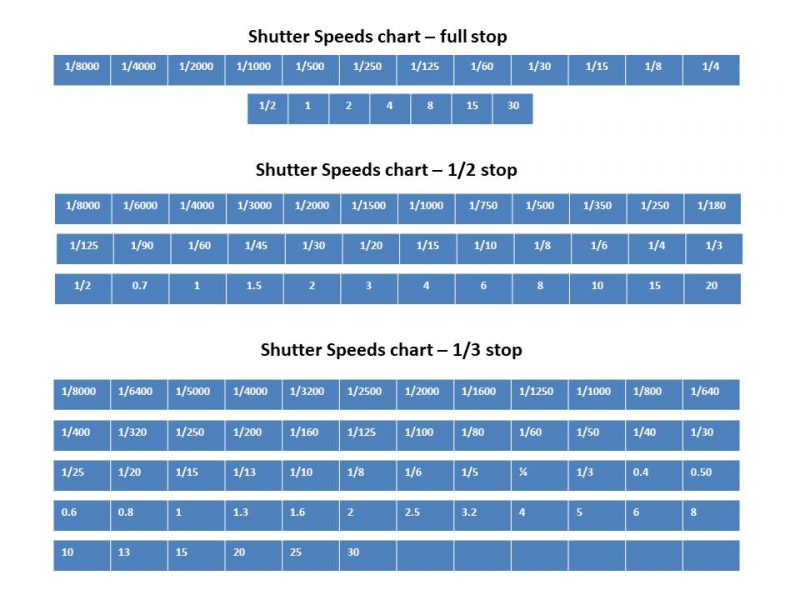
Don’t forget that each step along the full stop scale equates to a doubling (or halving) of the light that reaches your camera’s sensor. This ‘doubling’ is handy to keep in mind as aperture settings also double the amount of light that is let in – as a result increasing shutter speed by one stop and decreasing aperture by one stop should give you similar exposure levels.
Choosing a Shutter Speed- general guidelines
- Probably, you’ll be using shutter speeds of 1/60th of a second or faster. This is because anything slower than this is difficult to use without getting camera shake. Camera shake is when your camera is moving while the shutter is open and results in a blur in your photos.
- If you’re using a slow shutter speed (anything slower than 1/60) you will need to either use a tripod or a camera with an image stabilization feature.
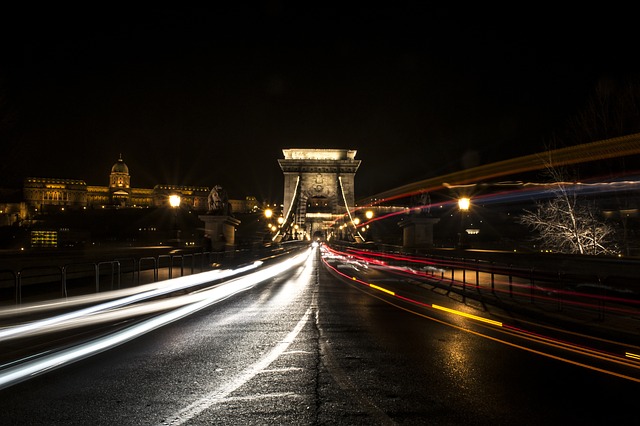
- Modern cameras also give you the option for very slow shutter speeds (for example 1 second, 10 seconds, 30 seconds, etc). These are used in very low light situations when you’re going after special effects and/or when you’re trying to capture a lot of movement in a shot. You may check my post >>Long Shutter Speed Photography – How To Apply it?. Some cameras also give you the option to shoot in Bulb mode. Bulb mode lets you keep the shutter open for as long as you hold it down. The following photos show some effects that can be achieved by slow shutter speed.
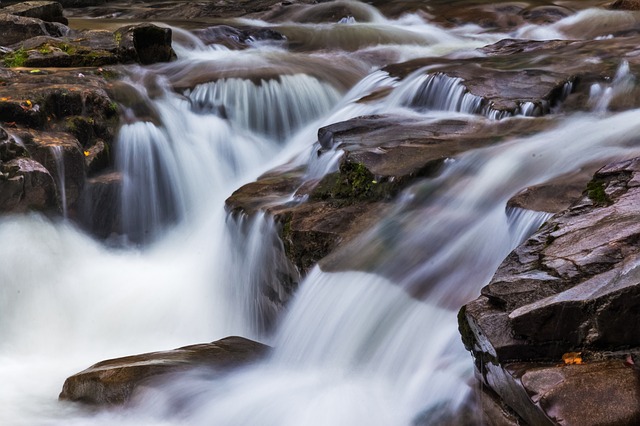
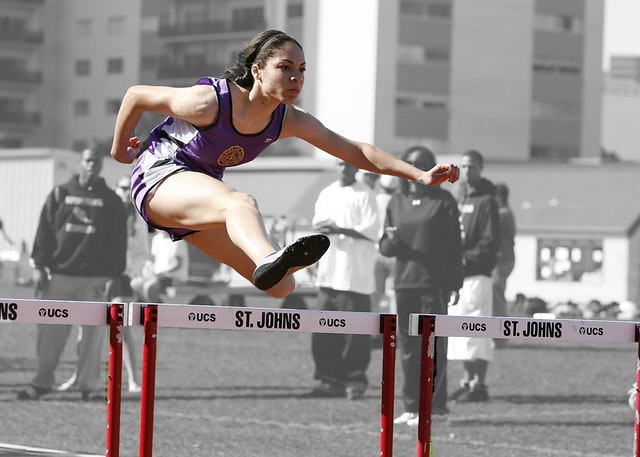
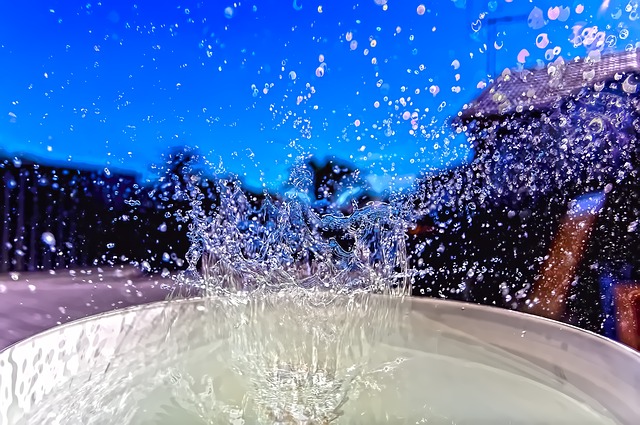
- To freeze movement in an image (like in the shots of a runner and the water splashes below) you’ll want to choose a faster shutter speed The actual speeds you should choose will vary depending upon the speed of the subject in your shot and how much you want it to be blurred. Also, you may check my post >> Fast Shutter Speed Photography – Most Important Things To Consider>>
- In the runner image, the shutter speed was 1/1250th of a second meaning that despite the runner movement is fast, it can be frozen in a split second of time. The water splashes shot below had a shutter speed of 1/2000th of a second capturing even the splashing drops of water sharply.
- Another thing to consider when choosing shutter speed is the focal length of the lens you’re using. You’ll need to choose a faster shutter speed when using Longer focal lengths because the longer the focal length is, the greater chance the amount of camera shake will be. If your camera hasn’t an image stabilizer feature, you may choose a shutter speed with a denominator that is larger than the focal length of the lens. For example, if you have a lens that is 50mm 1/60th is probably ok but if you have a 200mm lens you’ll probably want to shoot at around 1/250.
- If you’re just getting started with your photography and trying to pick up a shutter speed, then the following table will give you some general guidelines and some starting figures. It’s important to remember though that there aren’t any concrete rules in photography.
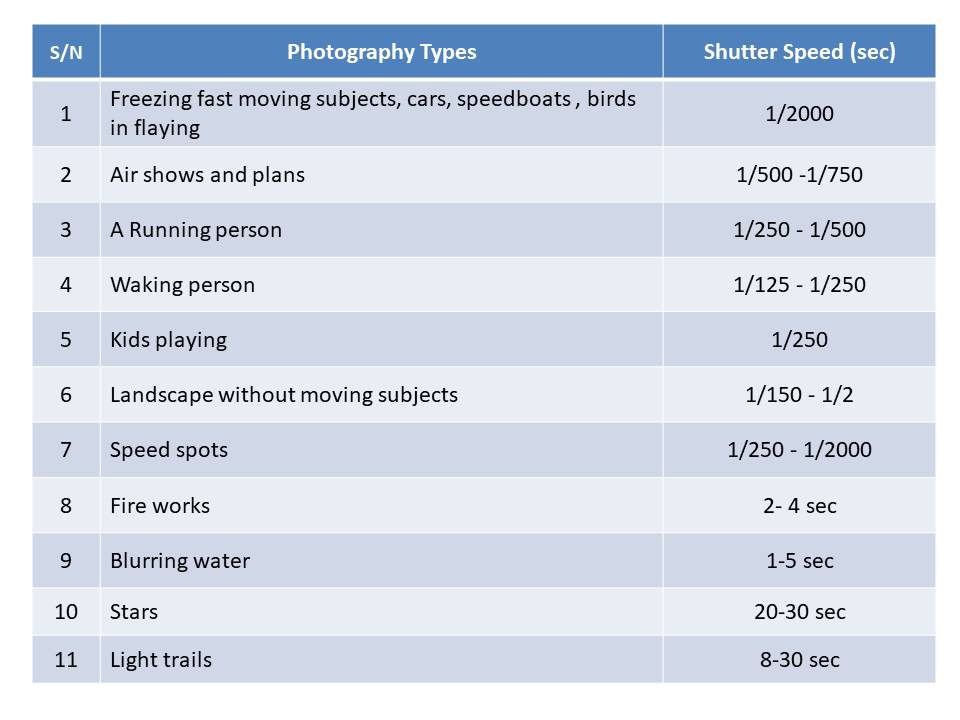
- Another very important point to consider when choosing the correct shutter speed is the position of the lens relative to your subject and this is why the table above should only be used as a guide and not gospel. It’s easier to freeze motion when your subject is coming right towards the camera than when it’s crossing perpendicular to your lens.
- When shooting with a flash, you are often limited to the shutter speed that you can use. This upper limit of shutter speed is often referred to as the X-Sync speed or ‘cross sync’. Essentially it’s the fastest speed that you can use, the physical motion of the camera’s shutter begins to interfere with the burst of light from the flash.
Hopefully, you now have a good understanding of the camera shutter function. Practice using the various shutter speeds to fit the situation, and then add your own creativity and your pictures should be fine!
Shutter speed is an important aspect of digital photography. If you want to gain more control of your digital camera, you should have an understanding of all parts of the exposure triangles, i.e. shutter speed, aperture, and ISO. You have to experiment with different settings and how they impact your images.
This post is part of a three posts series that explains the exposure, the other two posts are:
What Is the ISO in Photography
What Is The Aperture In Photography
Thanks for reading my article, hope you find what you are looking for. If you have any questions, please drop it down and I’ll be glad to answer it. In case you like the site, don’t forget to subscribe, we will notify you if new stuff is posted.





What a great article! I have been playing around with shutter speed and I will admit I still need a lot of work. I like how you were able to break down the shutter speeds along with pictures. I feel like my biggest issue is when I am taking high action shots. I am able to stop the movement the way I want to, but I can never get the exposure right. Do you have any suggestions on what I should fix?
Well, it depends on several factors either you are shooting day or night, you have to compensate your aperture & ISO to allow more light to go through the lens as you want to use high shutter speed to stop the action, check out the exposure triangle, also the gear really matter & also a full frame body which is a must in low light situations, so here is my recommended lens for sports:
-As I shoot Canon: Canon 70-200 F/2.8 IS II is highly recommended for sports photography.
-For other Camera bodies you can check out the Tamaron 70-200 G2 or the Tamaron old model 70-200 G1 which is a great lens too & will not break the bank.
Thanks for dropping by & if you have any questions don’t hesitate to drop me a comment :).