


One of the main default settings that have become standard across all the camera boards is how your camera focuses. That standard practice is to halfway press the shutter button, the camera focuses, and then you press the shutter down the rest of the way to take your image.
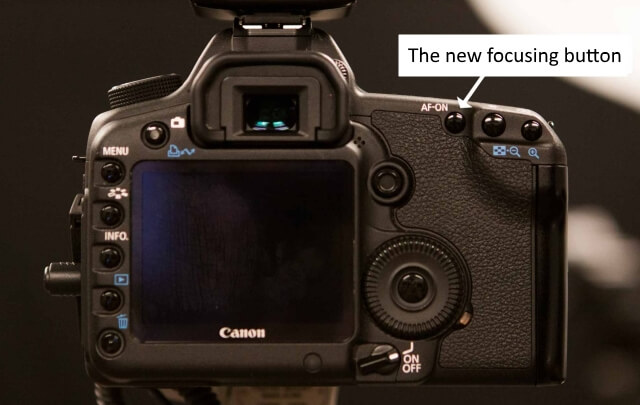
Until Canon first launched the EOS-1 back in 1989, they introduce the back focus concept, the act of separating the autofocus from metering adds a great deal of flexibility to the cameras. What back-button focus does is remove the focus actuation from the shutter button and instead assign this function to a button on the back of the camera (AF-ON). Now when you shoot, you’ll press your back-button to lock focus and then press the shutter to take an image.
As a first impression, this may sound that it will over complicating things; you have to use two buttons to shoot a photo instead of one. But after using this technique there will be some very real benefits that make this change more than worth your while.
Another thing you should know, you should not mix-up between the two terms “back focus” and “back button focusing”. Back focus is when the lens focuses behind the intended target, and back button focusing is a technique used by advanced photographers to focus by separating the focus and shutter activation of the shutter button.
The advantages of using the back focusing technique
-
No More Refocusing Every Time You Let Go of the Shutter
If you are using your camera with the default setting by pressing the shutter halfway down method to focus, you can lock in focus by holding the shutter halfway down, and then focus will stay locked as long as you hold your shutter as when you are using focus and recompose technique.
If you are shooting a still scene and you aren’t moving You can use the center AF point and focus on your subject and then you’re set for as long as you’re in that position. You can recompose for the different frames and just forget about focus. In the below photo once you set focus on the hut, you no longer needed to worry about focus. With BBF I didn’t have to worry about my camera refocusing when I was ready to press the shutter down.
Someone would say that focusing and recomposing should be avoided and that you should just toggle your focus points. It might be right, however, some older camera models have a few focus points, and sometimes the area of focus falls outside of those points. Being able to recompose in those situations is key.

-
No Need to worry about switching between single shot and continuous focusing
The two main types of autofocus on a Canon camera are One-Shot and AI-Servo. For more reading about this subject, you can read my post “What Is Autofocus and How It Work”
- One-Shot Focusing Mode (One-Shot AF – Canon)
It represents a single-focus capability. In this mode, when you depress the shutter release halfway, the camera focuses on the subject just once – there’s no continuous adjustment. This mode saves battery power and is ideal for subjects that aren’t moving.
- Continuous Focusing Mode (AI Servo AF – Canon)
This mode is used for Continuous Focus and it is most useful for keeping moving objects sharp within the viewfinder as you track the object. When using Continuous focusing mode, the camera detects the subject’s movements and refocuses accordingly to keep the object sharp as a tack.
If you set your camera to continuous focusing mode, you could also use Servo just like One-Shot by the way you press the back focus button.
If you have a still subject you can simply tap the back focusing button and let go, and focus will stop adjusting when you let go of the button even you are in the continuous focusing mode. This technique is great for landscapes, macro, and even sleepy newborns. No need to refocus every time you press the shutter.

If you have a moving subject and want to use Servo focusing with back focusing button you have to continuously hold down the back focusing button (AF-ON button) to track focus.

-
No need to switching the focus method (Manual Focus Switch Isn’t Needed)
When you’re out in the field, there may be times when you have to use manual focus. For instance, the situation may dictate you don’t want the lens to refocus every time you press the shutter. This involves switching the focus method either on the camera body, the lens, or both. If you use back-button autofocus, you never need to activate these switches because the pressing of the shutter no longer controls focus.
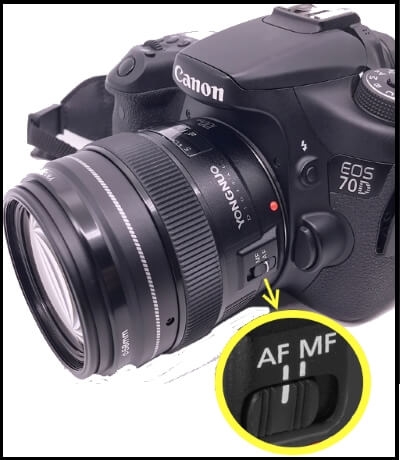
You can also ensure tack sharp images when using Live View and zoom your focal point into 100%, then lock that focus by using the back focusing button (AF-ON button). You can even adjust your focus manually by turning your focus ring on the lens without turning the switch to MF on the front of the camera.
- Back button focus helps prevent focus errors
Using the default focusing method by pressing the shutter halfway maybe a little difficult especially when you want to lock the focus. If you let go or accidentally lift your finger just a little bit, the camera will refocus as soon as you press it down again. Or if you press the shutter a little too hard and you will take a picture before you’re ready. Using the back focus bottom solves all these issues.
Another error that might happen, if an object moves in the foreground, the autofocus is often thrown off. Using back button focus allows you to quickly prevent focus errors. For example, if you’re shooting a sports game and a player or other object move in the foreground, you can release the back button to maintain the focus on your original subject.

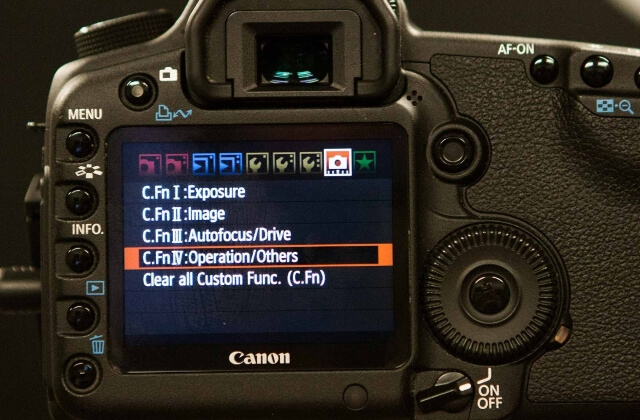
How to set the Back focus button for Canon
While this process may vary from camera to camera, below is a short list walking through how to set this feature up. If any of the below doesn’t work for you, I suggest referring to your camera’s owner’s manual or doing a quick YouTube search for your specific camera.
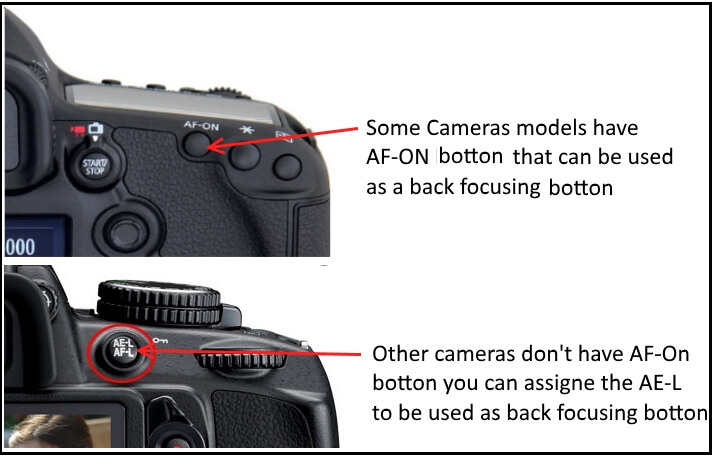
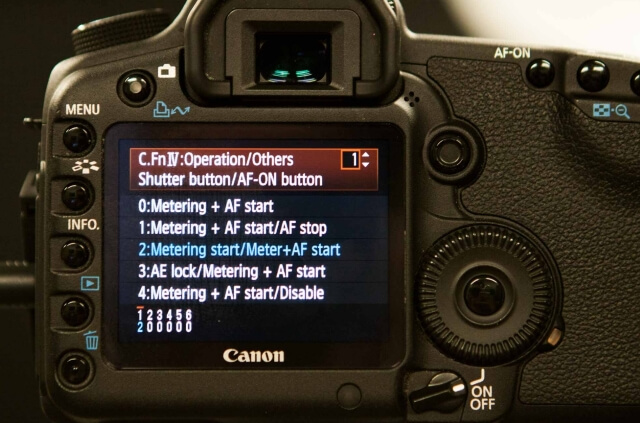
Canon was the first camera manufacturer to implement back button focus in 1989 and has put the feature in all DSLR models made in the last 8 or 9 years (yes, even the Canon Rebel XT and XTi). Until the arrival of the EOS 7D on previous EOS DSLRs back button focus had always been accessed via custom functions. In the Canon camera menu, you’ll look for an option called “Shutter/AE Lock Button” and then on that menu, you’ll see a whole host of options. The one you’re looking for is called “Metering Start / Meter + AF Start.”
In this menu, you’ll need to do two things. First, you’ll remove the AF-ON from the shutter button by selecting the shutter button and set it to AE-Lock. Next, you’ll select the AF ON button and set it to AF. After this, you set your camera’s AF mode to AF-C.
The following is a cheat sheet from the Canon Learning center where you’ll find the menu option on your Canon camera to set up back button focus.
- EOS Rebel T3: C.Fn 7 (option 1 or 3)
- EOS Rebel T3i: C.Fn 9 (option 1 or 3)
- EOS 50D: C.Fn IV-1 (option 2 or 3)
- EOS 60D: C.Fn IV-1 (option 1, 2, 3, or 4)
- EOS 7D: C.Fn IV-1 (Custom Controls — Shutter, AF-ON, AEL buttons)
- EOS 5D Mark II: C.Fn IV-1 (option 2 or 3)
- EOS-1Ds Mark III: C.Fn IV-1 (option 2 or 3)
- EOS-1D Mark IV: C.Fn IV-1 (option 2 or 3)
On the EOS 7D to set up back button focusing you enter the 7D’s Quick Control Screen (via the ‘Q’ control on the back left of the camera) and select the AE Lock button setting option. From here you can choose to have the button to start the autofocusing operation. You can also select the shutter button options and choose to remove autofocusing from the function.
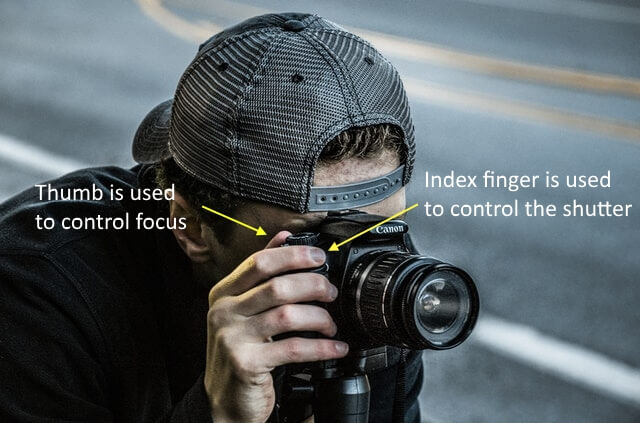
Of course, there will be an adjustment period before you can switch from the default shooting method to back-button focusing. Since most of us as photographers are accustomed to using their pointer finger to acquire focus and release the shutter, now you will use the thumb for focusing.
The primary reason photographers stick with shutter finger focus is that back-button autofocus doesn’t feel comfortable in the beginning, despite its huge advantages. Back-button autofocus may or may not work out for you, but you won’t know unless you give it a try.
Related posts
What Is Autofocus and How It Work
The focus and recompose technique
Thanks for reading, I hope you enjoyed the article if you have any questions just post them below & I will be happy to answer you.
If you enjoy the site, don’t forget to subscribe, we will only inform you when a new article is posted.


Dear Amin,
Wow, thanks a lot for another helpful and informative post, what an extensive guide indeed! I thoroughly appreciate the research you must have done to gather and compile so much information. Thanks for sharing from your experience.
Also the images are very helpful and you explained the process very well using images.
There are huge advantages on using the back focusing technique thanks a lot for shedding light on this and it saves us a lot of time and effort.
Your article certainly made me think more on the subject.
Best Wishes,
Paul
Thanks for your comment and I’m very glad that you like the post, for me the great advantage of using back focusing is that I can easily lock the focus because I frequently use the focus and recompose technique.