

Introduction
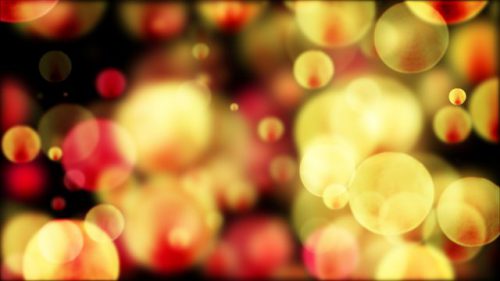
Bokeh is the official name for a specific photography effect. The name actually comes from the Japanese word for blur or haze: boke. It also comes from the Japanese word for blur quality: boke-aji. Bokeh is the quality of out-of-focus or “blurry” parts of the image rendered by a camera lens, it is NOT the blur itself or the amount of blur in the foreground or the background of a subject. It is simply the quality and feels of the background/foreground blur and reflected points of light. You may find more detailed information about bokeh HERE.
Bokeh is traditionally known as the aesthetically pleasing quality of the out-of-focus blurred part of an image. You may watch the 2 minutes video below and enjoy yourself with some sample photos of bokeh effects.
How to Achieve Bokeh in Your Images
To achieve bokeh in an image, you need:
-
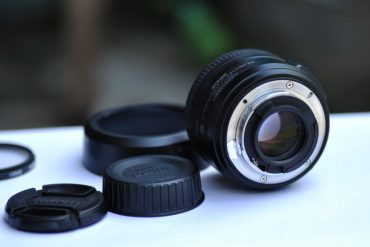
Use a fast lens, the faster the better
You’ll want to use a lens with at least a f/2.8 aperture, with faster apertures of f/2, f/1.8 or f/1.4 being ideal.
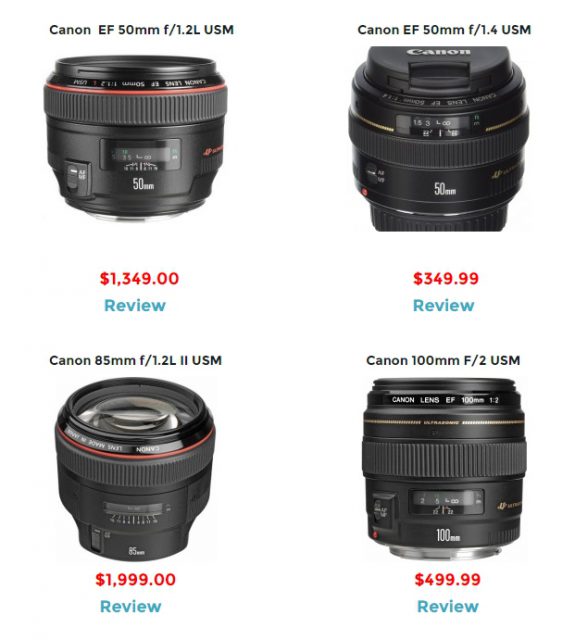
The following are some Canon prime lenses that are suitable for making amazing bokeh:
Canon EF 50mm f/1.8, Canon EF 50mm f/1.4, Canon EF 50mm f/1.2, Canon EF 85mm f/1.8, Canon EF 100mm f/2.
Also, bokeh is affected by the shape and the number of diaphragm blades (the aperture) of the lens. A lens with more circular shaped blades will have rounder, softer orbs of out-of-focus highlights, whereas a lens with an aperture that is more hexagonal in shape will reflect that shape in the highlights. Overall, the lenses that produce the best bokeh had 9 rounded blades. The worst have 5 straight blades. Most lenses fall somewhere in between, with 7 rounded blades.


Many beginning photographers always push for the lowest aperture available. This is a mistake. Often, the blurry portion of the photo is more aesthetically pleasing if enough detail is left in the background to make out some shapes or objects. The first rule to better bokeh is to determine proper depth-of-field rather than always choosing the blurry background available.
-
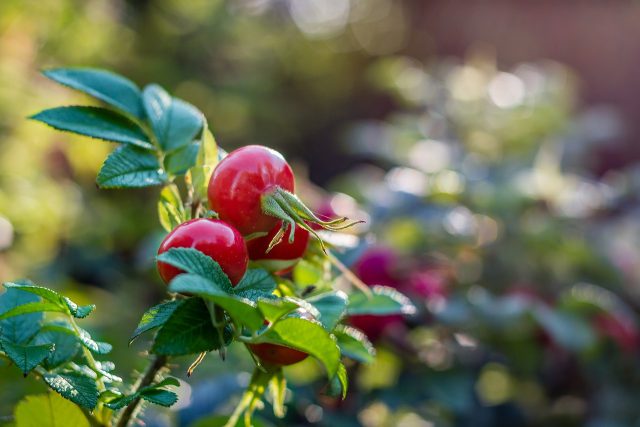
Find a subject that is easily captured in a close-up or short focal distance
The most photographed subjects showing nice examples of bokeh are portraits. Close-up portraits show bokeh very well. Close-up and macro images of flowers and other objects in nature are also popular subjects to photograph that show off bokeh in the image. Other favorite subjects that are suitable to apply bokeh are photographing wedding ceremonies and grouping of holiday lights or other highly reflective objects.


-
Increase the distance between your subject and the background
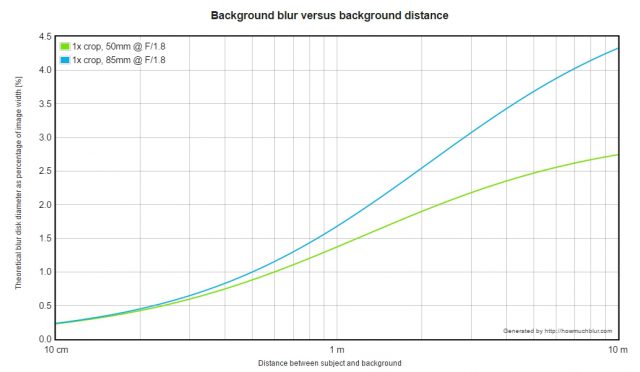
To increase the likelihood of visible bokeh in your photographs. You can do this by decreasing the distance between the camera and subject. The more shallow the depth-of-field, or further the background is, the more out-of-focus it will be.
The following charts illustrate the relation between the size of bokeh (as a percentage of the image width) the aperture of the lens and the background distances. The source of these charts is
The source of these charts is an interesting bokeh calculator.

How to Create Custom Bokeh
You can get different bokeh shapes in your photos;
The following shapes illustrate the steps for making different bokeh shapes.
- Cut the below shape outer diameters match the outer diameter of your lens
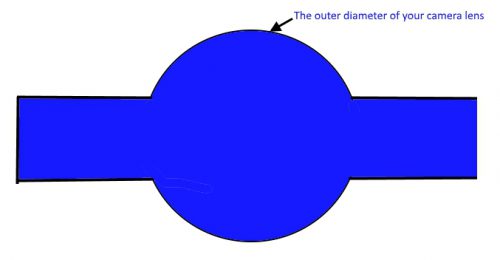
- punch out a small (approximately the size of a dime) shape in a black piece of paper.
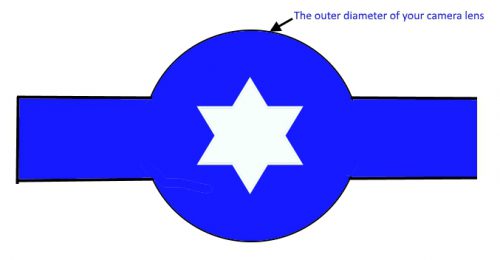
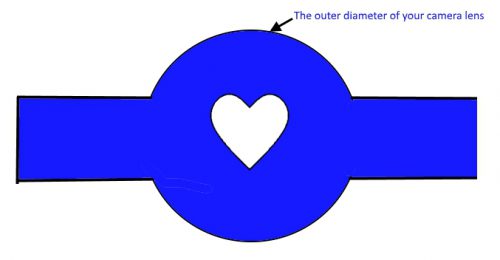
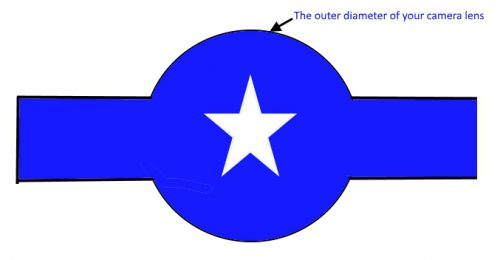 Then use a rubber band to fix this paper over the front of the lens as if it were a lens cap, with the cut-out precisely in the middle of the lens. When you take a picture, the bokeh will reflect the shape of the cut-out.

If you prefer to use ready-made bokeh shapes, you can buy the following product:
Bokeh Masters Kit – Masters Edition

- The kit work with almost any wide aperture lens with a filter size – Tested with the following lenses: Nikon 50mm f/1.8, 50mm f/1.4, 85mm f/1.8, 28-105mm f/3.5-f/4.5, 70-300mm f/4.5-5.6, Canon EF 50mm f/1.8, EF 50mm f/1.4, EF 85mm f/1.8, EF 100mm f/2
- It allows you to create your own special effect images “in camera” without having to rely on post-production software.
- It can be placed over a UV filter.
- For the wedding or party photographer, this kit offers you a marketing opportunity for creating images that other photographers may not be able to replicate.
- Allow you to turn a night scene or landscape into something completely different and unique.
-You can get it here from Amazon.
Bokeh in Post-Processing
You can have a bokeh effect on your photos by adding them to photo editing software. The steps are quite simple and straight forward:
- Prepare a bokeh photo by shooting towards light sources and make sure that you are using manual focus and deliberately unfocus to obtain blurry spots of light or you may use a photo from the internet.
- Open both your original portrait photo file and the bokeh photo file on your editing software.
- Drag the bokeh photo over the portrait photo as a new layer.
- Adjust the opacity of the bokeh photo, so you can see the portrait photo below the bokeh.
- Adjust and erase as necessary to obtain the required bokeh.
You may check the following posts to explore options for creating a bokeh effect on your photos:
Best Lightroom Presets For Photographers
Free Photoshop Overlays for Photographers – How to Use?
Thanks for reading the post, hope you enjoy it and found it useful, you are welcome to add any comments in the box below, and I will be glad to answer any questions.
If you enjoy the site, don’t forget to subscribe, we will only inform you when a new article is posted.


Hi Ehab, as I have a hobby photo sharing website, I am always looking around for great photo websites.
My eye felt on your article about bokeh photography. I love the art of Bokeh. And your explanation about how to create a bokeh photo and which lens to use is great. Thank you.
You make fantastic pictures, I visited your gallery as well, and the Panning picture (on page 2) is sublime, I always shoot the other way around, the car is moving and the background stays still 😉
Loes
Hi Eimhier, thanks for the comment, the bokeh style can add a great effect for wedding ceremonies photos and for a situation where there are a lots of sparking light. Glad you likes the gallery, hope to see you again.