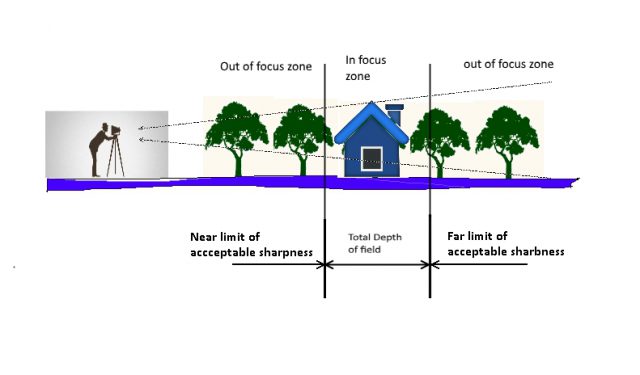
Let me first discuss the meaning of Depth of Field, and then I will proceed to how to control DOF of your photo. In every photo, you take there is a specific zone which is in focus (your subject), and there are probably two other zones, the first zone is the one at the foreground of the subject, and the other one is in the background of the subject. They are out of focus, hence less sharp up to blurry. The concept of how to control DOF is to control the sharpness of these two zones.
A basic definition of the DOF: it is the zone of acceptable sharpness within a photo that appears in focus. In some photos there is a small zone of focus; it is normally called shallow depth of field. In others there is a large zone of focus; it is called deep depth of field.
There are more definitions for the DOF:
- The depth of field refers to the section of a photograph that appears to be in sharp focus. John Shaw’s Nature Photography Field Guide, John Shaw, 2000)
- The depth of field is defined as the area in front of and behind the subject that is in acceptable focus.
Night and Low-Light Photography Workshop, Alan Hess, 2011
Sample photos to illustrate the DOF:

Shallow depth of field and blurry background & Foreground
only the nose and the mouth of the dog are sharp and in focus

Shallow DOF and blurry background
The front zone of the photo is in focus and the rest are less sharp and blurry

Deep DOF : It is clear that almost all zones are sharp
Factors affecting the DOF:
Three main factors can control the depth of field of your photo, they are:
- Aperture (f-stop).
- The focal length of the lens.
- Distance from the camera to the subject.
1- Controlling DOF by adjusting the Aperture (f-stop):
Controlling the amount of light reaching the digital sensor is the simplest way to control the DOF, so changing the aperture (f-stop) can dramatically change the depth of field according to the following role:
Small aperture = large f-number = shallow (small) depth of field
Large aperture = small f-number = deep (large) depth of field
It is a straightforward rule and easy to remember, the higher your f-number, the larger your depth of field, and vice versa the lower your f-number; the smaller your depth of field. When setting your camera to f/2.8 for example, it will lead to a very shallow depth of field. But if you set your aperture to f/16 you will get a deep depth of field.

This photo is taken at aperture f/1.4 hence it has a shallow depth of field.
2- The focal length of the lens
If you kept the distance the same between your camera and the subject you are focusing on, while changing the focal length, the rule is simple:
The longer you set your focal length the shorter (shallower) depth of field you will get.
After doing some calculations, here is a comparison between three different focal lengths and the resulting depth of field.
| Focal length (mm) | Near sharp limits (meters) | Fare sharp limits (meters) | Total DOF (cm) |
|---|---|---|---|
| 50 | 4.65 | 5.41 | 76 |
| 100 | 4.91 | 5.09 | 18 |
| 200 | 4.98 | 5.02 | 4 |
3- Distance from the camera to the subject.
The farther the subject is from your camera, the deeper the depth of field will be, and the nearer the subject is from your camera, the shallower the depth of field will be.
Points you should consider:
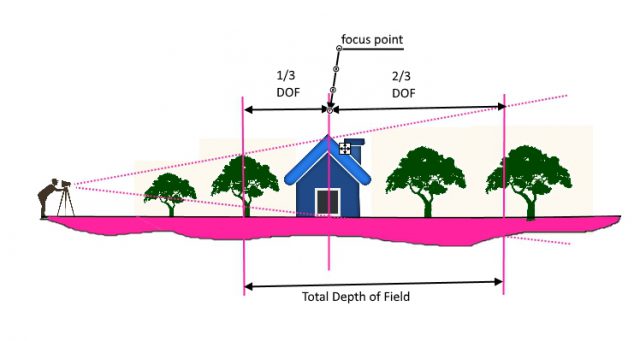
- The depth of field is not equally distributed around the focal point; it is around one-third in the foreground and two-thirds in the background. This ratio tends to change when the focus length increases until it reaches equal distances at larger focal lengths.
- If you prefer to use the automatic mode in your DSLR camera, you can still control the DOF, use the aperture priority mode, select the appropriate aperture, and let the camera choose the shutter speed for you.
- Controlling the depth of field can add a great impact to your photos, because the sharpness of your photos may be the most important thing to consider to get amazing photos. Learning and mastering the ways to make parts of your photo sharp and other parts blurry is a powerful tool to enhance your photos. DOF and Hyperfocal Calculator
How to Calculate Your DOF
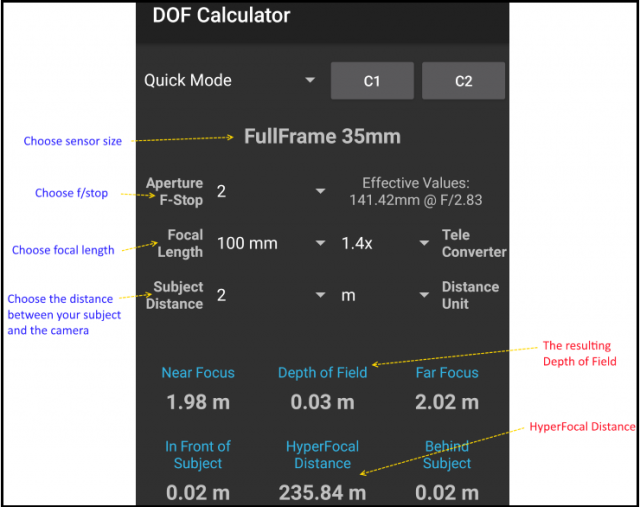
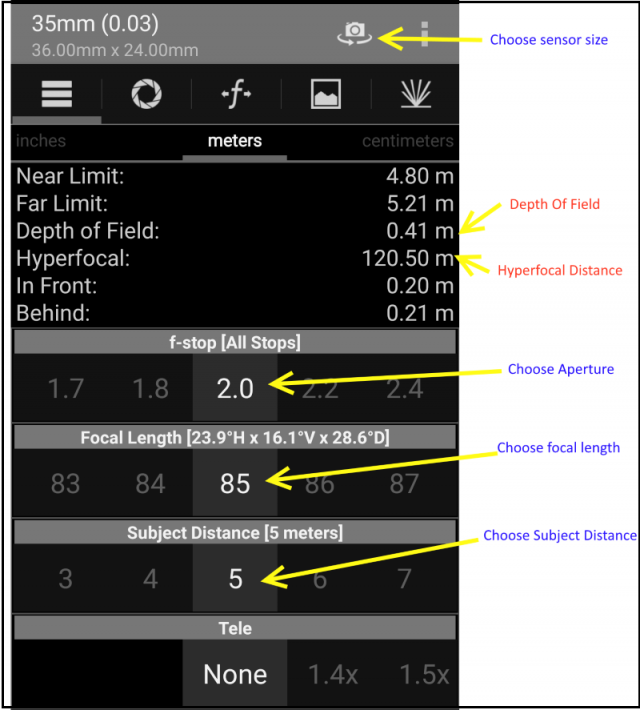
There are many apps available on smartphones nowadays, like Online Depth of Field Calculator, DOF, and Hyperfocal Calculator for the Android system. You can easily calculate your DOF if you select the focal length, the aperture, sensor size, and the subject distance. The following are screenshots of the two apps.
Use of shallow DOF:
In many situations, you may want to make your subject stand out alone from its background to make the viewer’s eye concentrate upon it, using shallow depth of field is the appropriate tool to do so. You can apply shallow depth of field in portrait photography, macro photography, sports photography, wildlife photography and food photography. The following photos represent some examples of the application of Shallow DOF in different photography types.


Use of deep DOF:
The most common type of photography where you can apply deep depth of field is the landscape photography. Using a wide lens and a small aperture you will maximize you DOF and hopefully make all the subjects in the view in sharp focus.

The concept of hyperfocal distance:
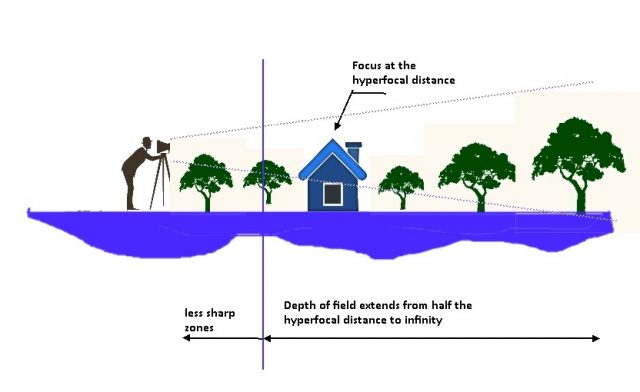
The hyperfocal distance is the focusing distance that gives your photos the greatest possible depth of field. In landscape photography, you certainly want everything – the foreground and the background – to look sharp. If you focus on the foreground, the background will look blurry in the photo. And if you focus on the background the foreground will look out of focus. The answer is to focus at a particular point between the foreground and the background which makes both of them appear reasonably sharp. This focusing point is called hyperfocal distance.
If you set the camera’s focus to the hyperfocal distance, your depth of field will extend from half of the hyperfocal distance to infinity—a much deeper depth of field.
Factors determining the Hyperfocus distance:
1- Aperture:
A wider depth of field means that you can focus closer and still keep the background sharp. So the smaller the aperture you use, the closer the hyperfocal distance.
The smaller the focal length – meaning the wider the angle of view – the closer the hyperfocal distance.
3- Sensor size:
the size of your digital sensor. A larger digital sensor will result in a closer hyperfocal distance.
Determining the hyperfocal distance:
There are a number of free calculators online and apps for your phone. For example, DOFMaster has a chart and calculator and they also have a smart phone app. There are a number of other resources out there as well. You can use these to determine hyperfocal distance.
There is an alternative way, I prepared some tables, you can print the one that matches your camera sensor size and use it.
To use the charts, just line up the focal length and aperture settings you plan to use. The corresponding figure will be the hyperfocal distance.
Hyperfocal distance ( meters) for four-third camera
| Focal Length | Focal Length | Focal Length | Focal Length | Focal Length | Focal Length | |
|---|---|---|---|---|---|---|
| Aperture F-stop | 16 mm | 20 mm | 24 mm | 28 mm | 35 mm | 50 mm |
| f/2.8 | 6.1 | 9.5 | 14 | 19 | 29 | 60 |
| f/4 | 4.3 | 6.7 | 10 | 13 | 20 | 42 |
| f/5.6 | 3 | 4.8 | 6.9 | 9.3 | 15 | 30 |
| f/8 | 2.1 | 3.3 | 4.8 | 6.8 | 10 | 21 |
| f/11 | 1.6 | 2.4 | 3.5 | 4.8 | 7.4 | 15 |
| f/16 | 1.1 | 1.7 | 2.4 | 3.3 | 5.1 | 10 |
| f/22 | 0.8 | 1.2 | 1.7 | 2.4 | 3.7 | 7.6 |
Hyperfocal Distance (meters)- for APS-C cameras
| Focal length | Focal length | Focal length | Focal length | Focal length | Focal length | |
|---|---|---|---|---|---|---|
| Aperture f-stop | 16 mm | 20 mm | 24 mm | 28 mm | 35 mm | 50 mm |
| f/2.8 | 4.6 | 7.1 | 10 | 14 | 22 | 45 |
| f/4 | 3.2 | 5 | 7.2 | 10 | 15 | 31 |
| f/5.6 | 2.3 | 3.6 | 5.1 | 7 | 11 | 22 |
| f/8 | 1.6 | 2.5 | 3.6 | 4.9 | 7.7 | 16 |
| f/11 | 1.2 | 1.8 | 2.6 | 3.6 | 5.6 | 11 |
| f/16 | 0.8 | 1.3 | 1.8 | 2.5 | 3.8 | 7.8 |
| f/22 | 0.6 | 0.9 | 1.3 | 1.8 | 2.8 | 5.7 |
Hyperfocal Distance (meters)-for full frame cameras
| Focal length | Focal length | Focal length | Focal length | Focal length | Focal length | |
|---|---|---|---|---|---|---|
| Aperture- F-stop | 16 mm | 20 mm | 24 mm | 28 mm | 35 mm | 50 mm |
| f/2.8 | 3 | 4.8 | 6.9 | 9.3 | 15 | 30 |
| f/4 | 2.1 | 3.3 | 4.8 | 6.3 | 10 | 21 |
| f/5.6 | 1.5 | 2.4 | 3.4 | 4.7 | 7.3 | 15 |
| f/8 | 1.1 | 1.7 | 2.4 | 3.3 | 5.1 | 10 |
| f/11 | 0.8 | 1.2 | 1.7 | 2.4 | 3.7 | 7.6 |
| f/16 | 0.5 | 0.8 | 1.2 | 1.6 | 2.6 | 5.2 |
| f/22 | 0.4 | 0.6 | 0.9 | 1.2 | 1.9 | 3.8 |
Conclusion:
To summarize controlling Depth of Field:
To increase the Depth of Field
- Narrow your aperture (larger f-number).
- Shorten your focal length.
- Move away (farther) from your subject.
To decrease the Depth of Field
- Widen your aperture (smaller f-number).
- Lengthen your focal length.
- Move closer to your subject.
Determining the hyperfocal distance can be a great tool for making sure you have the right parts of your picture sharp. It is most useful for landscape photography where you are often concerned with keeping a distant background sharp. In those cases, the hyperfocal distance charts should help you set your focus.
Hyperfocal distance is most useful when there is no particular part of your image that you want sharper than others.
When you focus at the hyperfocal distance, you sacrifice a part of foreground sharpness for background sharpness. The whole point of hyperfocal distance is to determine the point at which you can keep the background in focus, and there is less thought to the foreground.
Related posts
What Is Aperture In Photography
Full Frame vs Crop Sensor – Which To Choose
Thanks for reading the post, I hope you enjoy it, and found it useful. In case you have any questions, I would be glad to answer any questions.
If you enjoy the site, don’t forget to subscribe, we will only inform you when a new article is posted.





I have a Canon 5D Mark 3 and I love the body and the canon lenses. Your information of how to control DOF is really great, and that is coming from a semi-professional photographer. Personally I love photographs that have a shallow depth of field and create Bokeh. As you said deep DOF is the most common for most applications. I have bookmarked your page and will definitely be reading more of your articles.
Thanks for your comment, I am glad that you found the post informative. I agree with you that using a shallow depth of field is a great tool and will add touch of art to your photo.