


The Sunny 16 rule is a formula that’s been kicking around since the early days of picture taking. It has held true through, even with the advanced technology of modern digital camera. The Sunny 16 rule is a simple way of establishing a correct exposure when taking pictures outdoors without using either your camera auto exposure mode or a light meter.
So if you haven’t heard about the Sunny 16 Rule or just need to refresh your photography knowledge, here’s a quick post on this classic metering rule.

THE SUNNY 16 RULE
The starting point for establishing the correct exposure is to set the only non-variable part of the equation, specifically the f-stop of the lens, which as you might guess when talking about the Sunny 16 Rule is f/16.
The rule states that if you have a clear, sunny day and your aperture is set at f/16, whatever ISO you are using, your shutter speed will be the reciprocal value of that ISO value (ISO X = 1/X seconds shutter speed).
So for example, if your ISO is 200, then your shutter speed will be 1/200 seconds. If your ISO is 100, then your shutter speed will be 1/100 seconds, and so on.
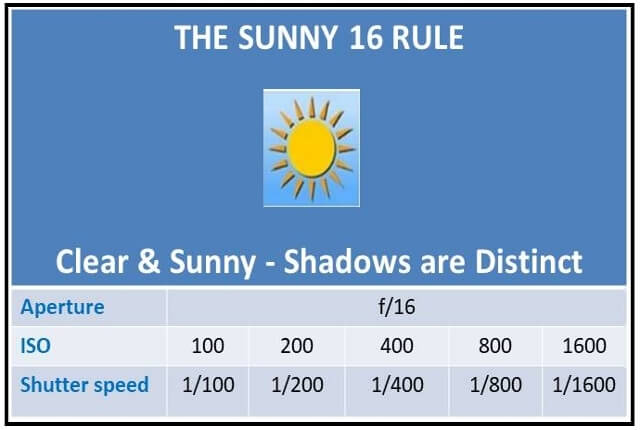
As you can see in above table, the aperture remains constant. As long as the sun is shining, the aperture should remain at f/16 and the ISO and shutter speed should be manipulated accordingly. Note, however, that this rule just gets you close to a good exposure – it doesn’t guarantee that the result will be optimal. In some instances, you might need to do a little further adjustment to get the best exposure.

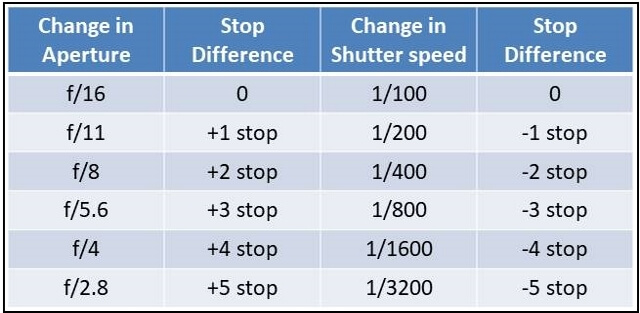
Camera manufacturers establish the stop scale for both the aperture and the shutter speed; they operate in incremental defined stops. For example, if you adjust the aperture by one stop, such as from f/16 down to f/11, it results in twice as much light entering the lens. Moving the other way one stop, from f/16 to f/22, halves the amount of light entering the lens. The same concept applies for the Shutter speed if moving from 1/400 seconds to 1/200 seconds results in twice as much light because the shutter speed is twice as long. Moving from 1/400 seconds to 1/800 seconds halves the amount of light because the shutter speed is twice as fast.
The table below illustrates the idea of manipulating shutter speed and aperture and still having the same exposure.
Guide to different weather conditions
There are other weather conditions besides clean and sunny; they require using other aperture values.

The table below gives you a guide for the aperture setting for different weather conditions.
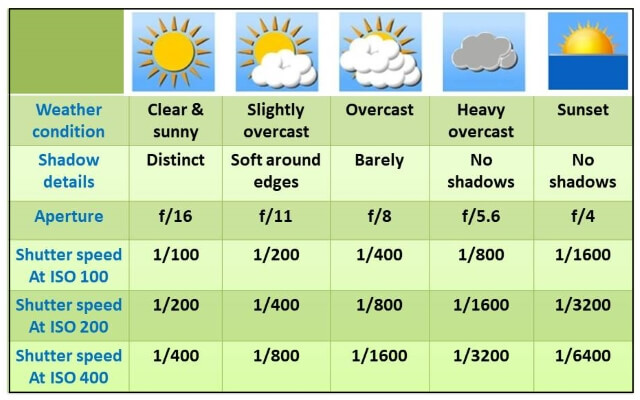
Assume that you are taking a landscape photo on a sunny day. As such, you use the appropriate settings to get a good exposure: an aperture of f/16, an ISO of 100, and a shutter speed of 1/100. But then, imagine that the weather changes as the day go on and you want some more shots; you find that you’re now shooting under heavily overcast skies. Looking at the chart above, you need to set an aperture of f/5.6.

In short, on a sunny day, your settings would be:
Aperture: f/16, ISO: 100, Shutter Speed: 1/100 seconds
And on a heavily overcast day your settings would be:
Aperture: f/5.6, ISO: 100, Shutter Speed: 1/800 seconds
Another example,
You are shooting at sunrise, your setting will be:
Aperture: f/4, ISO: 100, Shutter Speed: 1/1600 seconds

Why it is important to know about the sunny 16 rule
- It is a great way for beginner photographers to start learning how to control exposure; the sunny 16 rule is a very good starting point.
- The Sunny 16 Rule can be used to find out if your camera is capturing accurate exposures. Some cameras – even when they are brand new out of the box – can tend to underexpose images. By using this rule, you can test your gear to find out if it naturally tends toward underexposure or if it is spot on.
- The Sunny 16 Rule allows you to meter the incident light on your camera. If you set your exposure according to the setting of the sunny 16 rule, then read the displayed reading of the exposure (this value represent the amount of incident light on your subject). But if you let your auto camera system find the correct exposure for you, and display its reading (that is the value of the reflected light from your subject into your camera sensor). You may check my post for more detailed information about this subject.
Related posts:
If you are interested in learning more about photography rules, the following are two interesting posts:
Top 10 Photography Rules – Guidelines for better photos
10 Rules for Photo Composition
Thanks for reading, I hope you enjoyed the article if you have any questions just post them below & I will be happy to answer you.
If you enjoy the site, don’t forget to subscribe, we will only inform you when a new article is posted.


So, that chart is 100% wrong.
With the sunny 16 rule you shouldn’t be changing both aperture and shutter speed. In your last example on the beach you list the exposure as:
Aperture: f/4
ISO: 100
Shutter Speed: 1/1600
Unfortunately, this is the same exposure as:
Aperture: f/16
ISO: 100
Shutter Speed: 1/100
If the aperture needs to open up to compensate for lower light, why does your chart and explanation also have increasing shutter speeds that would lower the light hitting the film/sensor?
Absolutly, No the table is 100% correct. First let me remind you what exactly is the Sunny 16 Rule? Simply put, it’s a handy guideline that helps photographers determine the proper exposure settings when shooting in bright sunlight. If you need another setting for your aperture (for example to increase the depth of field) you need to adjust the shutter speed to get the same recommended exposure by the rule. I hope this may clarify the confusion!
Thanks for your response
“Yes the chart is correct” (it’s not.)
The chart adjusts aperture and shutter speed, but you’re just shooting the same EV across the board. Shooting “overcast” at f5.6, 1/800 @ ISO 100 is the same as “sunny:” f16, 1/100 @ ISO 100. Overcast *should* be f5.6, 1/100 @ 100 because you need more light hitting the sensor. Conversely if you wanted an increased depth of field, that would then become f11, 1/25 @100 or f11, 1/100 @400.
I’m not quite convinced you have learned how these values correlate to one another if you’re convinced the chart is correct.
The technical considerations and iterations for modern photographic equipment are extensive. I have not researched every possible solution but rely more on the preset configurations of me SLR camera. The results so far have been great.
In you opinion, are these types of configurations for professional only or should amateur photographers also be playing with these settings?
Rich
These photography rules are basic, and general guidelines, they can be used by both amateur and professional photographers.