Aperture plays an important part in the look and feel of your images, In order to control the exposure of your camera, you have three separate settings. There are two ways to control the amount of light that enters the camera and exposes the photosensitive surface: aperture and shutter speed, and one way to control the sensitivity of that surface: ISO. Learning how and when to adjust these settings can help improve your photography.
In this post, I’ll talk about the aperture, and answer the question: What Is The Aperture In Photography?
What is Aperture?
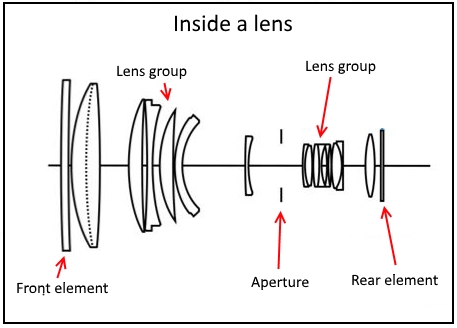
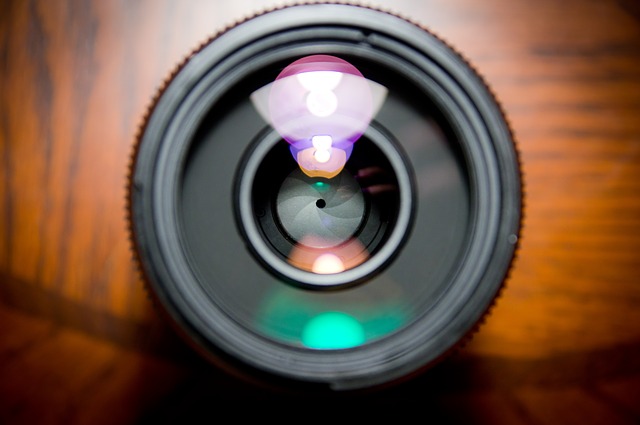
The aperture is the size of the opening in the lens. Most photographic lenses have variable apertures in order to control the amount of light entering the lens. The aperture is physically located inside the lens, as shown in the below diagram.
This aperture is regulated by a diaphragm made of overlapping blades that can be adjusted to vary the size of the opening through which light passes. The photo below shows a typical diaphragm with 9 blades.

Aperture is measured using something called the f-stop scale. The number denotes how wide the aperture is. The lower the number, the wider the aperture. The table below illustrates the different types of F-stop scales.
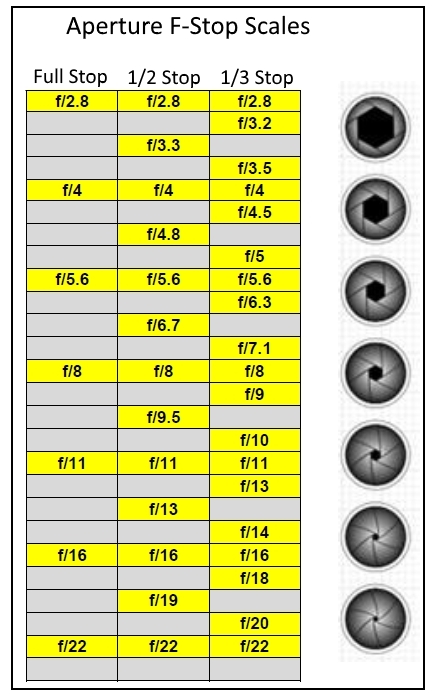
The most important thing to know about these numbers is that, from each number to the next, the aperture decreases to half its size (full scale), and allowing 50% less light through the lens. Opening up the aperture by one whole stop doubles the amount of light passing through the diaphragm.
It is important to know that the same scale system (doubling and halving effect) is used in shutter speed and ISO. If the shutter speed is kept the same, the difference in exposure between openings up the aperture from f/8 to f/5.6 is the same as pushing sensitivity up from ISO 100 to 200; the image will be one stop brighter in both cases.
Similarly, if sensitivity is kept the same, the difference in exposure between a shutter speed of 1/125 sec and 1/60 is the same as adjusting from f/8 to f/5.6; again it’s one-stop brighter.
To understand how these numbers are defined, there is some simple mathematics involved. For example, we are using a lens 50mm f/2, to find the width of the aperture; you divide the 50 by the 2, giving you a diameter of 25mm, and a radius of 12.5mm. As you already know that the area of a circle with radius r:
Area = pi * r²
So, the area of the aperture of a lens 50mm f/2 equals to 490 mm2.
Another example, we are using a lens 50mm f/2.8, to find the width of the aperture; you divide the 50 by the 2.8, giving you a diameter of 17.9mm, and a radius of 8.95mm. Then calculate the area, the area of the aperture of a lens 50mm f/2.8 equals to 251mm2.
The area of f/2.8 will be exactly half of f/2. So by stepping down one full stop will result in getting half the aperture area.
How Aperture Affects the Depth of Field
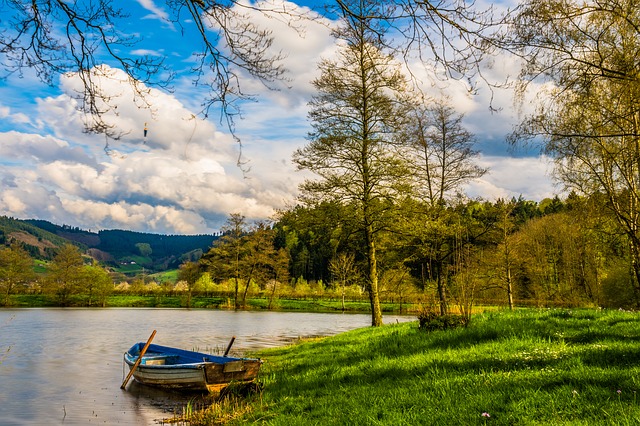
The depth of field (DOF) is the amount of your shot that will be in focus. A large depth of field means that most of your images will be in focus whether it’s close to your camera or far away. For example, the landscape shot below has an aperture of f/16 and the result is that both the mountain in the background and the boat in the foreground remain in focus.
A small (or shallow) depth of field means that only part of the image will be in focus and the rest will be fuzzy or out of focus. For example, in the photo below, the pencils in the middle of the photo (a yellow and red one) are sharp, but the rest of the pencils are out of focus and blurred. This is a very shallow depth of field and the photo was taken with an aperture of f1.8.

Aperture has a big impact on depth of field. A Large aperture (remember it’s a smaller number) will decrease depth of field while the small aperture (larger number) will give you larger depth of field. A detailed discussion about controlling your depth of field is given in my post <<How to Control DOF of Your Photos – Shallow Depth of Field vs Deep Depth of Field>>.
How Aperture Affects Shutter Speed
The f/stop also affects the shutter speed. The three factors that affect the correct exposure of a certain scene are the shutter speed, f-stop, and ISO setting.
Using a low f/stop means more light is entering the lens and therefore the shutter doesn’t need to stay open as long to make a correct exposure which translates into a faster shutter speed. Again, the reverse is true: using a high f/stop means that less light is entering the lens and therefore the shutter will need to stay open a little longer which translates into a slower shutter speed.
Aperture and sharpness
The relation between the aperture and the sharpness of the produced photos is considered a characteristic of a given lens. Each lens has its own relation, lens manufacturers and lens test sites provide data on how a specific lens behaves when varying the aperture. Modulation Transfer Function (MTF) chart provides much useful information in a single chart like the following:
- Lens Resolution (center to extreme corners at maximum and stopped down apertures)
- Lens Contrast (center to extreme corners at maximum and stopped down apertures)
- Lens sweet spot.
You can get these MTF charts for your lens from Linstips or the site of lens manufacturers.
For example:
Canon EF 85 mm f/1.2L II USM has the following chart (via linstips)

It is clear that the sweet spot of this lens is f/4 and f/5.6 for the center and the edge of the frame.
Aperture and Diffraction
Diffraction is the bending of light rays as they pass over the edge of the aperture blades. These rays don’t converge on the sensor surface and consequently, they give a soft image. At wide apertures like f/2.8 or f/4, diffraction is essentially impossible to see at such small apertures. At smaller aperture, diffraction increases which softens the image. As a general rule, it’s advisable to not close down a lens aperture to the smallest available value.
Number of aperture Blades and bokeh
The way that out-of-focus areas, particularly highlights are rendered is referred to as the lens’s bokeh. Good and nice-looking bokeh is generally having highlights that are rounded rather than having straight sides, and the edges of these highlights should be soft and not haloed or hard-edged. The following photos illustrate the concept, the first photo has a hexagonal bokeh shape, and the second one has a circular bokeh shape.
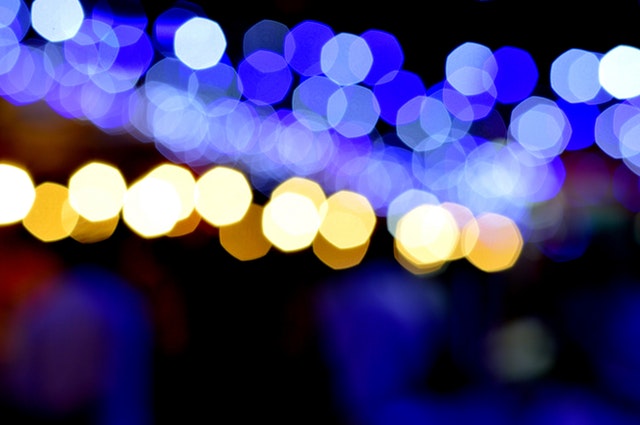

The best results are usually seen when the diaphragm has many blades (9 being typical) or more, that produce a nearly rounded edge (to create an almost spherical opening).
For more discussion about Bokeh, you may check my post >> Bokeh Photography – What Is Bokeh Effect<<
Aperture and autofocusing
Most modern cameras measure exposure and focus the lens when the aperture is wide open, then only close it down to the required setting shortly before the image is captured. For the AF system to operate it requires an aperture of at least f/5.6 or larger.
Consider that you are using a lens with a max aperture of f/4, if you add a 2X teleconverter to double the focal length of your lens, the effective aperture of this optical combination drops to f/8 and many cameras will be unable to autofocus the lens or may only be able to use the central AF point in these circumstances.
If you need to know more about autofocus, check my post >> What Is Autofocus And How It Work<<
Aperture and Fast lenses
You’ll often hear photographers refer to lenses as either being ‘slow’ or ‘fast’. This doesn’t refer to the focusing speed, but to the maximum aperture available – a lens with a maximum aperture anything wider than f/2.8 is referred to as ‘fast’, while others are referred to as ‘slow’. This is because they don’t let in as much light, so exposures require a slower shutter speed.
Finally, if you are going to shoot portrait photos, you should have your subject perfectly in focus, and to have a nice blurry background in order to ensure that your subject is the main focal point and that other elements in the shot are not distracting. In this case, you’d choose a large aperture (small number) to ensure a shallow depth of field.
If you are going to shoot landscape photos, and want to have the entire picture to be relatively in focus from the foreground to background. You’ll use small aperture settings (large numbers).
Aperture is an important aspect of digital photography. If you want to gain more control of your digital camera, you should have an understanding of all parts of the exposure triangles, i.e. shutter speed, aperture, and ISO. You have to Experiment with different settings and how they impact your images.
This post is part of a three-series that explains the exposure, the other two posts are:
What Is the ISO in Photography
What is The Shutter Speed in Photography
Thanks for reading the articles, hope you found what you are looking for. If you have any questions, please drop it down in the box below, I’ll respond as soon as possible. Don’t forget to subscribe to the site; we’ll only inform you only in case a new article is posted.




Love the thoroughness of this post and I think the diagrams you used were great. I’ve heard the aperture of a camera likened to the iris of an eye. I’ve been shooting weddings for 10+ years and us predominantly prime lenses. I’m all about fast lenses so I can try and shoot in natural light as much as possible. Do you have a favorite lens that you go to and a reason why it’s your favorite? What sort of insights can you give to the affect aperture has when you’re using a flash?
Thanks for your comment, I really love Sigma 85mm F/1.4 Art Lens. For the use of flash, you may check my post “How to use flash in photography”