


Photography is about capturing light from the scene and getting the proper exposure. To evaluate and control the exposure, you need to assess the Scene Luminance (Light Intensity) which is the amount of light available in the scene being photographed. Then use the exposure triangle to determine the correct camera settings
In this tutorial, I will explain in detail what the exposure triangle is and how to use it to get proper exposure.
Table of contents
1. What is exposure?
2. What is the Exposure Triangle?
3. Aperture
4. Shutter speed
5. ISO
6. Equivalent Exposures
7. What is the right exposure?
8. Exposure Modes (shooting modes)
9. The Exposure Triangle's purposes
10. How to use the exposure triangle
-
What is exposure?
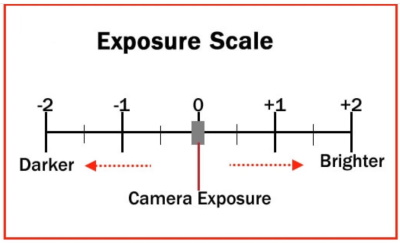
Exposure is the amount of light that reaches your camera’s sensor when a picture is taken, creating the visual data necessary to form a photo. Camera exposure is the overall brightness or darkness of a photograph.
The more you expose the camera sensor to light, the lighter your photo will be overexposed (the photograph loses highlight details and the bright parts become blown out or washed out.
The less light, the darker your photo will be underexposed (the photograph loses shadow details and the dark parts are almost all black.

-
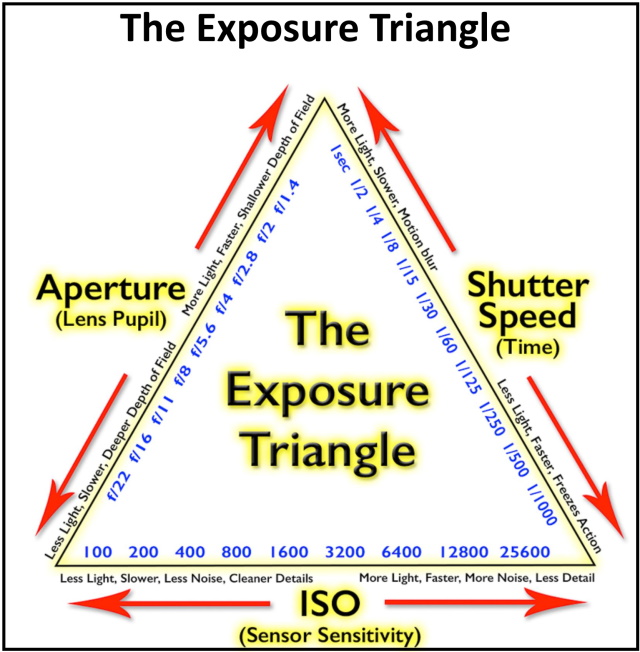
What is the Exposure Triangle?
The exposure triangle is a visual identification of the main elements that affect the exposure in a photograph: aperture, shutter speed, and ISO, and the way these elements are related. If you know how to control or adjust these elements, taking well-exposed photos will not be a problem for you. Let us look at each element closely and understand how they can help you achieve the right exposure.
-
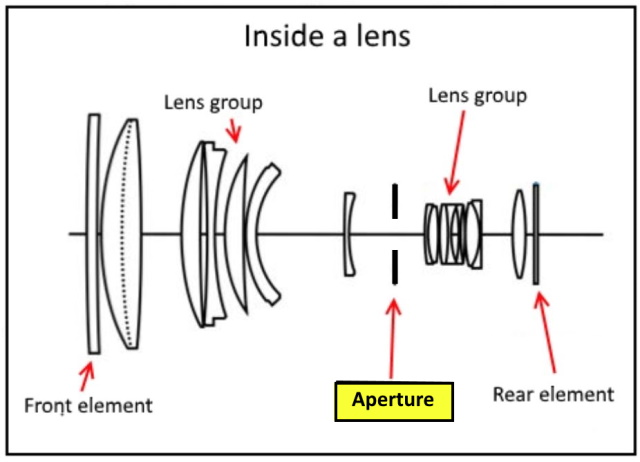
Aperture
Aperture refers to the size of the circular hole in the lens that lets in light. The aperture is physically located inside the lens, as shown in the below diagram.
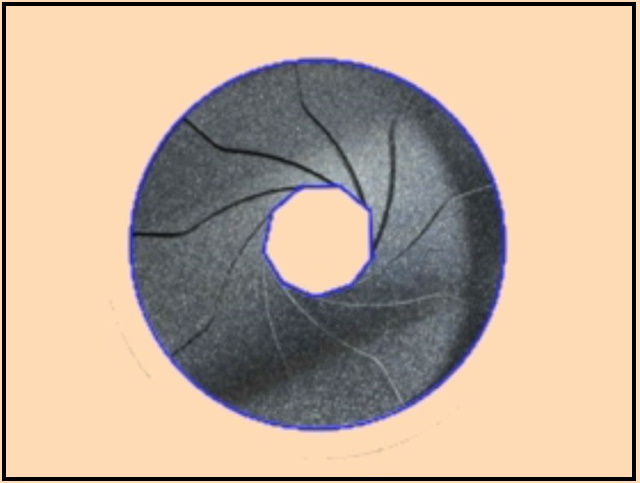
This aperture is regulated by a diaphragm made of overlapping blades that can be adjusted to vary the size of the opening through which light passes. The photo below shows a typical diaphragm with 9 blades.
The bigger the hole, the more light that reaches the sensor. In fact, each time you double the area of that opening, you double the amount of light or increase the exposure by one stop. On the other hand, if you half the area of the opening, you half the amount of light hitting the sensor. In addition, you guessed it; that will decrease the exposure by one stop.
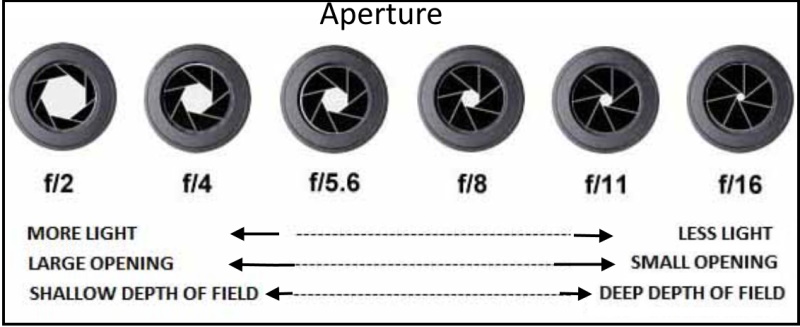
Aperture has a big impact on the depth of field. A Large aperture (remember it’s a smaller number) will decrease the depth of field while a small aperture (larger numbers) will give you a larger depth of field. A detailed discussion about controlling your depth of field is given in my post <<How to Control DOF of Your Photos – Shallow Depth of Field vs Deep Depth of Field>>.
In addition, the aperture has an effect on the way that out-of-focus areas, particularly highlights, are rendered. This effect is referred to as the lens’s Bokeh. Good and nice-looking bokeh is generally having highlights that are rounded rather than having straight sides, and also the edges of these highlights should be soft and not haloed or hard-edged.
The best results are usually seen when the diaphragm has many blades (9 being typical) or more, that produce a nearly rounded edge (to create an almost spherical opening).

-
Shutter speed
A camera shutter is a curtain in front of the camera sensor that stays closed until the camera fires. When the camera fire, the shutter opens and fully exposes the camera sensor to the light that passes through the lens aperture. After the sensor is done collecting the light, the shutter closes immediately, stopping the light from hitting the sensor.
The shutter of a DSLR camera consists of three basic parts the mirror, the bottom curtain, and the top curtain.
When you click the shutter button the mirror flips upwards to allow light to pass to the sensor. This is why the viewfinder goes black for a short amount of time when taking photos. Then the first curtain moves from top to bottom exposing the sensor beneath. After that another curtain will fall down, covering up the entire sensor, and then finally the mirror flips down to its original position.
The below video illustrate the working sequence of the focal plane shutter.
Now, what is Shutter Speed?
Shutter speed describes how quickly or slowly the shutter opens and closes again. Shutter speeds are measured in seconds, or fractions of a second. For example, a shutter speed of 1/100 means 1/100th of a second or 0.01 seconds. This is also known as the “exposure time” because it’s the amount of time the sensor is exposed to light.
Modern cameras also give you the option of very slow shutter speeds (for example 1 second, 10 seconds, 30 seconds, etc). These are used in very low light situations when you’re going after special effects and/or when you’re trying to capture a lot of movement in a shot (Light trails, Star trails, waterfalls).
Further reading: “Slow Shutter Speed Photography Ideas”
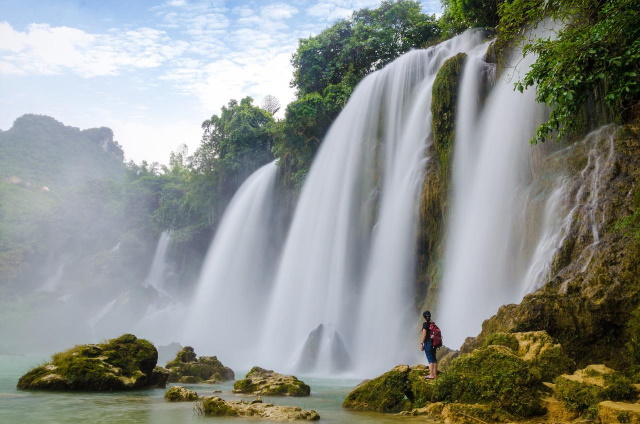
Image by Tuan Hoang from Pixabay
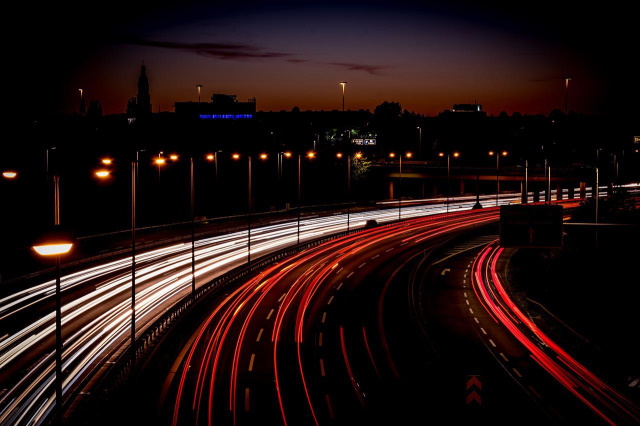
Image by Michael Kauer from Pixabay
On the other hand, Fast shutter speeds are utilized to stop activity versus giving it a chance to blur over a photo. Speeding autos, plunging swimmers, mischievous kids, racing animals, and more can all be frozen through fast shutter speed photography.
Further reading: “Fast Shutter Speed Examples”
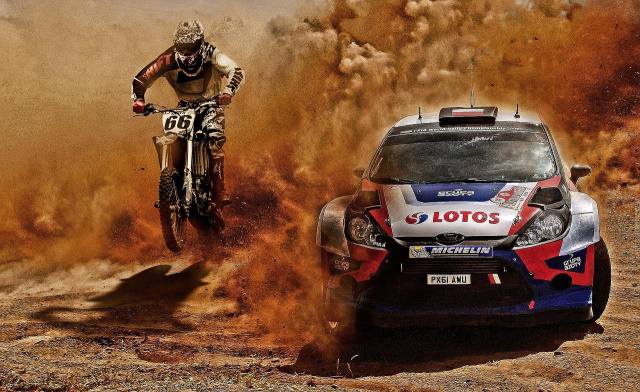
Image by ThePixelman from Pixabay
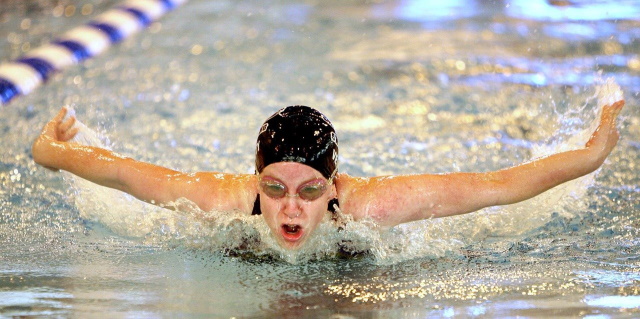
Image by Keith Johnston from Pixabay
-
ISO
In Digital Photography, ISO is the measure of the sensitivity of the image sensor. The lower the number is the less sensitive your camera is to light and the finer the grain. Higher ISO settings are generally used in low-light situations.
The camera’s ISO setting is its sensitivity to light. The higher the ISO, the more sensitive it is. Each ISO setting is double the one before: if you increase the ISO from 100 to 200, you double the camera’s sensitivity; and if you increase it from 200 to 400, you double it again.

As a general rule always you should stick to the lowest ISO of your camera, which is typically ISO 100 or 200, whenever possible. When there is plenty of light, you should use the lowest ISO to retain the most amount of detail and to have the highest image quality.
The higher your camera’s ISO is set, the more likely you are to encounter noise. There are two distinct primary types of digital noise:
- Luminance Noise: This is the gray or black-colored noise or grain you often see in a magnified view of an image, either on-screen or when you closely examine a large print.
- Chrominance Noise: This type of digital noise is also part of high-ISO images, but it’s different. It’s the pastel-colored, speckled noise you sometimes see in mid-tone or shadow areas.
-
Equivalent Exposures
Combining the ISO, aperture, and shutter speed results in an equivalent exposure value for a particular setting. If any one of these elements is adjusted, the resulting image will not be the same. If you increase the f-stop to decrease the amount of light getting to the sensor, you will also need to adjust the shutter speed and the ISO for an equivalent exposure; otherwise, your image might come out blurry or too bright; overexposed or underexposed.
If you increase or decrease any component of the exposure triangle, you will need to compensate with an equivalent number of stops in one or both of the other components in order to create an equivalent exposure or photo created with the same amount of light.
The measuring unit of the exposure is called exposure value EV, and it simply combines shutter speed and aperture to a single value (assuming ISO of 100). Unsurprisingly, there are many combinations of aperture and shutter speed settings, which yield the same EV. For example, the following two sets of aperture and shutter speed yield the same EV (9.6 EV)
- f/2.8 and 1/100 second
- f/4 and 1/50 second
To get familiar with the different combinations of shutter speeds and aperture you may check the exposure calculator
The EV scales you’ll see most often tend to range from about -6 to +17. For example, if you are shooting in a bright midday scene, you’ll need a high EV like +15 or +16. While if you are shooting at nighttime with a full moon, you will need a much lower value like -5 EV in order to avoid underexposure.
-
What is the right exposure?
The right exposure is a balancing act. Overexposure leads to overexposed highlights and faded-looking images. Underexposed images are dark and hard to see. Learn these basics to better understand camera exposure and discover how to get the right exposure for your work.
The act of having “right exposure” means your combination of settings between aperture, shutter speed, and ISO speed has produced a perfectly exposed image. When nothing is blown out (highlights) or lost in shadow in an image, it has achieved correct exposure.
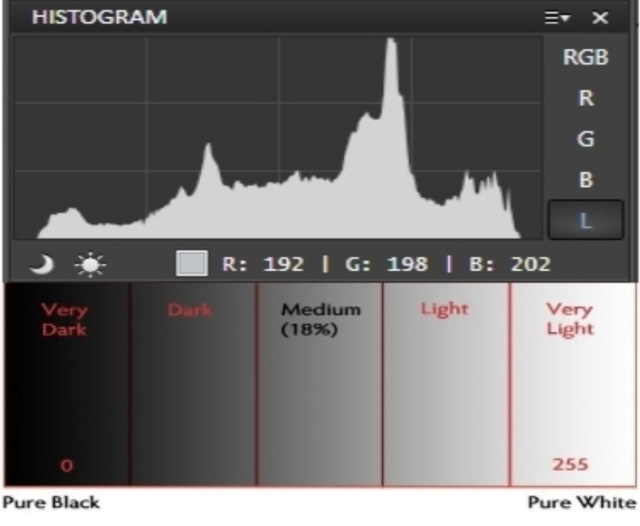
Well, how can I evaluate my exposure? You can review and evaluate the exposure of your image by examining your image on the screen at the back of our cameras and using the camera histogram. You can use it to determine whether your image is too bright or too dark.
-
Exposure Modes (shooting modes)
Digital cameras offer a number of different shooting modes. Each one aims to provide a correct exposure, according to the situation, but each one approaches this goal in a different way. The most common modes are:
-
Program mode:
the camera automatically selects both the shutter speed and the aperture. For any given brightness of light, the camera has been programmed to set a particular combination of speed and aperture.
-
The Aperture Priority mode:
his mode allows you to set a specific aperture while allowing the camera to calculate the proper exposure and assign an appropriate shutter speed. This mode is suitable when you want more control over the depth of field of your photo.
-
Shutter-priority mode:
this mode allows you to select the shutter speed you need, leaving the camera to choose the lens aperture. This allows you to reduce the duration that the shutter is open, to freeze fast-moving action, or conversely, leave the shutter open longer to allow blur and movement to appear in the frame, while the camera system adjusts the aperture according to the chosen shutter speed.
-
The Manual Mode:
the camera lets you control both shutter speed and aperture, although the camera’s exposure meter can still be used as a guide. There are situations where having full control is necessary to get the image that you desire. For example, when doing night photography, the camera’s meter cannot always handle extreme darkness, so you may prefer to shoot in manual mode.

-
The Exposure Triangle’s purposes
The exposure triangle has two purposes in photography:
- Adjust the exposure so you get a detailed result.
- Allowing you to adjust the shutter speed, aperture, or ISO while keeping the exposure consistent.
-
How to use the exposure triangle
- Switch your camera to Manual mode. In Manual mode, you can adjust the shutter speed, aperture, and ISO independently, so you can carefully observe the effects of each variable.
- Select the proper metering mode: Today, every DSLR has an integrated light meter that automatically measures the reflected light from the scene and determines the optimal exposure. There are many types of metering modes for cameras today, but the most common metering modes are:
-
- Evaluative metering mode: the metering sensor measures the brightness of a scene across all metering zones and takes into account colors and which parts of the scene are in focus. Then the camera uses a metering algorithm to determine the combination of aperture, shutter speed, and ISO required to make the right exposure.
-
- Center-weighted Metering: evaluates the light in the middle of the frame and its surroundings and ignores the corners. Compared to Evaluative Metering, Center-weighted Metering does not look at the focus point you select and only evaluates the middle area of the image.
-
- Spot Metering: this only evaluates the light around your focus point and ignores everything else.
- Set your ISO to your camera’s base option (often ISO 100).
- Dial in your aperture, thinking not in terms of exposure, but in terms of depth of field, and check the exposure bar, which sits across the bottom of the viewfinder.
- If your camera indicates a Plus (+) value, then the image is overexposed; if your camera indicates a Minus (-) value, then the image is underexposed. Set your shutter speed so that the exposure bar gives a middle value.
- Check your shutter speed, and decide if it is not slow for your subject movement, then proceed with the shooting.
- If the shutter speed is slow with respect to your subject movement then you should boost the shutter speed, then either increase the ISO or widen the aperture (Generally, increasing the ISO is the way to go
- When your camera indicates a well-exposed scene and you’re satisfied with the aperture, shutter speed, and ISO, take your shot.
Related posts
What Are The Different Types Of Light In Photography?
Canon Metering Modes Explained- How To Get A Proper Exposure
Long Shutter Speed Photography – How To Apply it?
Fast Shutter Speed Photography – Most Important Things To Consider
Thanks for reading, I hope you enjoyed the article, in case you have any questions just drop them below & I will be happy to answer you.
The featured photo by Ehab Amin
If you enjoy the site, don’t forget to subscribe, we will only inform you when a new article is posted.


What a great and informative guide Amin. I appreciate you taking the time to explain the triangle, exposure, and shutter time to me. I have often wondered how to get better pictures. My way of doing it have always just been to take lots of pictures and hoping some of them turned out good. But with this I can actually get some pictures that are more than good. And I have been missing that. Thank you again Amin
I am very glad you liked the post and found it useful to you, I really appreciate your comment, thanks.
Actually, I didn’t have much knowledge about this exposure triangle. Also about photography. From this post of yours, I learned how to use this triangle exposure. Also, you have given a good explanation about exposure modes. I also gained a lot of knowledge from it. Many thanks for this valuable and comprehensive post. Keep posting like this.
Thank you for your feedback.