

Time-Lapse Sky Photography is a fascinating technique that allows you to capture the ever-changing beauty of the sky in a unique and captivating way. By taking a series of still images over a specific period and then combining them into a video sequence, you can showcase the mesmerizing transformations of the sky, from vibrant sunsets and dramatic cloud movements to the dance of stars and the mesmerizing passage of the Milky Way.
What is Time-Lapse Sky Photography?
Time-Lapse Sky Photography is the art of capturing the passage of time in the sky through a series of still photographs taken at regular intervals. It involves setting up your camera in a specific location and allowing it to capture multiple frames over a chosen duration. These individual frames are then merged together to create a video clip that condenses hours, or even an entire night, into a few seconds or minutes.
With Time-Lapse Sky Photography, you can witness the natural phenomena that occur in the sky, such as the changing colors of the sunrise and sunset, the movement of clouds, the trails of stars, and the breathtaking dance of the aurora borealis. It offers a unique perspective on the passage of time, revealing the hidden beauty and dynamic nature of the sky that often goes unnoticed in our fast-paced lives.
Video by Felix Mittermeier
Why is Time-Lapse Sky Photography captivating?
Time-Lapse Sky Photography has a captivating effect on viewers for several reasons. Firstly, it compresses time, allowing us to witness the gradual changes and movements that occur in the sky within a short timeframe. This accelerated visualization highlights the extraordinary transformations that take place, creating a sense of wonder and awe.
Moreover, Time-Lapse Sky Photography captures moments that are fleeting and transient in nature. It freezes the ephemeral beauty of the sky, preserving it for us to enjoy and appreciate long after the moment has passed. It grants us the opportunity to relish the vibrant hues of a sunset, the majestic path of stars across the night sky, or the breathtaking show of the Northern Lights.
Time-Lapse Sky Photography also offers a different perspective on the world around us. By condensing time, it allows us to observe patterns and movements that are imperceptible to the naked eye. It reveals the hidden rhythms and symphonies of nature, providing a deeper understanding and connection to the ever-changing sky.
In conclusion, Time-Lapse Sky Photography is a captivating technique that allows us to capture and share the dynamic beauty of the sky. It provides a visual journey through time, revealing the magic and wonders that unfold above us. In the following sections, we will delve into the essential equipment, techniques, and post-processing steps required to master the art of Time-Lapse Sky Photography and unlock its full potential. So, let’s embark on this exciting adventure and capture the fleeting moments of the sky that leave us in awe.
Video by Joshua Woroniecki from Pixabay
Essential Equipment for Time-Lapse Sky Photography
Time-lapse aerial photography allows us to capture the breathtaking beauty of the celestial world in motion. Whether you’re interested in capturing the changing colors of a sunrise, the dancing of the stars at night, or the intense movement of clouds, having the right equipment is essential to achieving spectacular results. In this section, we will explore three essential pieces of equipment that are key to successful time-lapse sky photography: camera and lens selection, tripods and stabilization, and intervalometers and remote shutter release.
Camera and Lens Selection:
When it comes to time-lapse sky photography, choosing the right camera and lens combination is vital. Here are a few key factors to consider:
- Sensor Size: Opt for a camera with a larger sensor size, such as a full-frame or APS-C sensor. Larger sensors generally produce higher image quality and offer better low-light performance.
- High Resolution: A camera with a high megapixel count allows for greater detail in your images. This is particularly important when capturing intricate patterns and textures in the sky.
- Wide-Angle Lens: Wide-angle lenses are ideal for capturing the expansive sky and its breathtaking panoramas. Look for a lens with a focal length between 14mm and 35mm to capture a wide field of view. For more information about choosing the right wide-angle lens click here
Tripods and Stabilization:
To create smooth and stable time-lapse sequences, a sturdy tripod is essential. Here’s what to keep in mind:
- Stability: Look for a tripod made of lightweight yet durable materials like carbon fiber or aluminum. Ensure it has a solid construction to withstand outdoor conditions and prevent camera shake.
- Height and Portability: Choose a tripod with adjustable height options that suit your shooting needs. Additionally, consider its weight and portability, as you may need to carry it to various locations.
- Ball Head: A ball head allows for smooth movement and quick adjustments while composing your shots. Look for a ball head with a quick-release plate for convenient camera attachment and detachment.
To help you select the suitable tripod, check the post “Best Tripods In 2023 – Top 5 for Sharper Photos!”
Intervalometers and Remote Shutter Release:
An intervalometer is a device that automates the process of taking a series of photographs at predetermined intervals. It plays a vital role in time-lapse sky photography. Consider the following:
- Intervalometer Functions: Look for an intervalometer that offers customizable settings, including interval length, exposure duration, and the total number of shots. This flexibility allows you to capture the sky’s changing conditions effectively.
- Remote Shutter Release: Using a remote shutter release minimizes camera shake caused by manually pressing the shutter button. Opt for a wireless remote that provides a reliable connection to your camera from a distance.
- Compatibility: Ensure that the intervalometer and remote shutter release are compatible with your camera model. Different camera brands may require specific accessories.
JJC Intervalometer Timer Remote Control Shutter Release
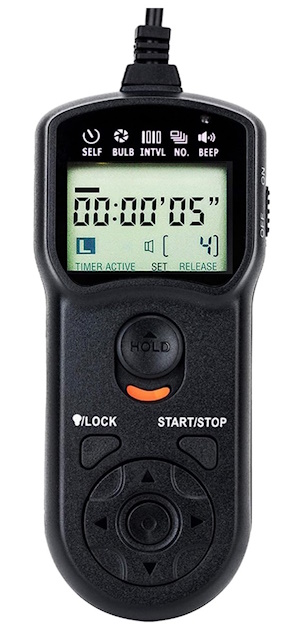
Key features
- Compact Size:12.1*4.0*2.1cm, 90cm long wired remote controller, powered by 2 AAA Alkaline batteries
- Self-timer, interval timer, long-exposure timer, and exposure-count setting features
- Take Photos without Camera Shake and great for Time-Lapse Photography
- The timer can be set anywhere from 1 sec. to 99 hrs., 59 min., 59 sec
- Humanized backlight design allows you to view the LCD screen in the dark
Memory cards
It’s important to have a reliable and high-capacity memory card that can handle the demands of continuous shooting. Look for memory cards with fast write speeds to ensure smooth and uninterrupted recording. Consider cards with ample storage capacity to accommodate the large file sizes of time-lapse sequences. It’s also a good practice to carry multiple memory cards as backups to avoid running out of space or potential data loss.
By equipping yourself with the right camera and lens combination, a sturdy tripod, a reliable intervalometer with a remote shutter release, and extra memory cards you’ll be well-prepared to embark on your time-lapse sky photography journey. These essential tools will help you capture the awe-inspiring beauty of the sky and create mesmerizing time-lapse sequences that will leave viewers captivated. So, grab your gear, find a scenic location, and let the sky unfold its wonders before your lens.
Video by Bradley Murray from Pixabay
Planning Your Time-Lapse Sky Photography Shoot
When it comes to capturing stunning Time-Lapse Sky Photography, proper planning is key. By researching weather conditions, choosing the right location, and setting up your composition, you can maximize your chances of capturing breathtaking moments in the sky.
Researching Weather Conditions and Celestial Events
Before embarking on your Time-Lapse Sky Photography shoot, it’s essential to research the weather conditions and celestial events that can enhance your images. Check the forecast for clear skies, as clouds can obstruct the view of stars or create undesirable effects. Keep an eye out for special celestial events like meteor showers, eclipses, or the appearance of the Milky Way, as they offer unique opportunities for capturing extraordinary shots.
Choosing the Right Location
Selecting the right location is crucial for successful Time-Lapse Sky Photography. Look for areas with minimal light pollution, as it can significantly impact the visibility of stars and the Milky Way. National parks, rural areas, or remote locations away from city lights are ideal for capturing the true beauty of the night sky. Consider any natural features, such as mountains, lakes, or open fields, that can add depth and interest to your composition.
Setting up Your Composition
Once you’ve chosen your location, it’s time to set up your composition. Look for elements that can add interest and foreground to your shots, such as trees, buildings, or silhouettes. Consider the rule of thirds to create a balanced and visually appealing composition. Experiment with different angles and perspectives to find the most captivating view of the sky.
Double-check the camera’s level to ensure a straight horizon. Frame your shot and adjust the focal length, focus, and exposure settings based on the desired effect and the lighting conditions.
Camera Settings for Time-Lapse Sky Photography
To capture stunning Time-Lapse Sky Photography, understanding and mastering the right camera settings is essential. By optimizing the aperture, shutter speed, ISO, white balance, picture styles, and exposure modes, you can achieve breathtaking results.
Aperture, Shutter Speed, and ISO
When setting up your camera for Time-Lapse Sky Photography, consider the following settings:
- Aperture: Choose a wide aperture (low f-number) to allow more light into your camera and capture brighter stars or vivid colors during sunsets and sunrises. A wide aperture works in night photography because of the limited light available. You may choose to use an aperture slightly narrower than the widest aperture on your lens to ensure the stars are sharp.
- Shutter Speed: Use longer shutter speeds to capture the movement of stars or create smooth cloud trails. Experiment with different speeds to achieve the desired effect. It is worth mentioning that any shutter speed of 30 seconds or higher will actually introduce blur from the rotation of the earth. Set your shutter speed shorter than 30 seconds, but long enough to let in plenty of light.
- ISO: Increase the ISO to make your camera more sensitive to light. However, be cautious as higher ISO settings can introduce noise in your images. Find the balance between capturing enough light and maintaining image quality. If the light in the scene will change, such as a time-lapse that starts with the stars but ends with the sunrise, you can use auto ISO.
White Balance and Picture Styles
To ensure accurate colors in your Time-Lapse Sky Photography, pay attention to the white balance setting. Set your white balance to match the lighting conditions. Use the “Daylight” or “Custom” white balance for capturing daytime scenes and “Tungsten” or “Incandescent” for nighttime shots. Shoot in RAW format to have more flexibility in adjusting the white balance during post-processing.
Manual vs. Automatic Exposure
Choosing between manual and automatic exposure is a crucial decision for Time-Lapse Sky Photography:
- Manual Exposure: Manual exposure mode allows you to have full control over your camera settings. It is recommended for capturing consistent and well-exposed frames throughout the time-lapse sequence. Take test shots and adjust the settings until you achieve the desired exposure.
- Automatic Exposure: Some cameras offer an automatic exposure mode, commonly known as “Aperture Priority” or “Shutter Priority.” While this mode can be convenient, it may result in exposure inconsistencies throughout the time-lapse sequence, especially in situations with changing light conditions.
Video by Mohamed Hassan from Pixabay
Shooting Techniques for Time-Lapse Sky Photography
To take your Time-Lapse Sky Photography to the next level, it’s important to explore different shooting techniques. By considering duration and interval selection, using bulb ramping for smooth transitions, and adding motion with motorized sliders, you can create visually captivating and dynamic time-lapse sequences.
Duration and Interval Selection
When shooting Time-Lapse Sky Photography, the duration, and the interval between each frame play a crucial role:
- Duration: Determine the duration of your time-lapse sequence based on the desired final video length. Longer sequences can capture extended periods of sky transformations, while shorter sequences create more condensed and fast-paced videos.
- Interval: Select an appropriate interval between each frame to capture the desired pace of motion in the sky. Shorter intervals result in smoother motion but require more images and storage space. Longer intervals create more pronounced changes between frames.
To plan the length of your time-lapse, you’ll need to consider both the duration you want the camera to shoot and the desired length of the resulting video. The longer the camera captures images and the shorter the final time-lapse, the faster time will seem to pass.
Start by selecting the frame rate for your time-lapse, typically 60 fps, 30 fps, or 24 fps. Each frame rate represents the number of still photos captured in one second of video. A higher frame rate creates smoother motion but also makes time appear to pass more quickly.
Using the chosen frame rate and the desired time-lapse length, you can determine how long to shoot and the interval between shots. For example, in a 60 fps time-lapse with photos taken every two minutes, one hour of shooting will translate into just half a second of video. Remember, capturing fewer photos will make time seem to pass even faster, while more photos will result in a longer time-lapse with a slower pace.
So, it is up to you to experiment with different durations and intervals to achieve the desired storytelling effect and capture the essence of the sky’s ever-changing beauty.
Using Bulb Ramping for Smooth Transitions
Bulb ramping is a technique that allows for smooth transitions in exposure during a time-lapse sequence. It is especially useful for capturing the changing light conditions during sunrise or sunset:
- Set your camera to bulb mode and use a remote shutter release with intervalometer capabilities.
- Start with a slightly underexposed frame during the darker period of the time-lapse.
- Gradually increase the exposure time for each subsequent frame as the light intensifies.
This technique helps maintain consistent exposure and creates seamless transitions between frames, resulting in a more visually pleasing time-lapse sequence.
Bulb ramping ensures that your time-lapse captures the gradual shifts in light and color as the sky transforms during the golden hours.
Video by llz502374737 from Pixabay
Adding Motion with Motorized Rotating Panning or Motorized Sliders
To introduce an extra element of motion and depth in your Time-Lapse Sky Photography, consider using motorized rotating panning or motorized sliders.
The difference between motorized rotating panning and motorized slider lies in the type of movement they provide for capturing time-lapse sequences.
-
Motorized Rotating Panning:
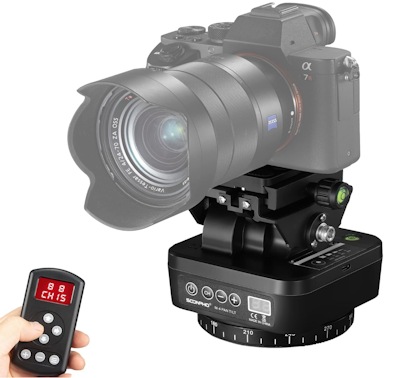
Motorized rotating panning systems are designed to rotate the camera horizontally or vertically while capturing time-lapse shots. These systems typically consist of a rotating base that can be programmed to move the camera at a specific angle or speed. Motorized rotating panning allows for smooth and controlled rotational motion, which is ideal for capturing sweeping panoramic views or creating dynamic motion in a time-lapse sequence. It adds a sense of rotation and expansiveness to the footage, giving a broader perspective of the scene.
Soonpho M4 Motorized Rotating Panoramic Tripod Head
-
Motorized Slider:
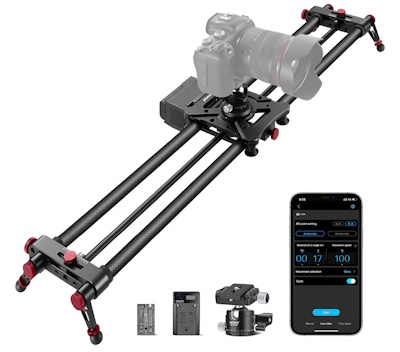
On the other hand, motorized sliders provide linear movement for the camera during time-lapse photography. They consist of a sliding mechanism that moves the camera along a track, either horizontally or vertically. The motorized slider can be programmed to move the camera at a consistent speed or specific intervals, creating a controlled and smooth motion throughout the time-lapse sequence. Motorized sliders are particularly useful for adding a sense of depth, foreground interest, or subject tracking to time-lapse shots. They enable dynamic movements such as revealing a landscape or slowly panning across a scene.
NEEWER 31.5″/80cm Motorized Camera Slider
Both techniques offer unique possibilities for adding motion and depth to time-lapse sequences, but they differ in the type of movement they provide and the creative effects they can achieve.
Post-Processing Time-Lapse Sky Photography
Once you’ve captured a series of stunning time-lapse shots of the sky, the post-processing stage is where you bring your footage to life. In this section, we’ll explore the essential steps of importing and organizing your footage, editing and adjusting images, and creating the final time-lapse sequence.
Importing and Organizing Footage
Begin by transferring your time-lapse footage from your camera to your computer. Create a dedicated folder for your project and organize your files in a logical and chronological order. This ensures easy access and streamlines your post-processing workflow.
Editing and Adjusting Images
Next, it’s time to edit and adjust your images to enhance their visual impact:
- Use software like Adobe Lightroom or Capture One to process the RAW files from your camera. Adjust exposure, contrast, and white balance to achieve the desired look.
- Apply consistent edits across all images in the sequence to maintain visual continuity.
- Consider making selective adjustments to specific frames if necessary, such as reducing noise or enhancing certain elements.
Remember to strike a balance between enhancing the natural beauty of the sky and maintaining a realistic representation.
Creating the Final Time-Lapse Sequence
To create a mesmerizing time-lapse sequence, you’ll need video editing software:
- Import your edited images into the software and arrange them in the desired order.
- Set the desired duration for each frame, ensuring a smooth transition between images.
- Add transitions, such as crossfades or fades to black, to create seamless connections between frames.
- Adjust the playback speed of the sequence to achieve the desired pacing.
- Consider adding music or ambient sounds to enhance the viewing experience.
- Preview the final sequence and make any necessary adjustments to ensure a visually pleasing and cohesive time-lapse.
By following these post-processing steps, you can transform your raw time-lapse footage into a visually stunning and captivating sequence that showcases the ever-changing beauty of the sky.
Video by Pixabay
Tips and Tricks for Mastering Time-Lapse Sky Photography
Mastering the art of Time-Lapse Sky Photography requires more than just technical know-how. It involves exploring different perspectives, utilizing time-lapse sky photography apps, and continuously learning and improving your skills. Let’s dive into some tips and tricks that will help you take your time-lapse sky photography to the next level.
Experimenting with Different Perspectives and Compositions
Don’t be afraid to get creative with your time-lapse sky photography. Experiment with different perspectives and compositions to add interest and uniqueness to your shots. Consider shooting from low angles or incorporating foreground elements such as trees, buildings, or natural features. These elements can provide depth and context to your images, making them more visually appealing and engaging.
Try capturing time-lapse sequences from various locations and viewpoints. Move around, change your vantage point, and explore different angles to find the most captivating perspective that highlights the beauty of the sky. Embrace experimentation and let your creativity soar.
Harnessing the Power of Time-Lapse Sky Photography Apps
Take advantage of the wide range of time-lapse sky photography apps available for your smartphone or camera. These apps offer valuable tools and features to enhance your shooting experience and help you achieve better results:
Intervalometers: Use intervalometer apps to control the timing and interval between each frame, ensuring precision and consistency in your time-lapse sequences.
Sun and Moon Positioning: Apps that provide information on the position and movement of the sun, moon, and other celestial bodies can help you plan your shoots more effectively and capture unique sky phenomena.
Star Trackers: Utilize star tracker apps to locate and track specific stars or constellations, allowing you to include them purposefully in your time-lapse compositions.
By harnessing the power of these apps, you can streamline your shooting process, gain valuable insights, and maximize your creative potential.
Continuous Learning and Improvement
Time-Lapse Sky Photography is a journey of continuous learning and improvement. Embrace every shoot as an opportunity to refine your skills and expand your knowledge. Keep up with the latest techniques, trends, and equipment in the field of time-lapse photography. Engage with the photography community, join workshops or forums, and seek inspiration from other photographers.
Critically analyze your own work and identify areas for improvement. Pay attention to feedback and constructive criticism, and use them as stepping stones for growth. By constantly pushing your boundaries and striving for improvement, you will elevate your time-lapse sky photography to new heights.
In conclusion, mastering Time-Lapse Sky Photography goes beyond technical settings. By experimenting with perspectives and compositions, harnessing the power of time-lapse sky photography apps, and continuously learning and improving, you can unlock the full potential of this mesmerizing art form. Embrace the joy of exploration and the pursuit of excellence as you capture the magic of the ever-changing sky.
Related posts
Timelapse Photography Tips – Full Tutorial & Post-Processing With Lightroom CC
Time Lapse Photography – An Introductory Guide For Beginners
Thanks for reading, I hope you enjoyed the article, in case you have any questions just drop them below & I will be happy to answer you.
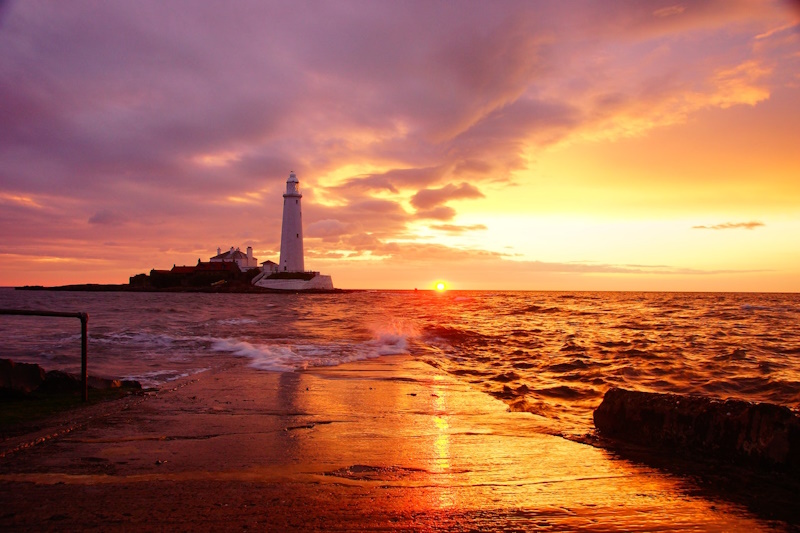
The featured Photo by Ray Bilcliff
If you enjoy the site, don’t forget to subscribe, we will only inform you when a new article is posted.


One of nature’s beauties that I appreciate as a photographer is the changes in the sky. It naturally adds beauty and elegance to our pictures when we get it right. Thank you for introducing the concept of Time lapse sky photography. Although I have tried on severally to capture the sky in my work, I did not think of it as a skill to be acquired. We have necessary equipment, but we need to acquire the intervalometer as advised.
I’m glad you appreciate the beauty of the sky as a photographer! Time-lapse sky photography is a wonderful way to capture its ever-changing nature. Using an intervalometer is key to achieving successful time-lapse sequences. It allows you to capture a series of still images at predetermined intervals, showcasing the sky’s elegance and dynamics. Acquiring an intervalometer will greatly enhance your ability to create captivating time-lapse videos. If you have more questions, feel free to ask. Happy shooting!
Hey there! I stumbled upon your post about mastering Time-Lapse Sky Photography, and I must say, it’s an incredibly captivating technique. The way you described capturing the ever-changing beauty of the sky through a series of still images is truly mesmerizing. I found your tips on equipment selection, shooting techniques, and post-processing to be really helpful for anyone interested in exploring this art form.
I’m particularly fascinated by the concept of condensing hours or even an entire night into a few seconds or minutes of video. It’s like witnessing the passage of time in a whole new way. I’d love to know, what inspired you to delve into Time-Lapse Sky Photography? Have you had any particularly memorable experiences or favorite shots while practicing this technique?
Looking forward to hearing more about your journey and any additional insights you may have. Keep up the great work!
Thank you for your enthusiastic response! I’m glad you found my post on Time-Lapse Sky Photography captivating and helpful. I was inspired by my fascination with capturing the passage of time and the dynamic nature of the sky. Memorable experiences include capturing the transition from day to night and a dramatic storm with lightning. It’s a continuous learning process that keeps me inspired. If you have more questions, feel free to ask. I’m here to assist you!