


When Most of the Beginner photographers start practice photography, they are obsessed with the exposure triangle and trying to get a balanced image with the right exposure. They do not give much importance to how to nail focus. Eventually, they will understand that getting a nicely focused image is very important, and without it, an image becomes useless. They also will learn that there is no software out there that can bring back blurred image into focus.
Nailing focus every time is something that needs to be practiced a lot especially while shooting wider apertures or while shooting fast-moving subjects and has to be done right in the camera.
In this post, I have gathered some tips and guidelines to assist you in getting the perfect focus every time.
Guidelines and Tips on How to nail focus
-
Carefully choose the right focusing mode
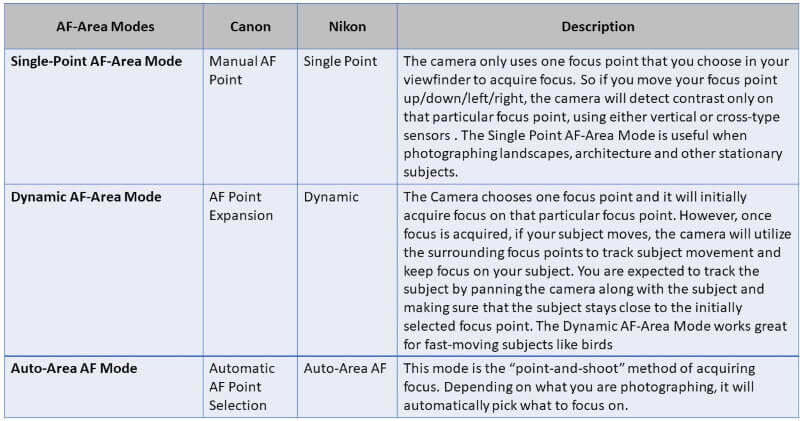
Modern digital cameras nowadays are equipped with a very advanced focusing system, so it is very important to fully understand it. Once you figure it out you will be able to choose the right focusing mode for your certain type of photography. The following tables summarize the focusing modes that are available in Canon and Nikon.
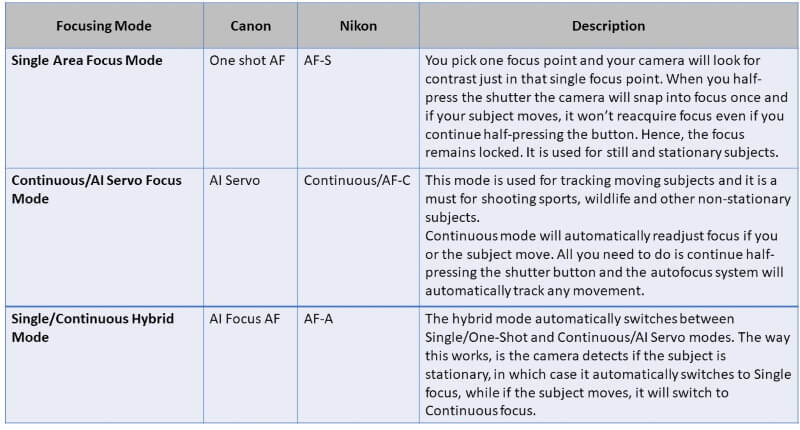
For example, if you are shooting a still portrait photo, the eyes of your subject are the obvious focusing target, so you should use the single area focusing mode (One shoot AF) for Canon and (AF-S) for Nikon. In addition, try using the central single point and moving that focus point over the eyes.
If you are lucky enough and have a modern Sony camera, it probably has a focus mode called “eye autofocus”; it detects an eye of your model (even when they close their eyes) and focuses on it. Even if your subject moves, the camera will track them and keep the eye in focus.

Image by Rizal Deathrasher from Pixabay
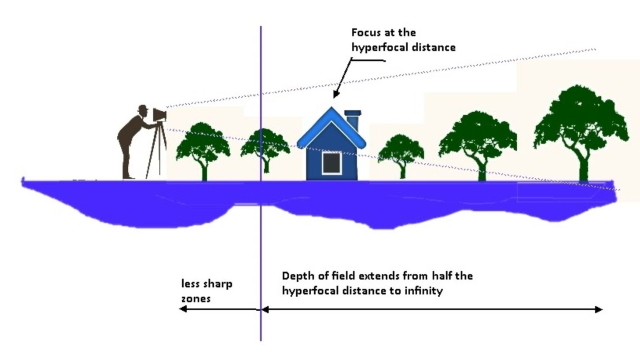
If you are shooting landscape, the focusing mode will be the same as the portrait, but you should focus on the hyperfocal distance. The hyperfocal distance is the distance at which everything beyond it and up to infinity is acceptably sharp, and Half of the distance between the hyperfocal length and the lens will also remain acceptably sharp too. The figure below illustrates the definition.
For more information on hyperfocal distance, check my post How to Control DOF of Your Photos – Shallow Depth of Field vs Deep Depth of Field. You will also find tables and calculators online, and even app on smartphones, that allow you to calculate the hyperfocal distance, like DOF calculator, and, DOF and Hyperfocal Calculator for the Android system.

Image by Frank Winkler from Pixabay
If you are shooting actions and sports photography, use the continuous/All servo mode. This mode activates predictive tracking as soon as the autofocus system detects a moving subject. It continuously monitors the focus distance. When the distance from the camera to the subject changes, the focus is adjusted accordingly.

Image by hiroshi mack from Pixabay
-
Be careful when using focus and recompose technique
The focus and recompose technique has been taught for years and it has been proven effective. Nevertheless, it has some limitations when used at a wide aperture and at a closer distance. By moving the camera (even just a little bit) to recompose, you will change the focusing plan and you will have a shift in focus as shown in the following picture:
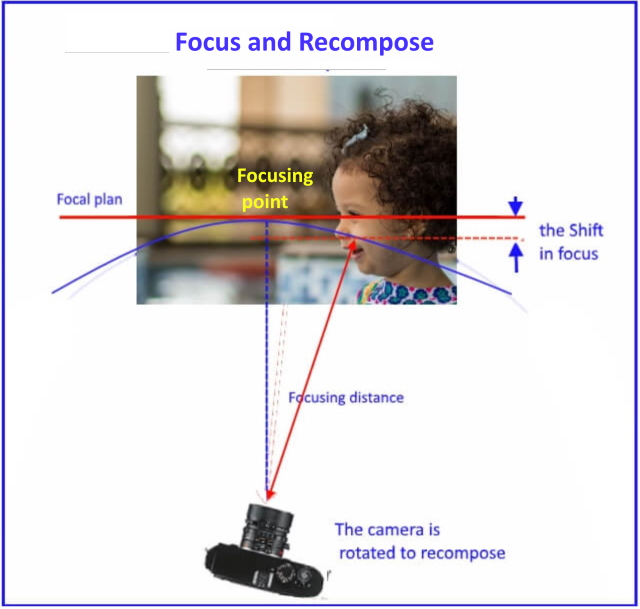
The problem becomes apparent when this focus shift is considered relatively big when compared with the depth of field. We all know that the depth of field is small when using a wide aperture. Therefore, there is a great risk when using focus and recompose technique with a wide aperture.
Instead, try moving the focus point on the camera to where you want it after having the frame composed.
-
Try to use a smaller aperture
Many photographers are obsessed with using wide apertures like f/1.4 to create that blurry bokeh effect in the background. Even the best lenses lose a little sharpness when you shoot at the maximum aperture of the lens. You will get some softness in the areas in focus, even if you nail the focus.
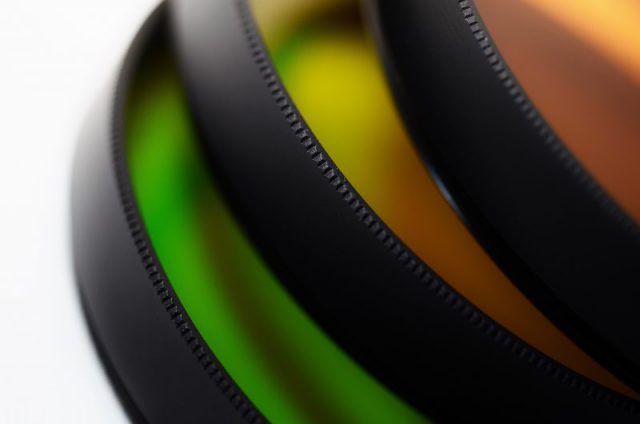
If you are interested to have some bokeh, you can use this solution: position your subject so that there is more space between them and the background, or find a location where the background is far away from your subject. That increased distance will help you blur the background without opening up the aperture to a point where it affects your sharpness.

Image by Albrecht Fietz from Pixabay
-
Use enough high shutter speed
It’s a common mistake to think that you don’t have to worry too much about shutter speed when taking still photos. However, if you want razor-sharp focus, don’t take shutter speed for granted. Even just a little movement of your subject or handshake can turn a perfectly focused subject into blurry.
A good rule for shutter speed is to make sure you are shooting faster than the reciprocal of your focal length. For example, if you are shooting at a focal length of 85mm, then your shutter speed should be at least 1/85 of a second or more. The general rule is:
For Full-frame cameras, Minimum Shutter Speed = 1/Focal Length or more
For cropped sensor cameras, Minimum Shutter Speed = (1/Focal Length) x 2 or more
-
Avoid Camera Shake
Eliminate any camera shake by holding your camera as firmly as possible to avoid creating blurry images. If you are shooting handheld, make use of the image stabilization (IS) or vibration reduction (VR) if your lens has them. Otherwise, use a tripod, but make sure you switch off IS or VR and use a remote shutter release.
-
Consider switching to a manual focus
Autofocus in DSLRs works well when there is enough contrast (the difference between light tones) on or between subject matter that the camera is able to detect. It is fair to say that autofocus doesn’t perform as well in some situations, so simply rotate the focus mode selector to manual focus and use the focus ring to sharpen the subject in view. These situations and limitations can be summarized in the following points:
- There are obstacles in front of your subject or distracting elements.
- Very high contrast or very low contrast
- Taking shots when you are too close to the Subject
- The low light situation is tough for autofocusing system
- Contrasted patterns can fool autofocus systems
- Scenes with geometric or repeated patterns
-
Avoid the following mistakes
There are some mistakes that can make your autofocus system not work well and hens you will not be able to nail the focus.
For detailed reading, check my post “Canon Auto Focus Problems – How To Avoid And Fix Them?”
- The most obvious and often overlooked cause is forgetting to switch your lens to autofocus mode.
- Camera and lens need a tune-up: For more detailed information, you may check my post “How To Calibrate Your Lens- Enhance Autofocus Accuracy”.
- Dirty lens contacts or camera contacts
- Dirty autofocus sensor
- Check your camera diopter
Related posts:
What Is Autofocus And How It Work
Canon Auto Focus Problems – How To Avoid And Fix Them?
Where To Focus In Landscape Photography
How To Calibrate Your Lens- Enhance Autofocus Accuracy
How To Focus And Recompose- Tips To Achieve Sharp Focus
What Is Live View In DSLR Cameras
Back Button Focus For Canon- What Is It And How To Use It
Manual Focus In Digital Camera- Manual Focusing Vs Autofocusing
Thanks for reading, I hope you enjoyed the article if you have any questions just post them below & I will be happy to answer you.
The featured Image by Pezibear from Pixabay
If you enjoy the site, don’t forget to subscribe, we will only inform you when a new article is posted.


Hello Amin, thanks for sharing such a nice post. My son has found love in photography and he is just developing his skills in taking pictures. I have just got him a new camera to help him with his interest and that is why I am making this research so he can learn more about how to take good pictures. I will share this link with him so he cans we for himself and learn more in this field
Thanks
Wow ehab, you have really good tips. Tody almost everybody wants to take pictures where the focus is very visible away from what they have decided to shift or drift from but it can be a bit of a problem for some other photographers. From your post here, IAM able to learn some more about photographic focus. It’s a good thing I’ll test and I’ll be back with some feedback. Thanks!
Thanks for your comment
Photography is such an amazing art but a difficult one also. There are so many photos I see all the time without having correct focus that its a shame as they manage to have great subjects to capture. I understand that many rely on autofocus as it is the easiest way and not bother with complex manual adjustments as this needs you to be more experienced but I would suggest to anyone that likes to make the best out of their photo shooting to learn manual focus. You can make so much more with it.
Hi
Thanks for your comment, I think both manual and autofocusing has their capabilities and limitations, but the important issue here is we should know when to use each of them. You may check my post “Manual Focus In Digital Camera- Manual Focusing Vs Autofocusing”. Thanks again for your feedback.