

Here are The Digital Photography Tips in the form of a Q&A list for more advanced topics, the list is suitable for photographers who are trying to improve their photography skills, and read about more interesting subjects.
To search easily through the list, a shorter list that contains only the question is presented first, just click the question link; it will take you right to the answer.
Also, I highly recommend the below site for Online photography classes.

Questions List
1- Why do my photo’s prints look too dark?
3- What is the Hyperfocal distance?
4- Do you have some tips for taking photos in low light situations, without using a flash?
5- What makes one lens “faster” than another?
6- Why using a handheld light meter while having all those choices in the camera?
7- Would you explain to me how to Take HDR photos?
8- How to get those amazing Catchlights in the eyes of your subject?
9- What are Lens distortions, and how to correct them?
10- What is the photo resolution?
11- What are the standard print sizes?
12- Can you tell me about focus stacking?
13- How far my flash will reach?
14- What is Exposure Compensation, How do I use it?
15- How can I set my exposure if my scene has a big area of low light and another smaller brighter area?
16- Is there a different way to do photo stacking other than focus stacking?
17- Is a smartphone camera as a good as a regular point-and-shoot compact camera?
18- How to determine your camera’s dynamic range, as well as the dynamic range of the scene?
19- When to use Manual focus or Autofocus?
20- Where to Put the Horizon Line in landscape photography?
21- What is the Gradient Neutral Density Filter?
22- How to correct the lens distortion that affects the colors?
For more Q&A lists, please check the following links:
The Digital Photography Tips- Ultimate Q&A List
Questions and answers for photography- basic Q&A list
You can also answer some photography quizzes to refresh your photography knowledge.
Answers:
1- Why do my photo prints look too dark?
That’s because most people set their computer monitors too bright, overcompensating during the image processing by making it “darker.” You need to set the brightness to a standard.
By calibrating your monitor, you will get the right setting for brightness, as well as white balance, contrast, and color fidelity. You want your computer monitor is to display these important factors as accurately as possible, so the prints look as close as possible to what you saw on the screen. For the calibration process of your computer monitor, check my post Color Calibration of Monitors – How to Calibrate Your Monitor
2- What is 4K photography?
You’ve probably heard of 4k video – a step above HD and a new league of unprecedented quality. It’s so advanced that many devices can’t even display it properly yet!
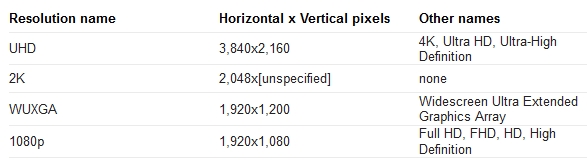
But 4k photography is a different concept altogether. It lets you extract frames from 4k video and not just any frames. Beautiful high-quality still images as shown in the following photo:

A comparison table of the photo resolution in pixels is shown below
On the 4k photo setting, the camera captures video at 30 frames or more per second as it would with any 4k video with almost no motion blur. In practice, it means that if you shoot for 5 seconds, you will have 150 different frames to choose from. That’s 150 different photos! My favorite camera is Canon 1D X Mark II, with the ability to capture 4K video at up to 60fps.
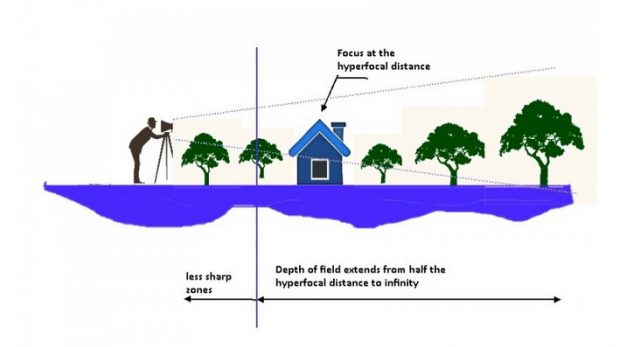
3- What is the Hyperfocal distance?
The hyperfocal distance is the distance at which everything beyond it and up to infinity is acceptably sharp, and half of the distance between the hyperfocal length and the lens will also remain acceptably sharp too.
You may check my post >>Here<< to know more about how to make use of the hyperfocal distance.
4- Do you have some tips for taking photos in low light situations, without using a flash?
There are many settings and solutions to overcome the low light conditions; I have tried to summarize them in the following list:
- Slow down the shutter
- Use a wider aperture
- Increase ISO setting
- Shoot in row
- Get your focus right
- Stabilize your camera
For more detailed information about the low light situation, click >>Here<<

5- What makes one lens “faster” than another?
A fast (or bright) lens admits lots of light through a big maximum aperture. This allows you to use a faster shutter speed than you can with a small-aperture (slow or dim) lens. The f-number designation on a lens tells you the biggest aperture you can set, with lower numbers signifying wider apertures: f/1.4 lens is very fast, f/2.8 is pretty fast, and f/5.6 is slow.
6- Why use a handheld light meter while having all those choices in the camera?
Because most handheld meters let you set your exposure based on the light falling on your subject, called “incident” light. They’re great when your subject is unusually dark (non-reflective) or light (highly reflective). They also help get consistent exposures in scenes with a wide range of tones. While camera meters measure the reflected light from the subject.
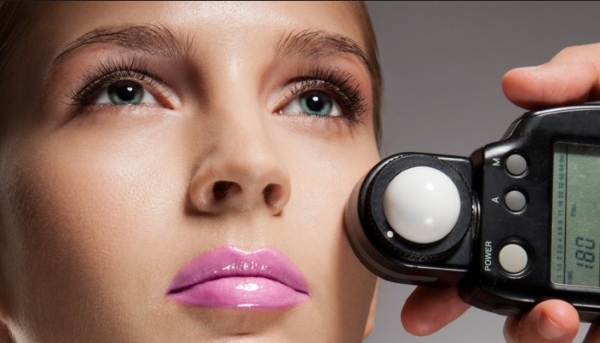
For an incident reading, hold the meter at the point on your subject where exposure is most critical, such as the face, and point it at the camera position. Many handheld meters can be set to read reflected light and flash intensity. For more reading about this subject, check my post >>HERE<<
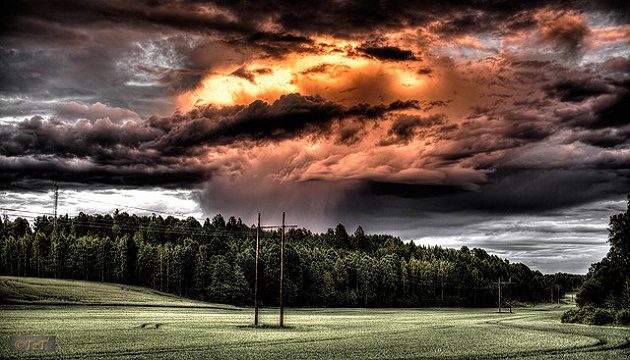
7- Would you explain to me how to Take HDR photos?
HDR photography is about shooting a scene that has a great dynamic range, for example when shooting a subject (that has shadows in its details) against a very bright background. When trying to set your exposure to show the details in the shadow part of the scene, the bright side of the scene will be over-exposed. Vice versa when trying to set your exposure to suit the bright side of the scene, you will lose much of the details on the darker side. This situation happened because of the large dynamic range of the scene compared to the dynamic range of your The HDR technique involves two main steps:
- Taking three or more photos at a varying exposure setting, this process is called bracketing.
- Use special software to align and merge the bracketed photos and get the final HDR photo. For another amazing software for processing HDR photo, check my post “Aurora HDR 2018 Review – Features and Technology”
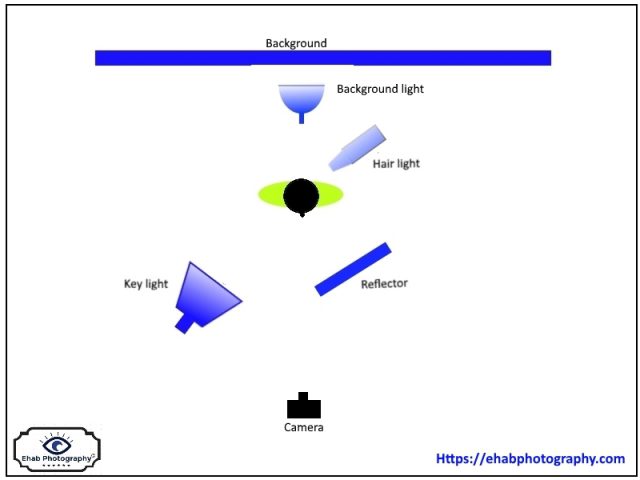
8- How to get amazing Catchlights in the eyes of your subject?
Catchlight or catchlight is a light source that causes a specular highlight in a subject’s eye in an image, in other words, it is a spark of light in your subject’s eyes. The catchlights in the subject’s eyes are produced by bouncing the light from an off-camera flash.
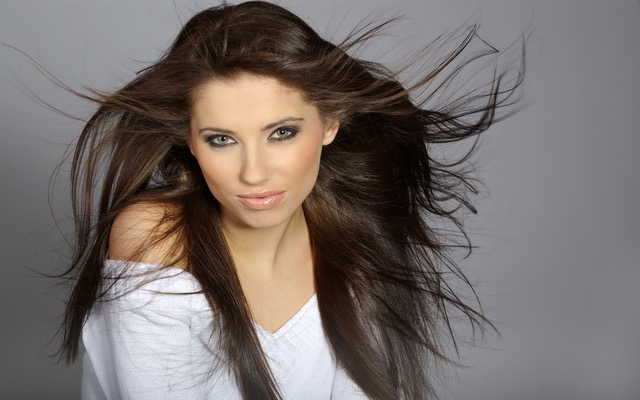
In a studio-type setup, the simplest and most effective position is to place the light at an angle to the subject and direct the flashlight to fall on your subject’s face from the side opposite to the camera’s view and slightly above head level.
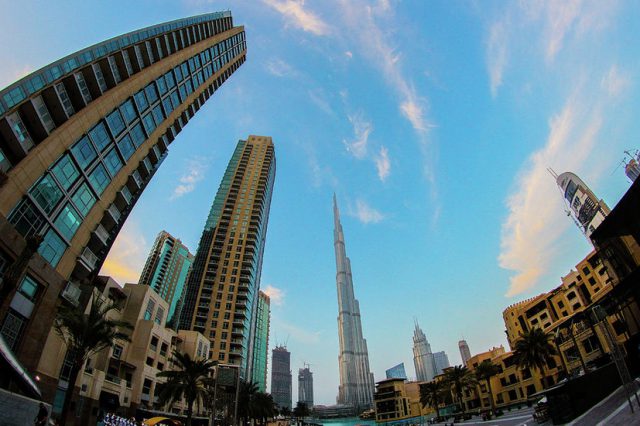
9- What are Lens distortions, and how to correct them?
The lens distortion occurs mostly in wide-angle lenses because the magnification of the image decreases the farther the subject is from the optical axis of the lens. The straight lines that shape building or tower seemed to bow out and become curved at the edge of the frame. Some lenses such as fisheyes take full advantage of barrel distortion by purposely capturing images that are heavily curved and spherical.
Lens distortion can be corrected after taking the photo by using photo editing software. For more detailed information about this subject and how to correct it, and my recommended software please click >>Here<<
10- What is the photo resolution?
Resolution is a measure of the ability to resolve and separate fine details that are positioned close to each other in a photo. The two most important factors influencing resolution in a digital image is the quality of the optical system used for capture, and the number of pixels used to make up the image file. The number of pixels along the height and width of a bitmap image is called the pixel dimensions of an image. The pixel count is a term used to denote the product of the pixel dimensions.
For example, the grid that makes up an image recorded by a Canon Power shot G5 is 2592 pixels wide and 1944 pixels height. If we multiply 2592 by 1944, we get 5038848 (slightly more than 5 million). This is why the Canon G5 is referred to as a 5 megapixel (Mpx) camera.
The resolution of a digital image when it is rendered on an output device (e.g. paper or screen) is usually expressed as pixels per inch (PPI) and dots per inch (dpi) respectively.
The relation between the pixels grid and dpi is as follow:
You can work out the print resolution from the pixel dimensions by taking the number of pixels along one of the sides of the image and divide by the length of the same side of your print. For example, if the long side of your image is 3600 pixels, and you are printing on 12-inch paper, your printing resolution is 3600/12=300 PPI.
11- What are the standard print sizes?
The standard print sizes are illustrated in the fig below, the data is from >>Here<<
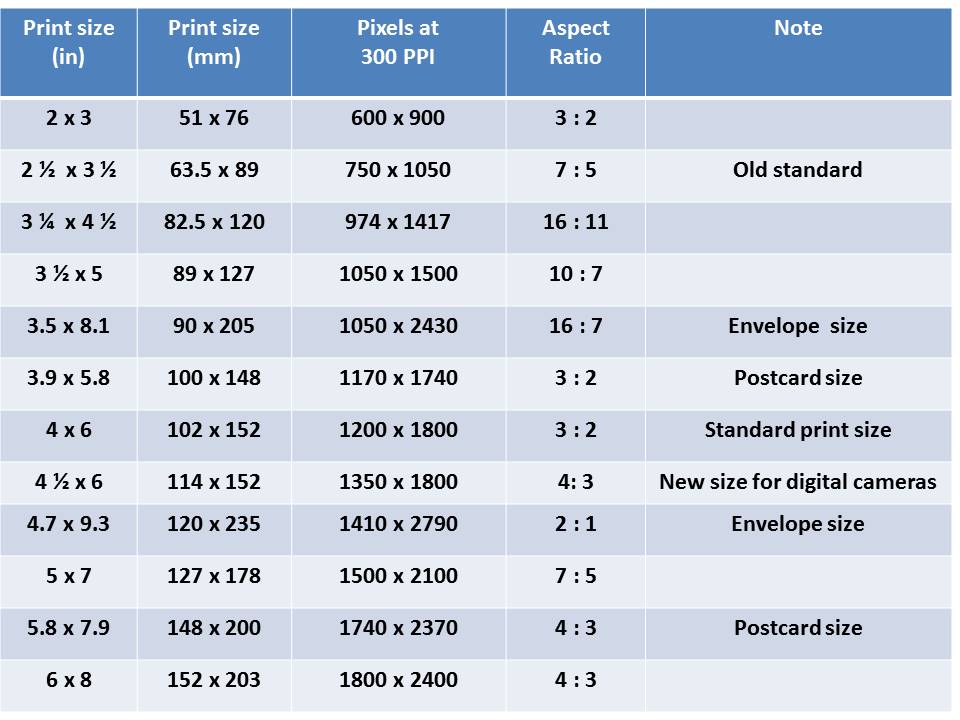
For more information about choosing the right printing size, I recommend checking the following link “The Ultimate Guide to Standard Photo Sizes“. You may explore this guide to find out how to choose the right resolution and aspect ratio to get the best results for your prints.
12- Can you tell me about focus stacking?
Focus stacking simply means taking multiple photos of the same subject, each with a different focused spot. This is followed by the use of post-processing software like Adobe Photoshop to align the focused portion of each image and blend them into one final-and-focused image. It is a really simple technique that everyone can use on their photos. The following photo is the result of merging three different photos; each of them was focused at different points.

Focus stacking technique is usually applied in macro and landscape photography with the aim of getting a very deep depth of field.
I recommend that you check my post “Getting The Best Photos Sharpness By Using Photo Stacking” for more information about the subject.
13- How far my flash will reach?
You can know how the flashlight will reach by its Guide Number, assigned to almost all built-in and shoe-mount flashes and listed in feet, meters, or both in the back of your camera or flash manual.
The GN tells you how far your flash will carry at a given aperture or what aperture to set for a given distance. The math equation is:
Guide Number = f/stop x Distance
For example, if a flash has a GN of 25 in meter(at ISO 100), it can reach up to 6.25 meters with a lens set to f/4 (25÷4=6.25).
You can use a Canon Flash power calculator to calculate range, aperture, and guide number at different ISO settings.
14- What is Exposure Compensation? How do I use it?
Exposure value (EV) is a number that represents a combination of a camera’s shutter speed and f-number; such that all combinations that yield the same exposure have the same EV (for any fixed scene luminance). Exposure Compensation allows you to override your camera’s meter reading by +/- 1, 2 or 3 stops.
If your camera is set to auto mode, and you should shoot at 250th/sec at F/8 but you think it best to add more light, you can increase the exposure compensation by +1 stop which means more light is added. Your camera will normally adjust the shutter speed by one stop giving you a new reading of 125th at F8. Going the other way, underexposing by one stop would give you 500th at F/8.
15- How can I set my exposure if my scene has a big area of low light and another smaller area that are well lit?
Suppose you are shooting a photo like the one below, the subject is in low light, and the outer scene is well lit. If you are using the “evaluative” or standard metering, which in turns meter for the largest area in view, which in this case is the interior of the room. As it is dark it will overcompensate, and give a slow shutter speed or large aperture to allow more light in and therefore “overexpose” the outside.
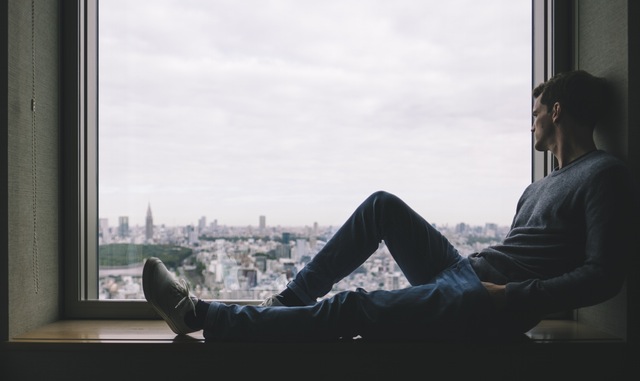
If you really want to include the details; you have 3 options to do:
- Expose for the outside, lock the exposure, step back and shoot using fill-in flash. You will end up with both areas perfectly exposed.
- Apply bracketing technique (question 7), take 2 images, one is exposed to the exterior, one is exposed to the interior and then merge the two photos in Photoshop or similar editing program later on.
- Do as the first option above but if you either do not have a flash or the time to use it, leave the subject darkened and pull out the details later on in Photoshop or your favorite editing program using “shadow/highlights tools or similar.
16- Is there a different way to do photo stacking other than focus stacking?
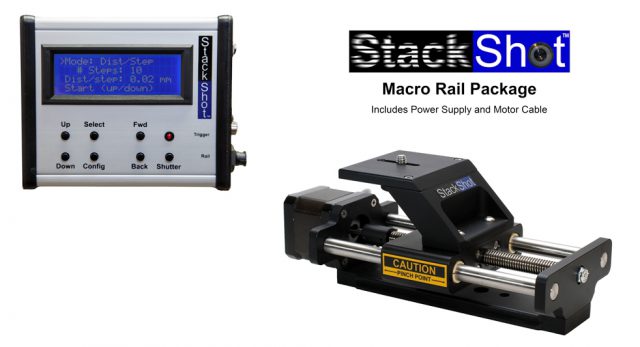
As mentioned in question 12, there is a similar way of doing photo stacking. By moving the camera closer to the subject a very tiny distance you actually refocus at a different point. This method is used in macro photography and needs a special device to move the camera.
The photo below shows one of those devices. The camera is mounted on the top of the device, the control unit controls the movement of the carriage tiny distances and it can be synchronized with the camera and the flash.
17- Is a smartphone camera as good as a regular point-and-shoot compact camera?
The best smartphones have really good cameras built onto, even if they don’t have quite the same impressive amount megapixels as dedicated digital cameras. In most cases you get a fixed focal length lens, so you can’t zoom in on distant subjects; the fixed lens is often wide-angle. It is great for selfies and getting loads in the frame, but not for flattering portraits; smartphones aren’t so easy to hold, and it has limited control over shooting settings.
There is an interesting upgrade that may add some extra capacity to the smartphone camera. You can replace lenses of your phone camera, the lens kit comes with 4 accessories: a clip-on holder and 3 lenses (wide-angle, macro and fisheye), it’s compatible with most phones out there, and its small size makes it very portable. The photo below shows a lens kit.

18- How to determine your camera’s dynamic range, as well as the dynamic range of the scene?
To catch all the contrast of the scene, it is important to have a camera’s dynamic range higher than that of the scene. Unless you know the dynamic range of your sensor, you won’t know when a scene exceeds it and you’ll lose highlight or shadow detail. There are numerous ways of measuring dynamic range, but as DxO labs have tested many digital cameras, you could always use their figures as a guide. Visit the site to see how your camera measures up.
You can use your camera’s Spot meter to determine the contrast in a scene. Take one reading for the brightest highlight area, and another for the deepest shadow to determine how many stops separate the two readings. If this exceeds your camera’s dynamic range, you’ll have to accept some clipping in the shadows, highlights, and or both.
19- When to use Manual focus or Autofocus?
The autofocus system is the ability of the camera to detect where to focus automatically, it has two types:
- The “Active AF” system works by shooting an infrared or visible light beam on your subject, then bouncing that light back to your camera to figure out the distance between the camera and the subject.
- The “passive Autofocus” either uses special sensors within the camera to detect contrast from the light that goes through the lens or uses the camera sensor itself to detect contrast in the image. And adjust the focus point to the high contrast point in the scene.
For in-depth information about autofocus click >>here<<
On the other hand, Manual focus rings are available on most DSLR cameras. For example, when taking a photo of an animal behind bars in a zoo, the autofocus camera might focus on the cage bars instead of the animal.
On most consumer-grade autofocus cameras, use manual focus when:
- You have a zoom lens on an active autofocus camera, and your subject is more than 7 meters away.
- You have a passive autofocus camera and the subject has little or no detail, like a white shirt with no tie or clear sky.
- You have a passive autofocus camera and the subject is not well lit.
For an in-depth explanation, please check my post “Manual Focus on Digital Camera- Manual Focusing Vs Autofocusing“
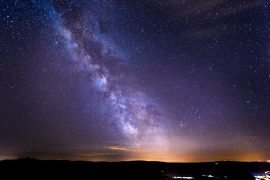
20- Where to Put the Horizon Line in landscape photography?
When it comes to the question of “Where do I place the horizon?” the answer is pretty easy. Don’t take the amateur route and always place the horizon in the dead center of the photo, or your landscape shots will always look like snapshots. Instead, decide which thing you want to emphasize the sky or the ground. If you have a great-looking sky, then put your horizon at the bottom third of your photo which will give you much more emphasis on the sky. If the ground looks interesting, then make that the star of your photo and place the horizon in the top third of your photo. This puts the emphasis on the ground, and most importantly, either one of these methods will keep your horizon out of the center, which will give your shots more depth and interest. The following photo may illustrate the idea:
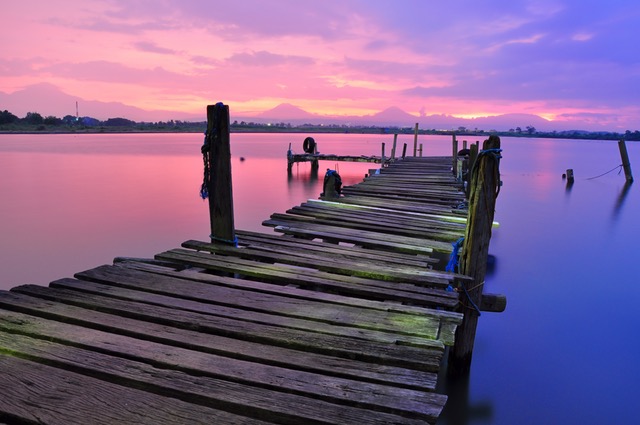
There is an interesting post about composition you may like to view “10 Rules for Photo Composition”
21- What is the Gradient Neutral Density filter?
The ND filter modifies or reduces the intensity of all wavelengths of light in an equal manner, giving no changes in hue of color rendition. The filter can be clear or gray. The importance of the ND filter is to reduce the amount of light entering the lens. This allows the photographer to select combinations of exposure time, aperture, and sensor sensitivity to prevent the production of overexposed pictures. Click >>here<< to see the different types of filters.
Let’s say you’re shooting a landscape at sunset. If you expose for the sky, the sky will look great but the ground will be way too dark. If you expose for the ground, then the sky will be way too light. So, how do you get both the sky and the ground to look right? With a neutral density gradient filter, a filter that’s dark at the top and smoothly graduates down to transparent at the bottom, as shown in the photo below.
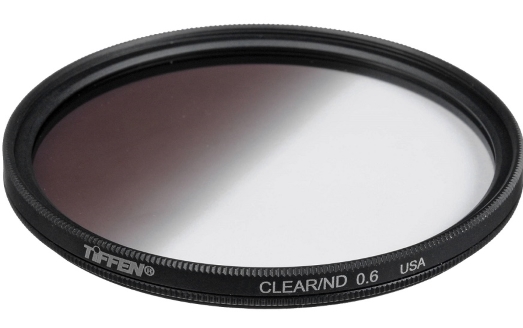
What this essentially does is darkens the sky, which would have been overexposed, while leaving the ground untouched, but the brilliance of it is the gradient, it moves from darkening down to transparent gradually and smoothly. That way it only darkens the sky, but it does so in a way that makes the top of the sky darker, and then your sky gradually becomes lighter until the filter has no effect at all by the time it reaches the ground. The result is a photo where both the sky and ground look properly exposed.
22- How to correct the lens distortion that affects the colors?
There are common types of lens distortion that affect the coloring of the photos, they are:
- Vignetting, it is a defect that darkens the corners of an image due to light falloff around the perimeter of the lens.
- Chromatic aberration, it is a defect that appears as a color fringe along the edges of objects, caused by the lens focusing on different colors of light in different planes.
- Lens Flare or Ghosting, light straying across the camera lens or a very strong light source can cause ghosting or lens flare. Ghosting is a contrast reducing seen on an image and lens flares are spots of light in an image.
The above-mentioned defects can be corrected by a photo editing software like Photoshop, Lightroom, and ACDSee Pro. My recommended software is DxO optics Pro. The software uses its optics modules library for different cameras and lenses and picks up the one you are using in capturing the photo and applies the correction automatically. You may need to download the specific optics module file of your camera and lens.
Thanks for reading, I hope you enjoyed the article if you have any questions just post below & I will be happy to answer you.
If you enjoy the site, don’t forget to subscribe, we will only inform you when a new article is posted.


Thanks a lot Amin on this post.
So much of useful information about a picture on one site!
I will definitely try some of the tips that you have given here, and I hope that from now on my photos look much better than before.
I hope to soon be able to catch some specular highlight in my photos!
Hi
Thanks for your comment, I’m glad you liked the post and found it useful.
There is another similar post with more FAQ, you may check it here
Come and visit me again, you will always find a new post. Happy shooting!